
Phew, is it just me, or does the temperature spike suddenly every summer? When the heat is really bearing down, nothing shuts down a craving faster than something incredibly cold and creamy. Forget fiddly baking—that’s why this Ultimate No-Bake Cookies and Cream Ice Cream Pie is the absolute hero of my summer dessert lineup. It requires zero oven time, which is a win in my book! This reliable, rich ice cream pie comes together so easily, proving that sometimes the simplest frozen dessert recipes are the best ones for real life. Trust me, once you see how fast this comes together, it will be your go-to celebration treat!
- Why This No-Bake ice cream pie is Your New Favorite Frozen Dessert Recipes
- Gathering Ingredients for Your Ultimate ice cream pie
- Step-by-Step Instructions for the Perfect No Bake ice cream pie
- Tips for Success with Your Homemade ice cream pie
- Exploring Variations of the Classic ice cream pie
- Serving Suggestions for Your Decadent Layered ice cream pie
- Storage and Make-Ahead Tips for Your ice cream pie
- Frequently Asked Questions About Making an ice cream pie
- Share Your Favorite ice cream pie Creations!
Why This No-Bake ice cream pie is Your New Favorite Frozen Dessert Recipes
Honestly, I developed this recipe because I needed something decadent that wouldn’t turn my kitchen into a sauna in July. That’s the beauty of it—it’s one of the best easy frozen dessert recipes around because there is absolutely no baking involved. Seriously, zero oven time means you keep the cool factor high and the stress low. This recipe is so reliable, too; I’ve made it dozens of times, and it comes out perfectly every time, which is why it’s my go-to make ahead ice cream dessert.
Perfect for Summer Ice Cream Pies and Parties
You know those last-minute invites for the BBQ or when you need a birthday-worthy centerpiece without a ton of fuss? This is it. It looks so impressive when you pull it out of the freezer, yet it took me maybe 20 minutes of *active* work. It’s the ideal homemade ice cream cake alternative because it gives you all the layers and textures everyone loves, but you skip all the messy cake-layering steps. It’s built to be chilled and served!
Gathering Ingredients for Your Ultimate ice cream pie
Alright, let’s talk about what you need to make this magic happen! Since this is a no-bake recipe, the quality of your starting ingredients really shines through. We need just a few simple things to create our classic Cookies and Cream style. Don’t worry about finding anything strange; everything here is usually sitting in your pantry or freezer already. Just make sure you have your half-gallon of ice cream softened just a touch—not melted soup, just soft enough to spread easily!
Ingredient Notes and Substitutions for Your ice cream pie
Listen up, because this is where you can adapt things! For the crust, I love the Oreo crunch (who doesn’t?), but if you don’t have Oreos, a graham cracker crust works perfectly too—just swap the cookies for graham crumbs and adjust the butter slightly if needed. The real fun is in the ice cream! If Cookies and Cream isn’t your favorite, feel free to swap for anything sturdy. Think about a peanut butter ice cream pie one, or even mint chocolate chip. That’s the beauty of a simple base, kids!
Step-by-Step Instructions for the Perfect No Bake ice cream pie
Okay, deep breaths! We are now moving into assembly. Even though the active prep time is super quick—making this a truly quick ice cream dessert—the freezing time is what makes this work. Don’t rush the chill-down periods! That’s how you get those gorgeous, clean layers every time you slice into this dream.
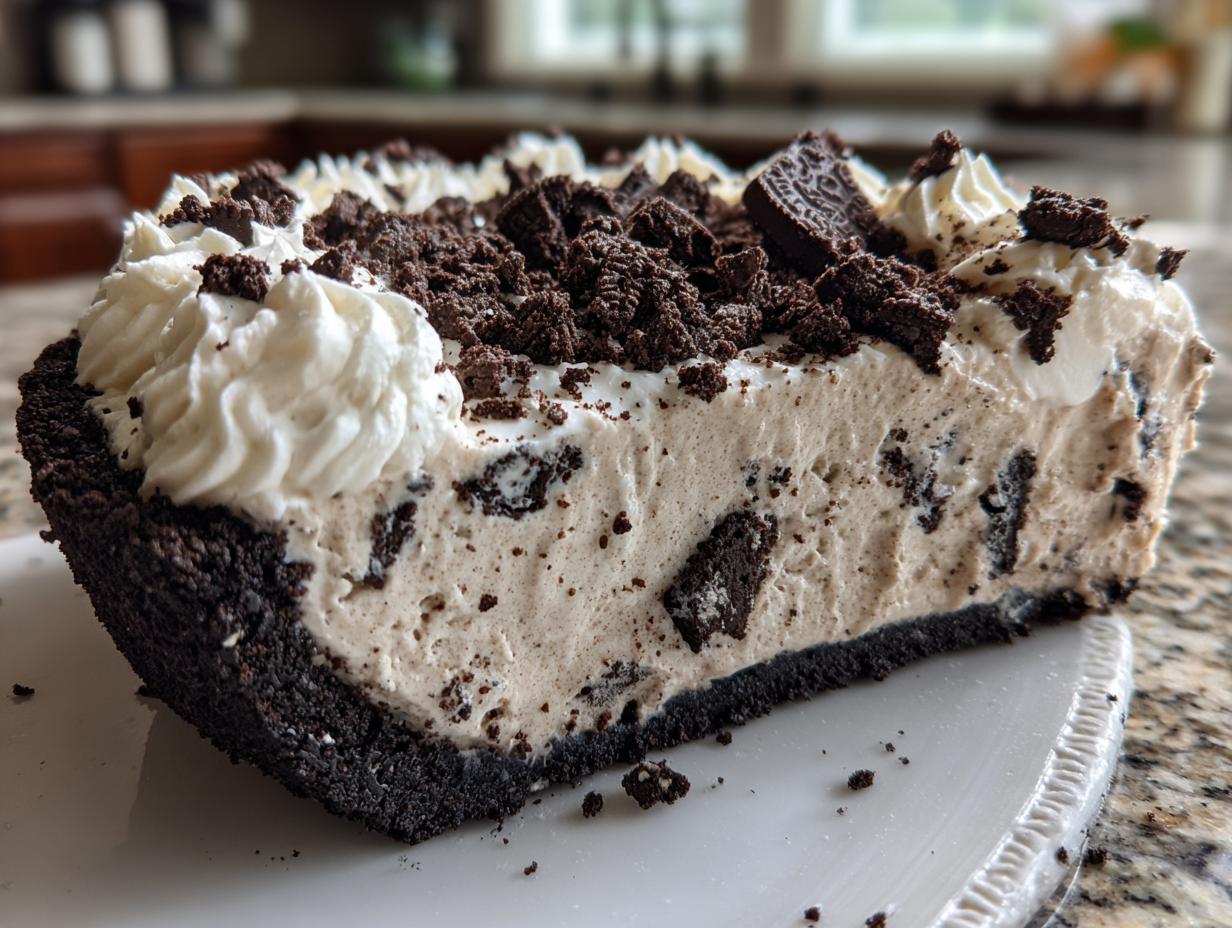
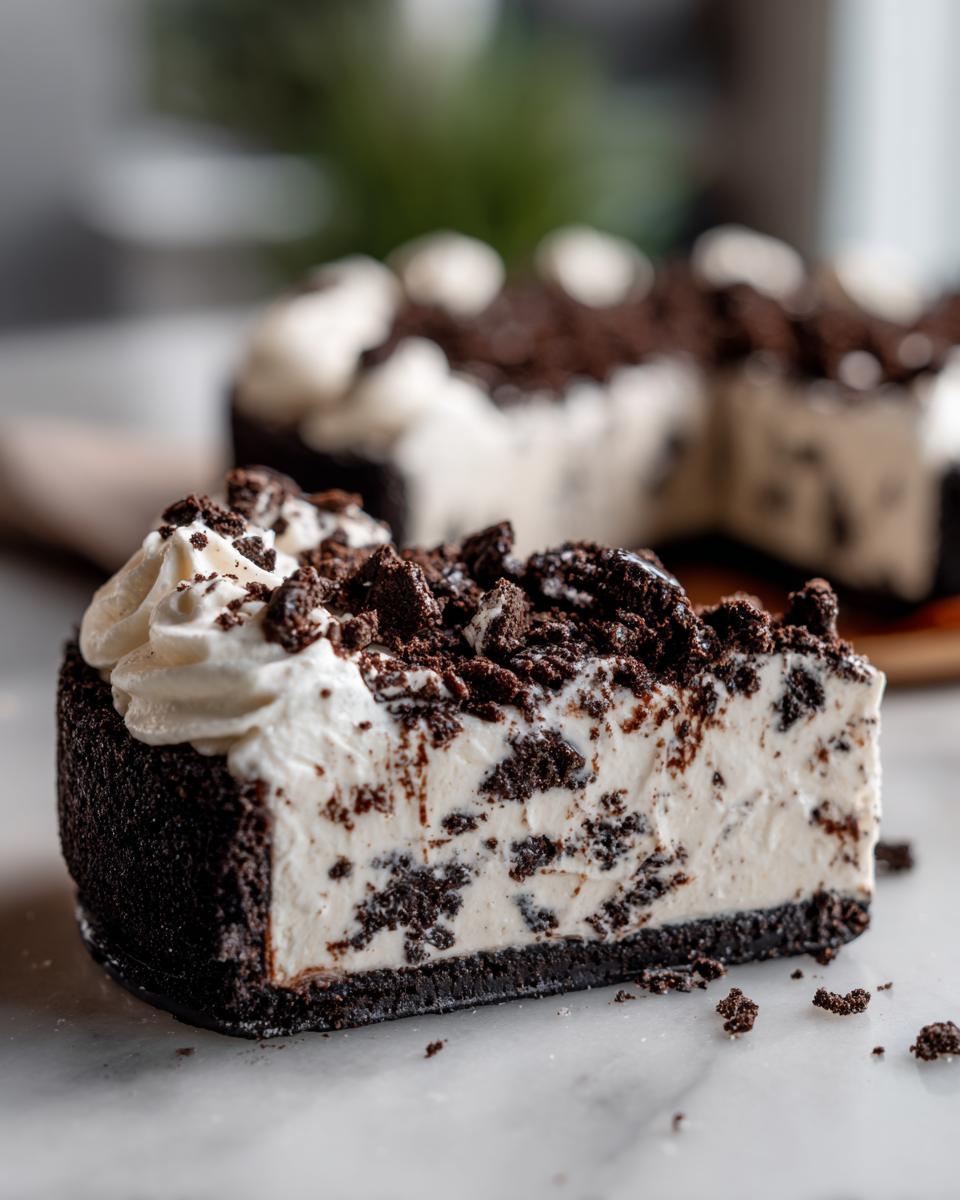
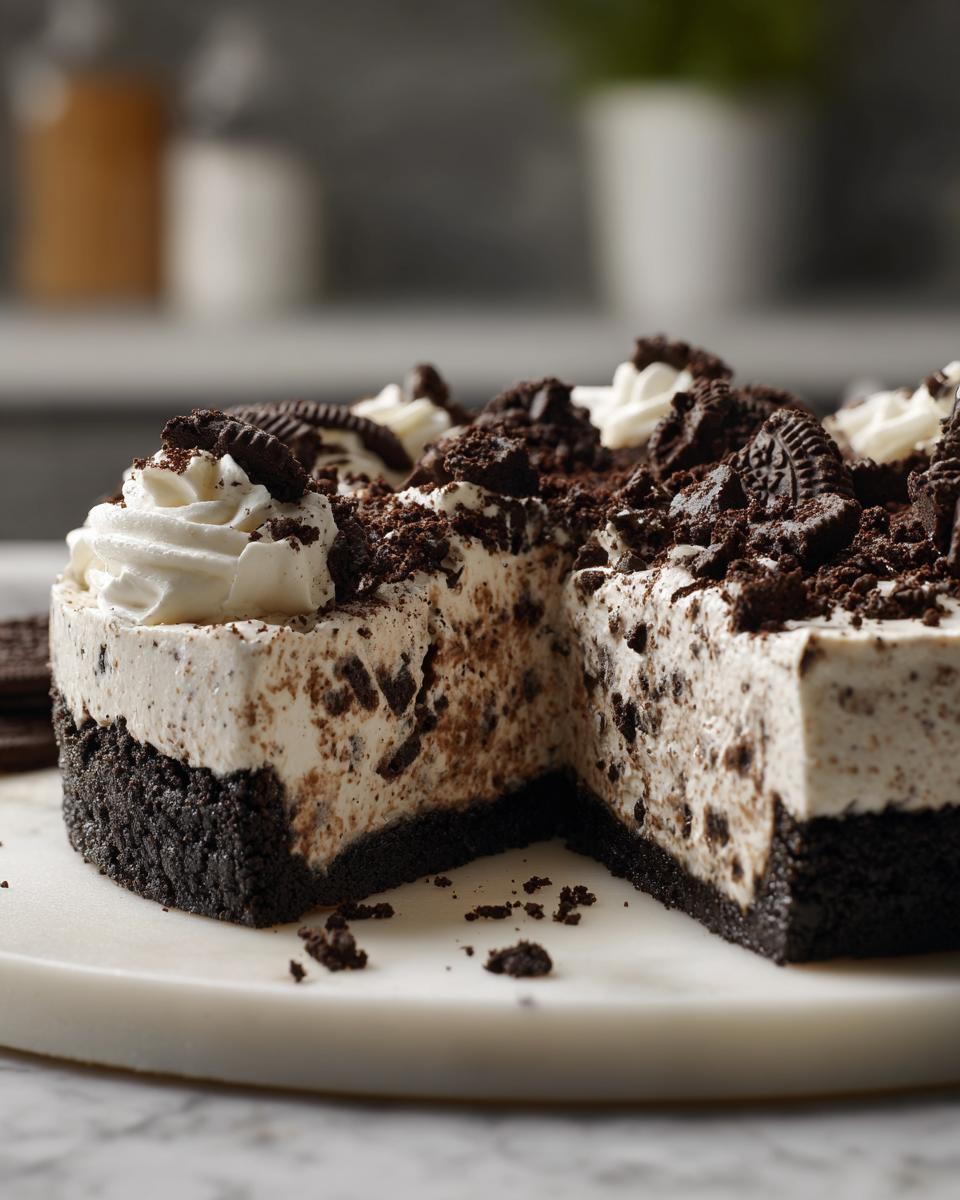
Creating a Sturdy Oreo Crust ice cream pie Base
First things first: that crust has to hold up to the filling! You’ll mix your crushed Oreos (and yes, you can leave the white filling in, I do!) with the melted butter until it looks like wet sand. Press this mixture firmly into your 9-inch pie plate. I use the bottom of a measuring cup for this—it gets it nice and even. Then, shove that into the freezer for at least 30 minutes while you get distracted by laundry or something. That hard chill prevents the crust from crumbling when we pile the ice cream in later.
Achieving a Creamy ice cream pie Filling Layer
Next up is the star: the cookies and cream ice cream. Make sure it’s only slightly softened—we want spreadable, not soup! Gently spread the ice cream evenly over your chilled crust. Be patient here; you want a nice, smooth surface. Once it’s looking perfect, put the pie back into the freezer. I insist on at least 2 full hours here. This layer has to set up like concrete before we put anything on top of it, otherwise, you ruin the texture.
Finishing Touches: Whipped Topping and Freezing the ice cream pie
Now we make the cloud layer! Beat the heavy cream, powdered sugar, and vanilla until you get stiff peaks. Don’t over-beat, or you’ll end up with butter! Gently spread this fluffy topping over the rock-hard ice cream layer. After that, sprinkle on whatever crunchies you saved, or drizzle with some amazing homemade chocolate sauce recipe. The final, crucial step is the long freeze. Cover it loosely and let it freeze for at least four hours, but honestly, overnight is best. This final freeze ensures you get that perfect, solid creamy ice cream pie filling.
Tips for Success with Your Homemade ice cream pie
I want your first experience making this easy frozen dessert to be absolutely flawless, so let me share a couple of little secret shoves that make all the difference when dealing with frozen treats. These might seem small, but they totally elevate your final product and stop that dreaded freezer disappointment!
First off, when you’re ready to slice, don’t just hack at it! It’s like cutting a frozen block otherwise. The trick is to use a long, sharp knife and dip it into a tall glass of hot water right before each cut. Wipe the knife dry quickly, and then slice. That immediate heat melts just enough of the ice cream to glide right through the crust and the layers. It makes for gorgeous, clean wedges!
My second big tip is all about preventing those pesky ice crystals—the arch-nemesis of any good indulgent frozen treat. Once your pie is fully set after that final freeze, you need to protect it. Wrap the entire pie plate tightly first with a layer of plastic wrap, pressing the wrap down gently onto the surface of the whipped cream. Then, wrap it again loosely with foil. This double-layer protection keeps freezer burn and any weird odor absorption away from our delicious dessert.
And just a quick reminder on the topping: if you find your homemade whipped cream gets overly stiff or a little grainy after being frozen for a long time, you can refresh it! If you need a stable base but want that fresh taste, try making a quick vanilla buttercream frosting instead of pure whipped cream. It holds up much better to deep freezing while still delivering that creamy texture you need for this kind of pie.
Exploring Variations of the Classic ice cream pie
While I absolutely adore the classic Cookies and Cream setup—it’s just so familiar and satisfying—we can’t talk about the best ice cream pie flavors without getting a little wild! This base recipe is just begging for experimentation. If you’re looking to step up your game and present some truly gourmet ice cream pie ideas at your next gathering, you just need to swap out the center flavor.
Think about rich, indulgent combinations. If you want something salty and sweet, definitely try making a rich peanut butter ice cream pie! You just replace the Cookies and Cream tub with peanut butter ice cream. Or maybe you are craving something fruitier? A chocolate crust with a smooth cherry ice cream filling, perhaps with some chocolate chips mixed in like I saw in an amazing cherry chocolate chip recipe idea, would be incredible for a summer evening.
Crust Options: Beyond the Oreo crust ice cream pie
We’ve been talking Oreos nonstop, and for good reason—they are amazing! But maybe you have some folks who don’t love chocolate cookies, or maybe you just want a lighter texture contrast. That’s where the graham cracker ice cream pie comes in handy.
A standard graham cracker crust, mixed with brown sugar and butter instead of Oreos, offers a buttery, slightly salty base that lets the filling flavor really sing. It pairs particularly well with flavors like vanilla bean, salted caramel, or even something tangy like lemon sorbet if you’re feeling adventurous! For something even more delicate, try using softened shortbread cookies instead of graham crackers for a truly buttery, tender base. It’s all about playing with textures!
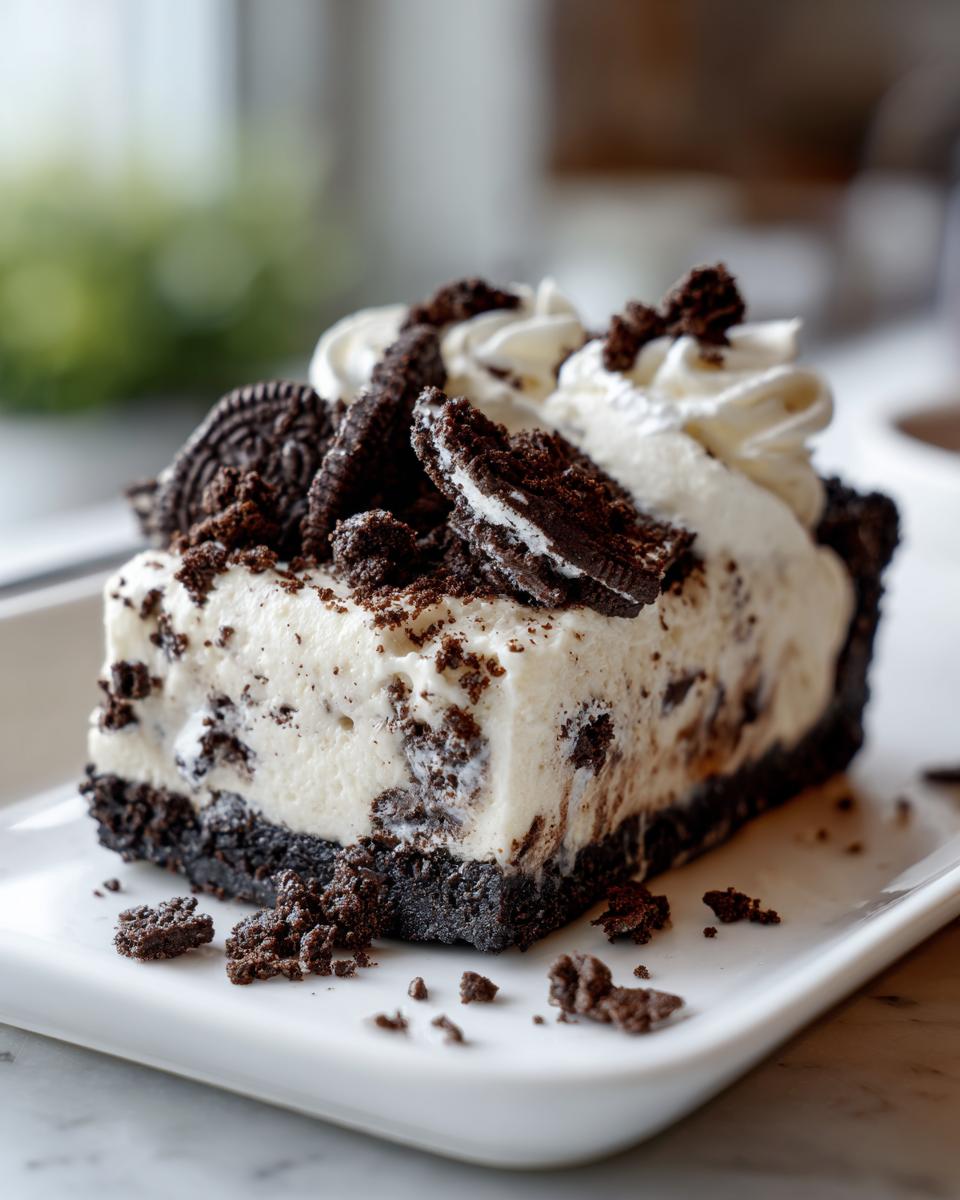
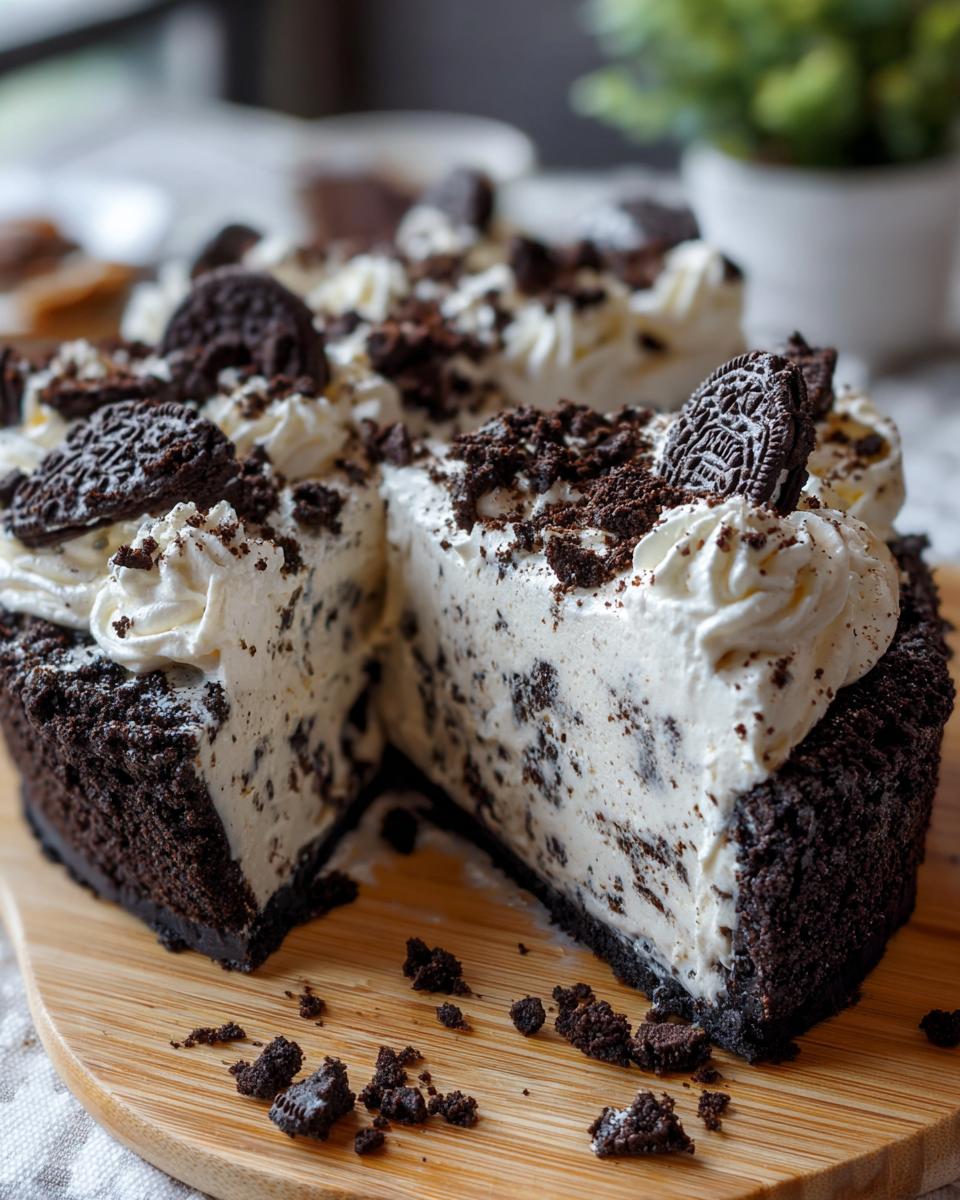
Serving Suggestions for Your Decadent Layered ice cream pie
Okay, your amazing creation is out of the freezer, it’s perfectly structured, and now we need to make it look worthy of being on a magazine cover! Whenever I’m bringing one of these to a party or a BBQ, I focus on texture contrasts for the topping, since we already nailed the textures inside the filling layers. This is where your hard work truly pays off, and you can really dress up this easy frozen dessert for any celebration.
Since we are using that classic Cookies and Cream vibe, we want toppings that lean into chocolate and creaminess. Obviously, you can’t go wrong with a heavy drizzle of store-bought fudge sauce—but why do that when you can make your own rich, silky sauce? I highly recommend whipping up a batch of homemade chocolate sauce to drizzle all over the top; it just tastes better and elevates the whole experience.
If you used the simple whipped cream topping that we made originally, let’s add some flair. Instead of just sprinkling crushed Oreos on top, try creating a border. Pipe small rosettes of whipped cream around the edge of the pie before sprinkling the center. This frames the pie beautifully for serving.
For something a little different, especially if you decided to go with a vanilla or chocolate base instead of Cookies and Cream, you could look at fruit! If you want a gorgeous color contrast, a swirl of homemade cherry topping looks stunning against white cream. Check out my recipe for easy homemade cherry pie filling recipe—it thickens up perfectly and adds a lovely, slightly tart contrast without melting your entire pie.
If this is a birthday ice cream pie, why not add some sprinkles? Use fun, colorful ones before that final freeze step to make sure they adhere properly. When you serve this layered ice cream pie, everyone will think you spent hours fussing, but we both know the secret is just great chilling and a little bit of decorative flair!
Storage and Make-Ahead Tips for Your ice cream pie
This is where this recipe truly shines as a lifesaver for anyone trying to plan ahead! Because this is a no-bake ice cream pie recipe, it’s practically begging you to make it a day or two early. It absolutely qualifies as the best make ahead ice cream dessert because you are already planning for long freezing times anyway. You can assemble the entire thing—crust, ice cream, and topping—and have it ready to go for a party the next day. It’s the perfect solution when you have a busy morning and need a showstopper for dinner!
I love using this as my emergency birthday ice cream pie recipe because I can make it on Friday and it’s perfect for a party on Sunday. The key, though, is wrapping it properly. If you don’t seal it up tight, you’re going to get weird ice crystals forming on that gorgeous whipped topping. Remember what I said before about the plastic wrap? Do that initial tight wrap, pressing gently onto the surface of the topping. Think of it like giving your pie its own little airtight sleeping bag!
Once you have that plastic layer on, give it an extra layer of security with a sheet of heavy-duty foil wrapped around the whole thing. This double barrier is essential for keeping out freezer odors and moisture. Properly wrapped, this ice cream pie will stay fantastic for about two weeks. If you’re making something like my big Thanksgiving gravy, which I prep way early using my best make-ahead turkey gravy recipe, the same storage principles apply—protection is everything!
Keep it tucked away in the coldest part of your freezer, which is usually toward the back. If you think you might unwrap it to add extra garnishes later, try to place it somewhere it won’t get knocked around. No one wants a cracked crust right before company arrives!
Frequently Asked Questions About Making an ice cream pie
It happens to us all—you make this gorgeous, easy frozen dessert, but then a few little questions pop up when you go to assemble or serve it. I want to make sure you feel totally confident making this recipe, so I’ve gathered the questions I hear most often when people are first tackling an ice cream pie!
Can I use store-bought ice cream for this no bake ice cream pie recipe?
Absolutely! That’s one of the best parts of this recipe! Since this is a no bake ice cream pie recipe, we are relying on commercial ice cream to provide the structure. The recipe calls for slightly softened store-bought ice cream. The only note I have is to make sure the brand you use is a high-quality one. Cheaper ice creams often have more air whipped in, meaning they melt faster. For the best, thickest, most satisfying result in your creamy ice cream pie filling, go for brands you know are dense!
How do I stop my Oreo crust from getting soggy?
This is the biggest worry when making any dessert that involves a crust getting next to liquid, even frozen liquid! The main defense is making sure that crust is chilled hard before the ice cream goes in. But here’s my expert tip: Since we are dealing with a lot of moisture (ice cream!), use salted butter in your crust mixture. That extra bit of salt helps repel moisture slightly. Also, make sure you press that crust mixture tightly against the bottom *and* up the sides of the pie plate. A thinner crust means less surface area for saturation. If you want extra insurance, you can lightly brush the bottom of the chilled crust with a tablespoon of melted chocolate—it hardens into a wonderful moisture barrier!
Can I bake the crust first, like I would a regular pie?
That’s a great idea if you’re used to traditional baking, but for an ice cream pie, you really, really don’t want to bake this crust. The structure relies on the butter in the crust being cold when it hits the freezer. If you bake it, you’ll likely end up with a greasy, crumbly base that won’t hold up to the ice cream layers, and it won’t taste right against the cold filing. Stick to the quick chill! If you need a little extra firmness, pop it in the freezer for an hour rather than the oven. For other baking needs, I always recommend reading up on techniques for no-knead breads, but keep this pie frozen!
What are the best toppings for an ice cream pie?
For this specific Cookies and Cream version, I rely heavily on texture, so crushed Oreos and maybe some chocolate shavings are a must. If you’re making a different flavor, try to complement it! If you made one of those peanut butter variations, crushed peanuts and maybe a tiny dash of flaky sea salt are fantastic. If you visit resources like other recipe sites, you’ll see people go wild with candies, but I keep the toppings simple for this one. The focus should be on the creamy layers inside!
Share Your Favorite ice cream pie Creations!
Now that you have the blueprint for what I consider the ultimate, no-fuss ice cream pie, I absolutely want to see what you come up with in your kitchen! Please don’t keep your amazing frozen masterpieces to yourself.
When you make this recipe, please hop down to the comments section below and leave me a rating. If you give it five stars, it lets me know this reliable dessert is helping you conquer the summer heat too! I always read every single comment, and it truly makes my day to know this recipe worked for you.
Did you swap the ice cream for a different flavor? Maybe you braved making a S’mores version, or perhaps you went all-in on that cherry chocolate variation we talked about? Tell me all about your crust choice—did you stick to the classic Oreo or try a graham cracker base?
And if you snap a picture of your finished, perfectly sliced frozen dessert for parties, please tag me over on social media! Seeing your beautiful, creamy, layered creations makes all the testing and perfecting worth it. If you have any last-minute questions that popped up while you were assembling, feel free to use my contact page, and I’ll get right back to you. Happy freezing, everyone!
PrintUltimate No-Bake Cookies and Cream Ice Cream Pie with Oreo Crust

Make this easy, no-bake ice cream pie using a classic Oreo crust and a creamy cookies and cream filling. This frozen dessert is perfect for summer parties or birthdays and requires minimal preparation time.
- Prep Time: 20 min
- Cook Time: 0 min
- Total Time: 6 hours 20 min
- Yield: 8 servings 1x
- Category: Dessert
- Method: No-Bake
- Cuisine: American
- Diet: Vegetarian
Ingredients
- 1 1/2 cups crushed Oreo cookies (about 30 cookies)
- 6 tablespoons unsalted butter, melted
- 1/2 gallon cookies and cream ice cream, softened slightly
- 1 cup heavy whipping cream
- 2 tablespoons powdered sugar
- 1 teaspoon vanilla extract
- Extra crushed Oreos or chocolate syrup for topping
Instructions
- Prepare the crust: Mix the crushed Oreo cookies and melted butter in a bowl until the crumbs are evenly moistened. Press this mixture firmly into the bottom and up the sides of a 9-inch pie plate. Freeze the crust for at least 30 minutes while you prepare the filling.
- Prepare the ice cream layer: Spread the slightly softened cookies and cream ice cream evenly over the frozen Oreo crust. Use an offset spatula to smooth the top. Return the pie to the freezer and freeze for at least 2 hours, or until firm.
- Make the whipped topping: In a separate bowl, beat the heavy whipping cream, powdered sugar, and vanilla extract with an electric mixer until stiff peaks form. This creates your creamy topping.
- Assemble the pie: Once the ice cream layer is completely firm, spread the homemade whipped cream evenly over the top of the ice cream.
- Garnish and freeze: Sprinkle the top with extra crushed Oreos or drizzle with chocolate syrup. Cover the pie loosely with plastic wrap and freeze for at least 4 more hours, or preferably overnight, until fully set.
- Serve: Slice the ice cream pie using a sharp knife dipped in hot water for clean cuts. Serve immediately.
Notes
- For a richer flavor, use store-bought fudge sauce instead of chocolate syrup for drizzling.
- If you want a different flavor, substitute the cookies and cream ice cream with peanut butter ice cream or mint chocolate chip ice cream.
- This is a great make-ahead ice cream dessert; it keeps well in the freezer for up to two weeks.
Nutrition
- Serving Size: 1 slice
- Calories: 450
- Sugar: 35g
- Sodium: 320mg
- Fat: 28g
- Saturated Fat: 16g
- Unsaturated Fat: 12g
- Trans Fat: 0.5g
- Carbohydrates: 45g
- Fiber: 1g
- Protein: 5g
- Cholesterol: 60mg