
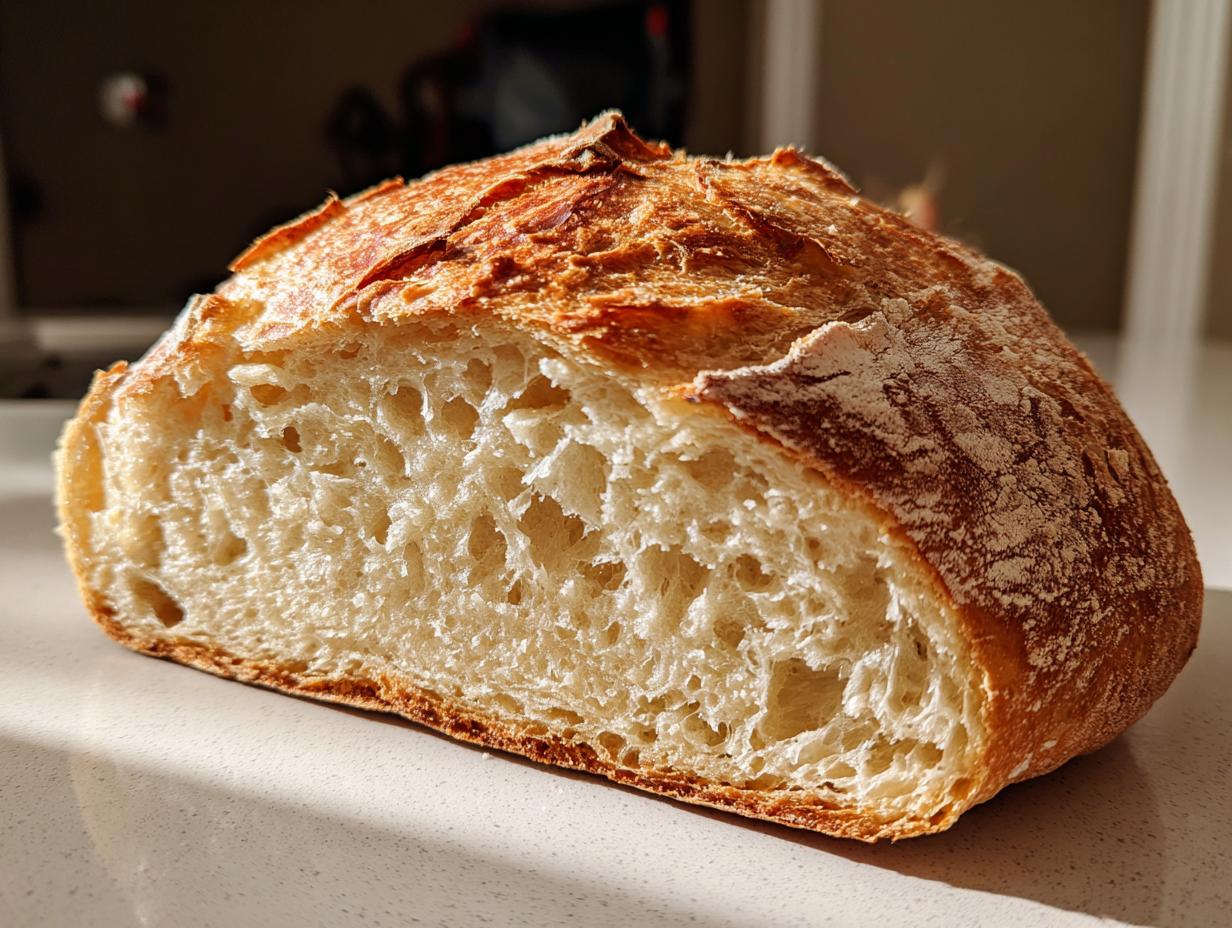
Oh, there is truly nothing better than cracking the crust of a loaf you made yourself! That sound is pure happiness, isn’t it? If you think baking fantastic homemade bread is too intimidating or takes up your entire weekend, I have news for you: I completely disagree. That’s why I developed this Easiest No-Knead Dutch Oven Artisan Bread. As someone who champions simple, trusted recipes, I promise this method cuts out all the hard work while delivering that incredible rustic quality we all crave in our baking recipes from scratch. Get ready for bakery-quality results with barely any effort!
- Why This No Knead Bread Recipe is the Best Bread Recipe for Beginners
- Gathering Your Ingredients for Artisan Bread
- Step-by-Step Instructions for Your No Knead Bread
- Tips for Success with Your Homemade Bread
- Savory Bread Variations to Try Next Time
- Storage and Reheating Instructions for Your Artisan Bread
- Frequently Asked Questions About Making This Bread
- Estimated Nutritional Information for This Simple Bread
- Share Your Homemade Bread Creations
Why This No Knead Bread Recipe is the Best Bread Recipe for Beginners
When folks look for easy homemade bread recipes, they often get scared off by the thought of kneading for twenty minutes straight! Not this time, friends. This is where the magic happens for beginner bread baking. The entire secret lies in patience, not muscle power. We do zero kneading. Seriously, you just mix the ingredients until they look messy, cover it up, and walk away. For more ideas on elevating this technique, check out some great No-Knead Artisan Bread Recipes.
The long, slow fermentation period—that 12 to 18 hours resting time—is where the flavor truly develops. That extended rest allows the simple ingredients to create those complex, slightly tangy notes you usually only find in fancy bakery items. I love knowing that while I sleep, my dough is doing all the hard work for me. It’s honestly foolproof; if you can mix two things with a spoon, you can master this!
The Magic of Dutch Oven Bread for Crusty Bread
If you want that satisfying, crunchy shell, you absolutely need the Dutch oven. It acts like a mini-steam oven right inside your regular oven. The heavy lid traps all the moisture released by the dough during the initial bake. That trapped steam is what gelatinizes the starches on the outside, giving you that amazing, blistered, shatteringly crusty bread finish. It’s the easiest way to get an artisan look without any fancy steam injection.
Gathering Your Ingredients for Artisan Bread
Honestly, part of what makes this recipe fly off the counter is how little you need! I always keep these key ingredients on hand, and that’s it—no specialty items required for this basic loaf. We are talking flour, salt, yeast, and water. That’s the backbone of this amazing artisan bread. I stick to the measurements exactly, but you have a little bit of wiggle room if you want to mix in some savory additions later on. Just keep the core components accurate, and you are golden!
Ingredient Notes and Substitutions for Your Bread Flour
You can use standard all-purpose flour, and it works beautifully for that slightly softer interior. However, if you want a chewier texture and a slightly stronger oven spring, swapping in bread flour makes a noticeable difference. The absolute most important thing here, which might seem weird, is to use cool water—not warm! Warm water speeds up the yeast too much, and we need that slow, controlled rise over 18 hours to develop the flavor for this amazing yeast bread basics recipe. Don’t skip that temperature rule!
Step-by-Step Instructions for Your No Knead Bread
Don’t let the long rest time fool you; the active work time for this recipe is practically zero! It’s all about setting it up correctly in the beginning. We’re going to mix, wait for flavor development, and then fire up the oven. Make sure you have at least 15 hours free for the resting phase, which is when it really works its magic. You’ve got this! I absolutely love how simple the method is, and you can find a great side-by-side on this No Knead Dutch Oven Bread Recipe if you need a visual.
Mixing and the Essential Long Rest for Perfect Bread
First things first: grab your ingredients in a big bowl. Whisk the flour, salt, and that tiny bit of instant yeast right together. If you’re adding herbs or Parmesan, toss them in now too! Pour in your cool water and just mix it until it looks like a complete mess—that’s right, it should be shaggy and sticky. Resist the urge to knead it! Cover that bowl tight, like you’re wrapping up leftovers for a picnic, and leave it totally alone for 12 to 18 hours. Trust me, this long rest is the core of the no knead bread process.

Baking Your Crusty Bread in the Dutch Oven
Now for the fun part, but please be careful! About 30 minutes before the dough is done resting, put your empty Dutch oven, lid and all, into the oven and crank the heat up to 450 degrees Fahrenheit. We need it screaming hot. Once it’s hot, carefully take it out—it’s dangerous, wear good mitts! Scrape your dough gently onto a sheet of parchment paper. Use that parchment paper like a sling to lower your dough right into that blazing hot pot. Cover it, pop it back in the oven, and bake for 30 minutes. After that first half-hour, take the lid off so the top can turn that deep, gorgeous golden brown we want on our crusty bread. You might want to check out this Easy Yeast Bread Recipe for more inspiration on the technique!

Tips for Success with Your Homemade Bread
Even though this is the easiest style of baking, a couple of little tricks separate a good loaf from an amazing one. First, resist checking on your dough during that long rest! Seriously, the plastic wrap needs to stay tight; you don’t want the dough drying out, otherwise, your final texture will suffer. For those of you learning yeast bread basics, remember that cold water is your friend here because it slows everything down beautifully.
My absolute biggest tip, and I mean this: You MUST let the loaf cool completely on a wire rack before slicing—I know it smells incredible, but slicing hot bread causes the moist steam inside to escape too fast. When that steam rushes out, it collapses the soft interior crumb, and you end up with a gummy layer right where you cut. It’s heartbreaking! For other reliable staple recipes, take a peek at this guide on making White Bread From Scratch. Finally, if your oven runs hot, check the internal temperature at the 40-minute mark, just to be safe!
Savory Bread Variations to Try Next Time
Once you master the basic, plain loaf—which you will, trust me—you have to start experimenting! This recipe is such a fantastic canvas for tossing in your favorite additions. If you’re looking for that ultimate side dish, the search results kept showing off amazing cheesy, garlicky loaves. You can completely transform this dough into incredible savory bread.
For a Garlic Parmesan version, just mix in about a quarter cup of grated Parmesan cheese right along with your flour, and add a teaspoon of garlic powder into the water mixture. Or, if you prefer something earthy, toss in a mix of dried rosemary and thyme right at the beginning. If you want to see how beautiful herbs look when baked into an artisan loaf, check out this Garlic Herb Artisan Bread Recipe. Seriously, the smell that fills your kitchen with these additions is unbeatable. Don’t forget to peek at this amazing Garlic Parmesan Herb Bread for flavor inspiration!

Storage and Reheating Instructions for Your Artisan Bread
Okay, the hardest part is over: waiting for it to cool! Once it’s completely cool, the biggest enemy of this lovely loaf is humidity, which kills the crust instantly. If you plan to eat it all in one day, just leave it on the counter, cut-side down on a clean surface. For longer storage, wrap the entire loaf loosely in a clean kitchen towel, and then put that into a paper bag.
If you end up with slices leftover—which is rare in my house—don’t refrigerate them! To bring that glorious crust back to life, just spritz a few slices lightly with water and pop them into a 350°F oven for about five minutes. They come out tasting freshly baked all over again!
Frequently Asked Questions About Making This Bread
Baking can bring up so many little questions, and that’s totally fine! Even though this is the easiest version of artisan bread out there, it’s natural to wonder about tweaks, especially when you’re learning yeast bread basics. I get asked these all the time, even when I’m trying to pass on recipes for things like soft homemade rolls. Here are the answers to the most common things I hear about this method!
Can I use warm water instead of cool water for this bread?
Oh, please don’t grab warm water for this one! You want cool water—tap temperature is perfect. If you use warm water, the yeast wakes up way too fast, and you’ll rush the 12-to-18-hour rise. Rushing it means you skip all that beautiful flavor development. Keep it cool so the flavor can deepen slowly!
What if I don’t have a Dutch Oven to bake my bread?
That’s such a good logistical question! If you don’t have a heavy Dutch oven, you can still get a great crusty result, though it takes a little extra effort. Try preheating a heavy baking stone or an upside-down baking sheet in the oven. When you load your dough (on parchment paper, of course!), place a metal pan on a lower rack and toss in a cup of hot water immediately to create that steam. See more tips for baking Artisan Bread Recipe success!

Estimated Nutritional Information for This Simple Bread
Now, I know some of you are watching the numbers, and I always try to give you a good idea of what’s in my food! Remember, because we don’t use much sugar or fat in this basic dough, the numbers are delightfully low. These figures are just estimates based on the base ingredients provided for one slice of this simple loaf. Your final numbers might vary slightly depending on exact measurements, but this gives you a great starting point!
- Serving Size: 1 slice
- Calories: 200
- Carbohydrates: 42g
- Protein: 6g
- Fat: 1g
- Sugar: 1g
Share Your Homemade Bread Creations
I just can’t wait to hear what you think! Seriously, if this was your first time diving into bread baking, let me know how easy—or maybe surprisingly easy—it was! Rate the recipe below, leave me a note in the comments about how crunchy your crust got, or snap a picture and tag me. Seeing your beautiful loaves makes all the testing and tasting worth it for me. Happy baking, friends!
PrintEasiest No-Knead Dutch Oven Artisan Bread
You can make this crusty artisan bread with minimal effort. This no-knead recipe results in a loaf with a crisp exterior and a soft interior, perfect for serving with soup or butter.
- Prep Time: 10 min
- Cook Time: 45 min
- Total Time: 13 hours 5 min (includes 12-18 hours resting time)
- Yield: 1 loaf 1x
- Category: Baking
- Method: Baking (Dutch Oven)
- Cuisine: American
- Diet: Vegetarian
Ingredients
- 3 cups all-purpose or bread flour
- 1 1/2 teaspoons salt
- 1/4 teaspoon instant yeast
- 1 1/2 cups cool water
- Optional: 1 teaspoon dried herbs (like rosemary or thyme) for variation
- Optional: 1/4 cup grated Parmesan cheese for variation
Instructions
- In a large bowl, whisk together the flour, salt, and instant yeast. If using herbs or cheese for a variation, mix them in now.
- Pour in the cool water and mix with a wooden spoon until just combined. The dough will be shaggy and sticky; do not overmix.
- Cover the bowl tightly with plastic wrap. Let the dough rest at room temperature for 12 to 18 hours. This long, slow rise develops the flavor.
- About 30 minutes before baking, place a 5- to 6-quart Dutch oven, with the lid on, into your oven. Preheat the oven to 450 degrees Fahrenheit (232 degrees Celsius).
- Carefully remove the hot Dutch oven from the oven. Gently scrape the dough out of the bowl onto a piece of parchment paper.
- Using the parchment paper as a sling, carefully lower the dough into the hot Dutch oven. Cover with the lid.
- Bake for 30 minutes with the lid on.
- Remove the lid and continue baking for another 10 to 15 minutes, or until the crust is deep golden brown.
- Carefully remove the bread from the Dutch oven and let it cool completely on a wire rack before slicing.
Notes
- For the best results, use cool water, not warm water, to control the long fermentation time.
- You can substitute bread flour for all-purpose flour for a slightly chewier crust.
- This recipe is excellent for beginners learning yeast bread basics.
Nutrition
- Serving Size: 1 slice
- Calories: 200
- Sugar: 1
- Sodium: 350
- Fat: 1
- Saturated Fat: 0
- Unsaturated Fat: 1
- Trans Fat: 0
- Carbohydrates: 42
- Fiber: 2
- Protein: 6
- Cholesterol: 0