

When the air gets that first crisp bite of autumn, you know what that means: it’s time to bake! For me, nothing screams cozy comfort food quite like a bubbling, warm fruit dessert. Forget fussy pies; my absolute go-to, the one I rely on when company pops over unexpectedly, is this recipe. I’m sharing with you The Ultimate Easy Apple Crisp Recipe with a Buttery Cinnamon Oat Topping. I’ve tried every variation out there, but I always come back to this one because it’s foolproof, tastes incredible, and honestly, it makes my whole house smell like the holidays. It’s simple magic, and I’m so glad you’re here to bake with me today. If you’ve been searching for that perfect apple crisp that delivers pure joy, trust me, this is it! If you love easy apple desserts, you might also adore my recipe for easy homemade glazed fritters. For inspiration on what others deem the best apple crisp, check out this link!
- Why This is the Best apple crisp Recipe You Will Ever Make
- Ingredients Needed for the Ultimate apple crisp
- Step-by-Step Instructions for a Simple apple crisp Recipe
- Tips for Making the Ultimate apple crisp Success
- Serving Suggestions for Your Warm apple crisp
- Storage and Reheating this Easy apple crisp Recipe
- Frequently Asked Questions About apple crisp
- Estimated Nutritional Breakdown for This apple crisp
- Share Your Homemade apple crisp Creations
Why This is the Best apple crisp Recipe You Will Ever Make
I know, I know, everyone calls *their* recipe the best apple crisp recipe, but I truly stand by this one. It hits that perfect sweet spot between being incredibly decadent and ridiculously simple. This isn’t some fussy, layered dessert; this is pure, unadulterated comfort food made with pantry staples. You get tender, spiced apples hugging a gorgeous, golden blanket of flavor. If you need a reliable, easy apple crisp recipe that always comes out tasting like fall, this is your new keeper. For more ideas on amazing apple bakes, see what others are making at this link!
Quick Preparation for Your apple crisp
Seriously, you can have this assembled and heading into the oven faster than you can decide what movie to watch. We’re talking 15 minutes of active work, tops! That’s why I love this for almost any weeknight when I crave a warm apple dessert but don’t have hours to spare. It’s the definition of a quick apple dessert that tastes like you spent all afternoon fussing over it.
Achieving the Perfect Buttery Oat Topping
The secret sauce to this whole thing? That topping! It’s not just oats; it’s a rich, deeply flavorful buttery oat topping that browns up perfectly against the bubbly fruit. The absolute, non-negotiable rule here is keeping your butter *ice cold* and cutting it in quickly. When the cold butter hits that hot oven, it creates those little pockets of steam that give you that satisfying, crumbly crunch instead of a hard, dense layer. Don’t skip that cold factor!
Ingredients Needed for the Ultimate apple crisp
Getting the right ingredients lined up is half the battle, and trust me, the precision here is what gets us the perfect texture when we pull this apple crisp out of the oven. We need two main groups—the fruit filling that gets all soft and spiced, and that glorious, crunchy topping. I’ve linked to my decadent apple brownies if you decide you need something extra rich later! Let’s get these listed out so we can move on to the fun part.
For the Spiced Apple Filling
For the base, you want apples that hold their shape well when they bake. I always recommend using a mix of sweet and tart; Granny Smith or Honeycrisp are my favorites for this because they give you that slight tang to balance the sugar. Remember, you need about six large apples, and they absolutely must be peeled, cored, and sliced evenly—picture about a quarter-inch thick. We mix those slices together with just a little granulated sugar and flour to sweeten them up uniformly. The flavor comes alive with 1 teaspoon of cinnamon and a quarter teaspoon of nutmeg. Don’t forget the lemon juice; it keeps them bright and stops them from turning muddy brown while bringing out that wonderful cinnamon apple dessert flavor.
For the Buttery Oat Topping for your apple crisp
This is what makes this the best apple crisp recipe, truly. The key here is the oats—make sure you grab the old-fashioned rolled oats, not the instant kind! We mix those with the brown sugar (which adds such a deep molasses note), some flour, and a whisper of salt in a separate bowl. Now, for the most important part for texture: the butter. You need a full half-cup (that’s one whole stick!) of unsalted butter, and it must be truly cold, cut up into small cubes. We’re cutting this cold butter into the dry ingredients until it looks like coarse, uneven crumbs. If your butter starts getting soft while you work, just pop the bowl in the fridge for five minutes. Cold butter equals a perfectly crisp, chunky topping!
Step-by-Step Instructions for a Simple apple crisp Recipe
Okay, friend, now that everything is measured and mixed, putting this apple crisp together is super fast. You only need your 8×8 baking dish, and make sure you give it a light grease first—we don’t want anything sticking later! This process is so smooth; you’re going to wonder why you ever bought those dry, packaged things. If you’re looking for another great dessert recipe with a crumbly bit, check out my moist coffee cake; it uses a similar topping technique!
Preparing the Apple Base
First things first: fire up that oven to 375°F (190°C). While it heats up, take your perfectly spiced apple mixture—the one coated in cinnamon, nutmeg, and lemon juice—and spread it out evenly across the bottom of that greased dish. Don’t pile it too high in the middle! We need this layer flat so the heat can work its magic evenly. It should look vibrant and ready to go.
Assembling the apple crisp Topping
Next, grab that wonderful coarse crumb mixture we just made with the cold butter. Sprinkle this buttery oat topping evenly right over the top layer of apples. Don’t dump it all in one spot! Try to spread it out so you get coverage everywhere. Now, here’s a crucial tip for that crunchy texture: press it down gently. You aren’t packing snow here; we want the topping to stay crumbly, with those lovely pea-sized bits of butter intact. If you overmix this, you’ll lose the crunch in your finished apple crisp.

Baking Times and Testing Tenderness
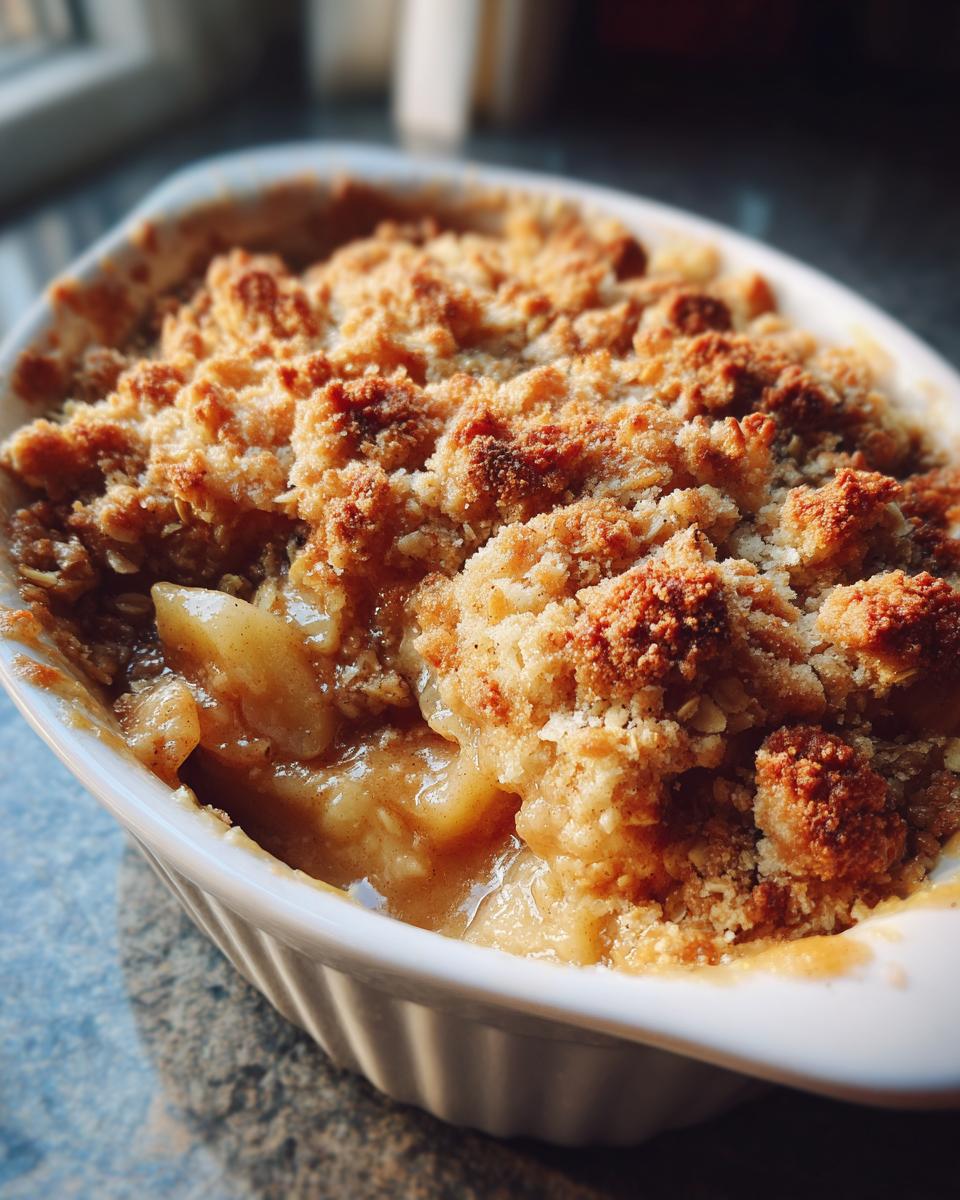
Slide that baby into the preheated oven. It needs about 40 to 50 minutes to bake up golden brown. You’ll know it’s done when the fruit underneath is bubbling with thick syrup all around the edges. Before you pull it out, test those apples! Pierce them gently with a fork—they should be tender, not mushy. If your topping looks dark gold but the apples are still a little firm, just loosely cover the whole dish with foil, and let it bake for another five minutes. Honestly, the smell when this is done is just unbeatable! See more great topping ideas over at this site.
Tips for Making the Ultimate apple crisp Success
Baking is all about learning a few little tricks that just elevate a good dessert into something truly memorable. Since we started with quality ingredients, now let’s talk technique to make sure this is the best apple crisp recipe for you every single time. When you nail these small details, you build confidence, and that’s what Devour Dish is all about!
Choosing the Right Apples for Your apple crisp
I emphasized Granny Smith and Honeycrisp before, but let me elaborate on why apple choice is so crucial here. You need structure! So many times, people end up with apple soup underneath a crunchy topping because they used apples that break down too quickly. You want varieties like Gala, Fuji, or Braeburn if you like them sweeter, or sticking to the classic Granny Smith if you want that pronounced tartness cutting through the brown sugar. A mix is always the dream for complexity, but make sure they are firm before they go into the dish. If you’re curious about other simple baked fruit recipes, I have a lovely easy Swedish apple cake recipe you might love!
Resting Time for the Perfect apple crisp
This is a huge one, and I almost forgot to mention it in the instructions! Resist the urge to grab a spoon the second the apple crisp comes out of the oven—I know it’s hard when that warm apple smell is filling the kitchen! You must let it rest for at least 15 minutes. Why? Because the juices are boiling hot and thin when they bake. That resting time allows the juices to thicken up just a bit, incorporating some of the moisture from the fruit and slightly cooling down the topping. If you serve it piping hot, it can run everywhere. If you let it sit, the topping stays crisper longer, and you get a cleaner scoop for your plate. You can find another great take on an honest, old-fashioned bake over at this site for comparison!

Serving Suggestions for Your Warm apple crisp
Part of the absolute joy of making a cinnamon apple dessert like this is serving it up piping hot! We’ve put in the work to get that topping perfectly golden and the apples tender, so let’s make the presentation just as wonderful. This is the quintessential fall apple dessert, and it begs for a creamy counterpart to balance out that warm spice and crunch.
Of course, the number one sidekick for any warm apple crisp has to be ice cream. Forget fancy sauces! A generous scoop of high-quality vanilla bean ice cream melting slowly over that warm oat topping? Perfection. The cold creaminess against the warm fruit is just *chef’s kiss*. If you’re serving this up for guests, I always recommend putting the ice cream right there on the table so everyone can scoop as much as they like—it definitely turns this into a memorable apple crisp with ice cream moment.

If you aren’t a huge ice cream fan, I have a couple of other ideas up my sleeve. A dollop of slightly sweetened whipped cream is always lovely; just whip heavy cream with a touch of powdered sugar until soft peaks form. Or, if you’re feeling extra ambitious (but still keeping it simple!), you could serve it with a nice drizzle of salted caramel sauce. Speaking of decadence, if you ever need another easy treat, my recipe for easy chocolate fondue is perfect for dipping fruit!
Honestly, whether it’s for a big family dinner or just a quiet night curled up reading, this warm apple dessert hits the spot every single time. Enjoy every bite!
Storage and Reheating this Easy apple crisp Recipe
Listen, if you manage to have leftovers of this incredible apple crisp—which, frankly, is a miracle in my house—don’t worry. Storing and reheating this dessert is super simple, and we absolutely cannot sacrifice that amazing crunchy topping!
First off, how long does it hang out happily in the fridge? Once it has cooled down completely after that initial 15-minute rest, cover the dish tightly with plastic wrap or transfer the servings to an airtight container. It stays beautifully fresh for about three to four days. It’s such a great simple apple dessert to have on hand later in the week!
Now for the magic trick: reheating. If you try to microwave this, you’ll end up with soggy apples and a mushy top, and we simply can’t have that! The best method, hands down, is the oven. Don’t even bother with the microwave unless you plan on scraping off the topping and eating it separately, which feels a bit sad, right?
I recommend reheating individual servings. Pop a portion onto an oven-safe plate or baking sheet. Pop it into a preheated 350°F oven for about 8 to 10 minutes. This gives the residual heat time to warm the apples through without turning them into mush, and crucially, it dries out the topping just enough to bring back that satisfying crispness. If you’re reheating the entire dish uncovered, it might just take 15 minutes.
If you’re making this for a holiday gathering, like Thanksgiving, you can totally assemble the whole dish a day ahead—apples mixed, topping sprinkled on top—and just keep it covered in the fridge. Pull it out about 30 minutes before you want to bake it so it’s not straight-from-the-fridge cold when it hits the oven, and then bake as directed, maybe adding five extra minutes to the timer. It’s so flexible! If you enjoy making homemade bread to go alongside your desserts, you should check out my recipe for easy homemade French bread. And for another take on an old-fashioned classic, see what they are doing over at this link!
Frequently Asked Questions About apple crisp
When I get questions about desserts like this apple crisp, it usually means people are loving the idea but just need that last little bit of reassurance before diving in. That’s what this section is for! We all want that guarantee that our cozy autumn desserts turn out perfectly baked and delicious. Here are the things people ask me most often.
Can I make this apple crisp ahead of time?
Yes, you absolutely can, and I often do this when I’m hosting! You have two options. If you assemble the entire dish—apples mixed and topping sprinkled on top—you can cover it tightly and keep it in the fridge for up to 24 hours. When you bake it, just plan on adding about 5 to 10 extra minutes to the baking time since it’s starting cold. Personally, I think the very best topping texture comes from assembling the apples the day before, keeping them covered in the fridge, and then making the buttery oat topping fresh right before baking the day of. That way, the oats are at their crispiest!
What is the difference between apple crisp and apple crumble?
That’s a classic question, isn’t it? For me, the difference is usually in the topping ingredients, though sometimes people use the terms interchangeably, which is fine! Generally speaking, an apple crumble topping focuses just on flour, sugar, and butter—it creates a dense, crumbly layer. Our recipe, the best apple crisp recipe, always includes oats in that topping mixture. Those oats give it the superior crunch and texture that I’m looking for when I crave a satisfying bite. So, think of ‘crisp’ as ‘crumble + crunchier stuff’!
Can I use different fruit in this apple crisp recipe?
Of course! This recipe is so adaptable because the topping works beautifully on nearly any sturdy fruit. If you want another warm apple dessert feeling without the apples, pears bake up similarly well—use firm Bartlett or Bosc pears. You can also easily substitute half of the apples with frozen berries (like blueberries or blackberries), though if you use frozen fruit, you might want to skip the added lemon juice in the filling. If you’re looking for other sweet treats, my recipe for easy homemade glazed fritters is another phenomenal way to use up fruit!
Estimated Nutritional Breakdown for This apple crisp
I always want to be super transparent with you about what goes into your body, even when it comes to a comforting treat like this amazing apple crisp. As a food blogger who studied nutrition science, I know how important accurate information is! So, please remember that the numbers below are just estimates based on the specific ingredients I used when I tested this recipe.
These figures account for one serving (we get about 6 generous servings out of the dish), and they use standard ingredients like regular flour and butter. If you swap things out—maybe you use almond flour or a sugar substitute—your totals will definitely change! We calculate this based on enjoying a nice slice of this easy apple crisp recipe, not exactly one of those skinny dessert recipes, but it’s packed with wholesome fruit, so we feel good about it!
Here are the approximate values based on the standard recipe details:
- Calories: 380
- Fat: 18g
- Carbohydrates: 55g
- Protein: 4g
- Sugar: 35g
See? Not terrible for what tastes like pure autumn bliss! You’re looking at about 5 grams of fiber in there too, which is fantastic for a warm apple dessert. Enjoy that scoop of ice cream on the side—it’s worth every buttery, sugary, delicious bite!
Share Your Homemade apple crisp Creations
And just like that, we’ve made the most comforting, cozy autumn dessert there is! I truly can’t wait to hear what you think of this apple crisp. When you make something that tastes this good, you just have to tell someone about it, right?
Seriously, once you’ve got your warm apple pie situation out of the oven, give it that little rest time, scoop out a serving—definitely with that ice cream melting on top—and then come right back here. Leave me a star rating below, and if you have a second, drop a comment telling me how it went! Did you use Honeycrisp apples? Did you manage not to eat the whole thing yourself? I want to hear all the wonderful details about your homemade apple crisp success.
If you snapped a picture of your bubbly, golden-topped masterpiece, please share it! Tagging me on social media means the world to me because seeing you enjoy these simple recipes is why I started Devour Dish in the first place. You can also check out what other bakers are saying about classic fall recipes, like these reviews for a great bake over at this site.
If you ever have questions that pop up while you’re in the kitchen, or maybe you just want to share a suggestion for a future recipe, please don’t hesitate to reach out through my contact page. I love connecting with all of you!
Thank you for baking with me today. I hope this easy apple crisp recipe becomes a staple in your home, bringing warmth and comfort to your family table for many seasons to come. Happy cooking!
PrintThe Ultimate Easy Apple Crisp with Buttery Cinnamon Oat Topping

You need this recipe for the best apple crisp. It features tender, spiced apples beneath a perfect, buttery oat topping that bakes up golden and crisp every time. This is the ultimate fall comfort food dessert.
- Prep Time: 15 min
- Cook Time: 50 min
- Total Time: 65 min
- Yield: 6 servings 1x
- Category: Dessert
- Method: Baking
- Cuisine: American
- Diet: Vegetarian
Ingredients
- 6 large apples (like Granny Smith or Honeycrisp), peeled, cored, and sliced about 1/4 inch thick
- 1/4 cup granulated sugar
- 1 tablespoon all-purpose flour
- 1 teaspoon ground cinnamon
- 1/4 teaspoon ground nutmeg
- 1 tablespoon lemon juice
- 1/2 cup all-purpose flour (for topping)
- 1/2 cup packed brown sugar (for topping)
- 1/2 cup old-fashioned rolled oats (for topping)
- 1/4 teaspoon salt (for topping)
- 1/2 cup (1 stick) cold unsalted butter, cut into small cubes (for topping)
Instructions
- Preheat your oven to 375°F (190°C). Lightly grease an 8×8 inch baking dish or a similar-sized pie plate.
- In a large bowl, combine the sliced apples, granulated sugar, 1 tablespoon of flour, cinnamon, nutmeg, and lemon juice. Toss gently until the apples are evenly coated.
- Spread the apple mixture evenly into the prepared baking dish.
- In a separate medium bowl, prepare the buttery oat topping. Whisk together the 1/2 cup flour, brown sugar, oats, and salt.
- Cut in the cold, cubed butter using a pastry blender or your fingertips until the mixture resembles coarse crumbs with some pea-sized pieces of butter remaining. Do not overmix.
- Sprinkle the oat topping evenly over the apple mixture in the baking dish. Press lightly.
- Bake for 40 to 50 minutes, or until the topping is golden brown and the apple filling is bubbly and tender when pierced with a fork.
- Let the apple crisp cool for at least 15 minutes before serving. Serve warm, perhaps with a scoop of vanilla ice cream.
Notes
- For the best texture, use a mix of tart and sweet apples.
- If your topping starts browning too quickly, loosely cover the dish with aluminum foil for the last 10 minutes of baking.
- This simple apple dessert is perfect for Thanksgiving gatherings or any cozy evening treat.
Nutrition
- Serving Size: 1 serving
- Calories: 380
- Sugar: 35g
- Sodium: 150mg
- Fat: 18g
- Saturated Fat: 11g
- Unsaturated Fat: 7g
- Trans Fat: 0.5g
- Carbohydrates: 55g
- Fiber: 5g
- Protein: 4g
- Cholesterol: 45mg