
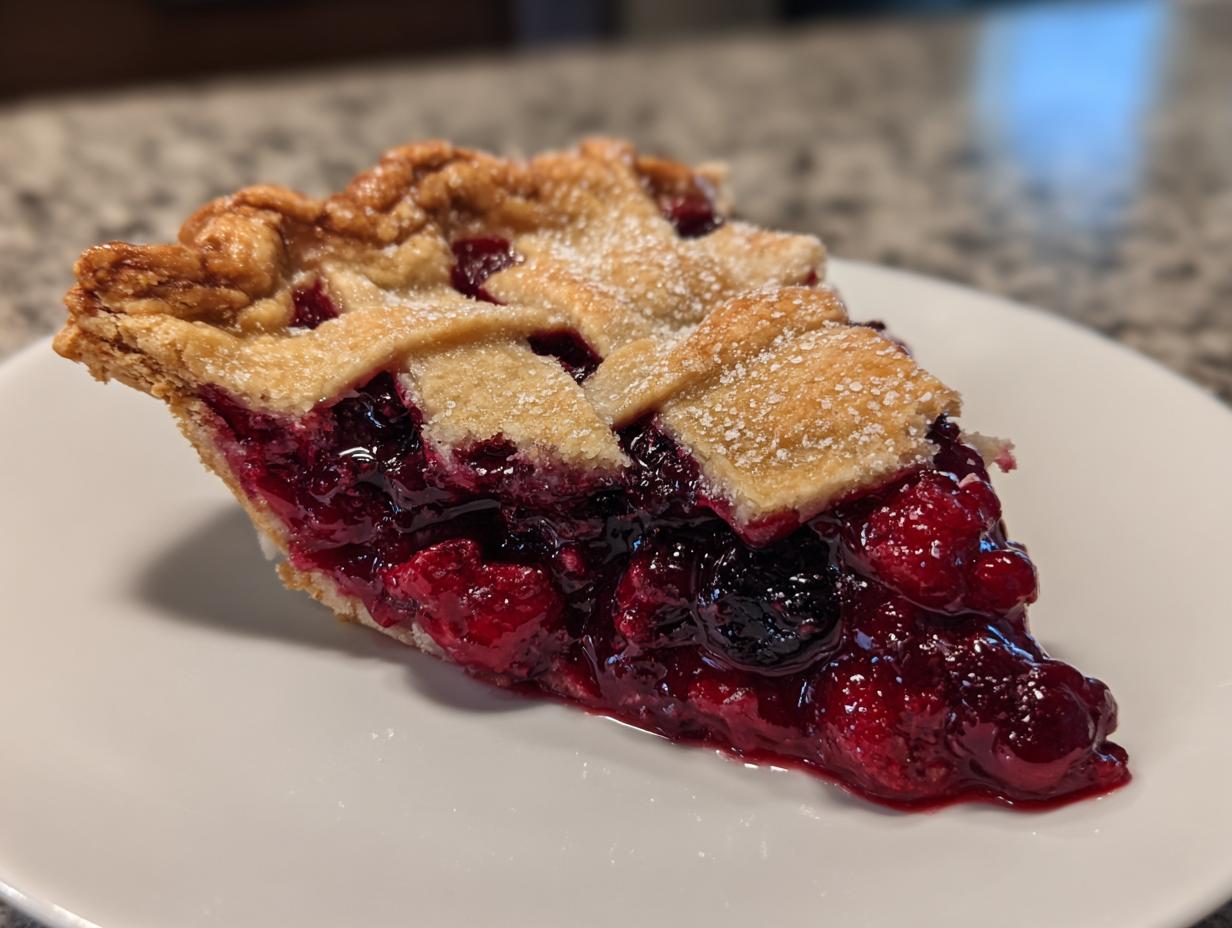
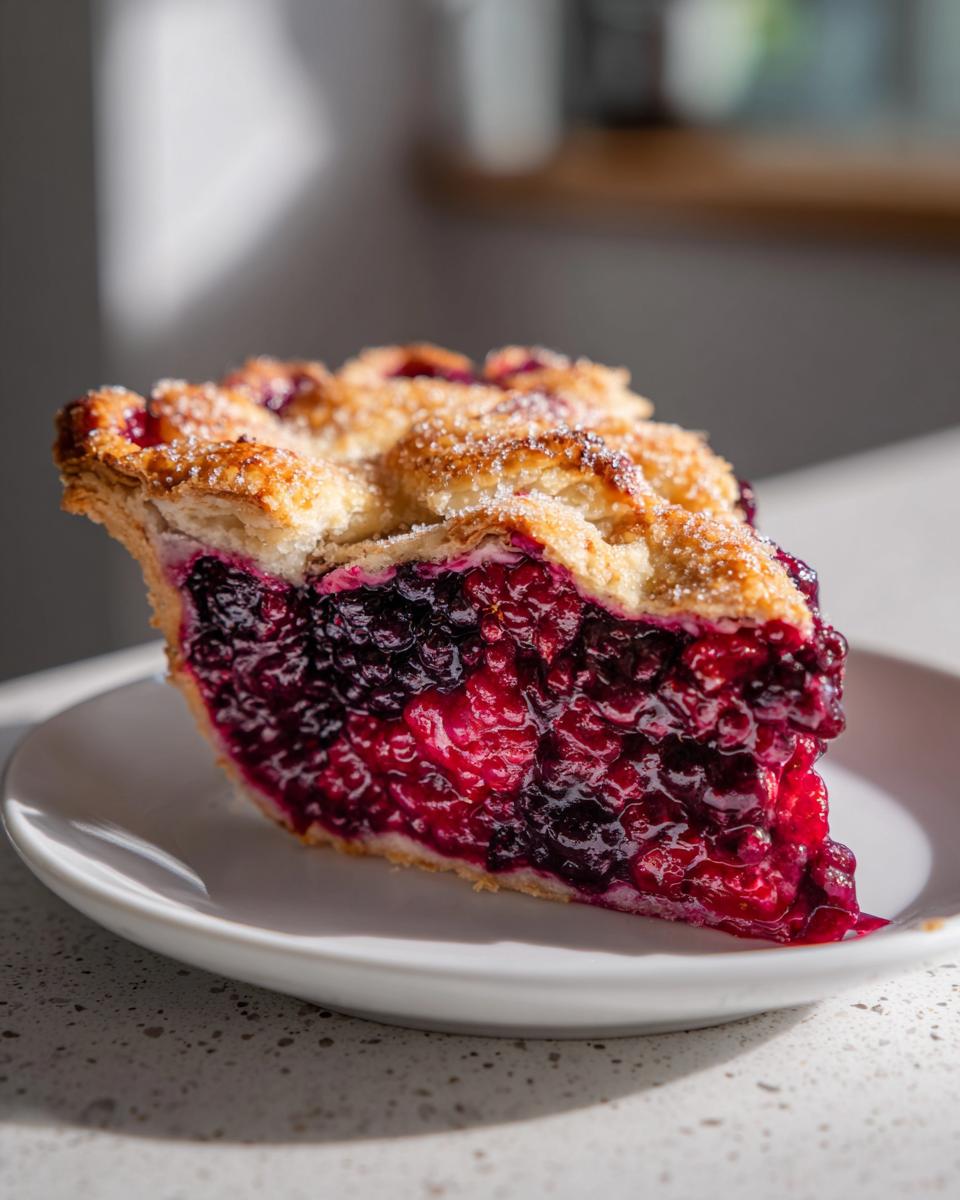
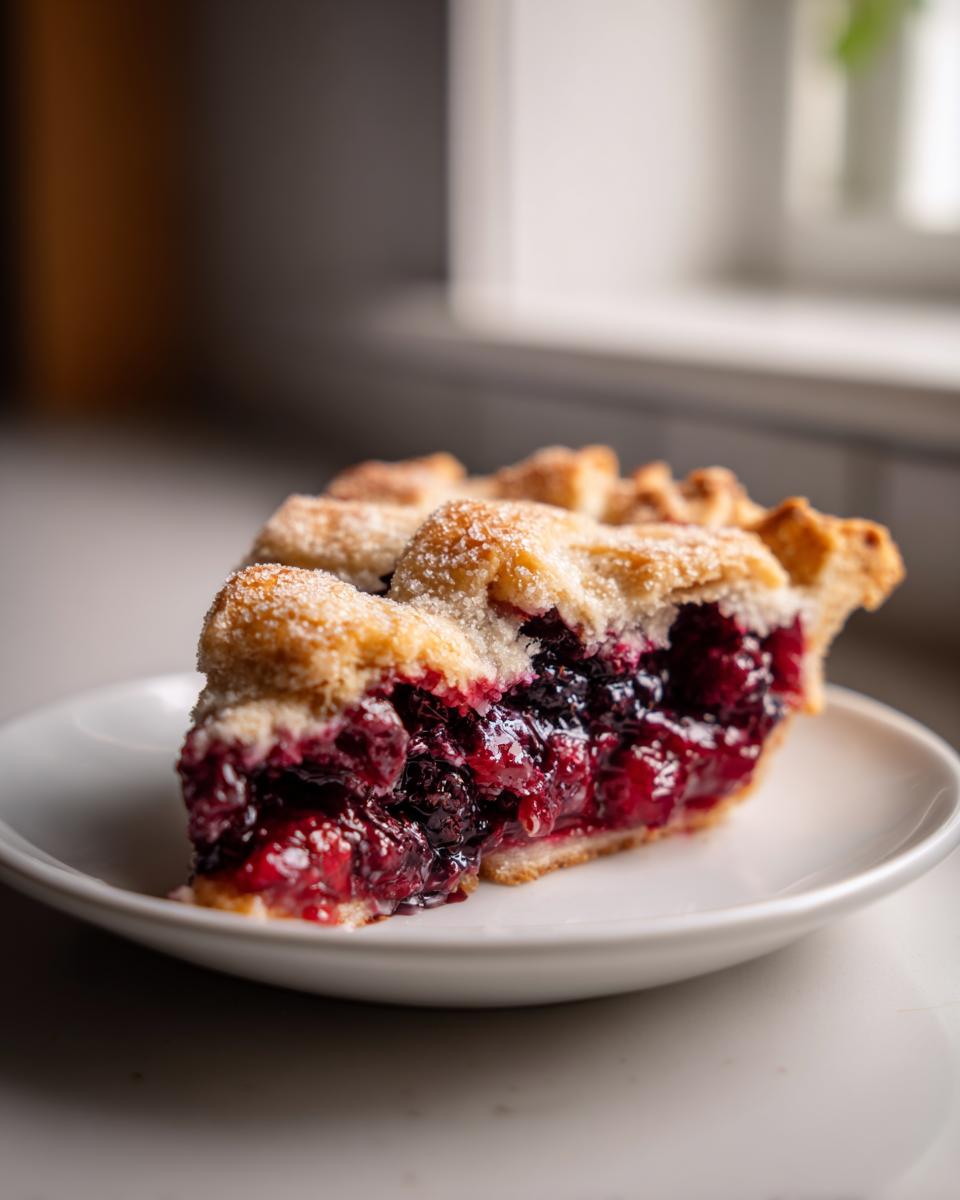
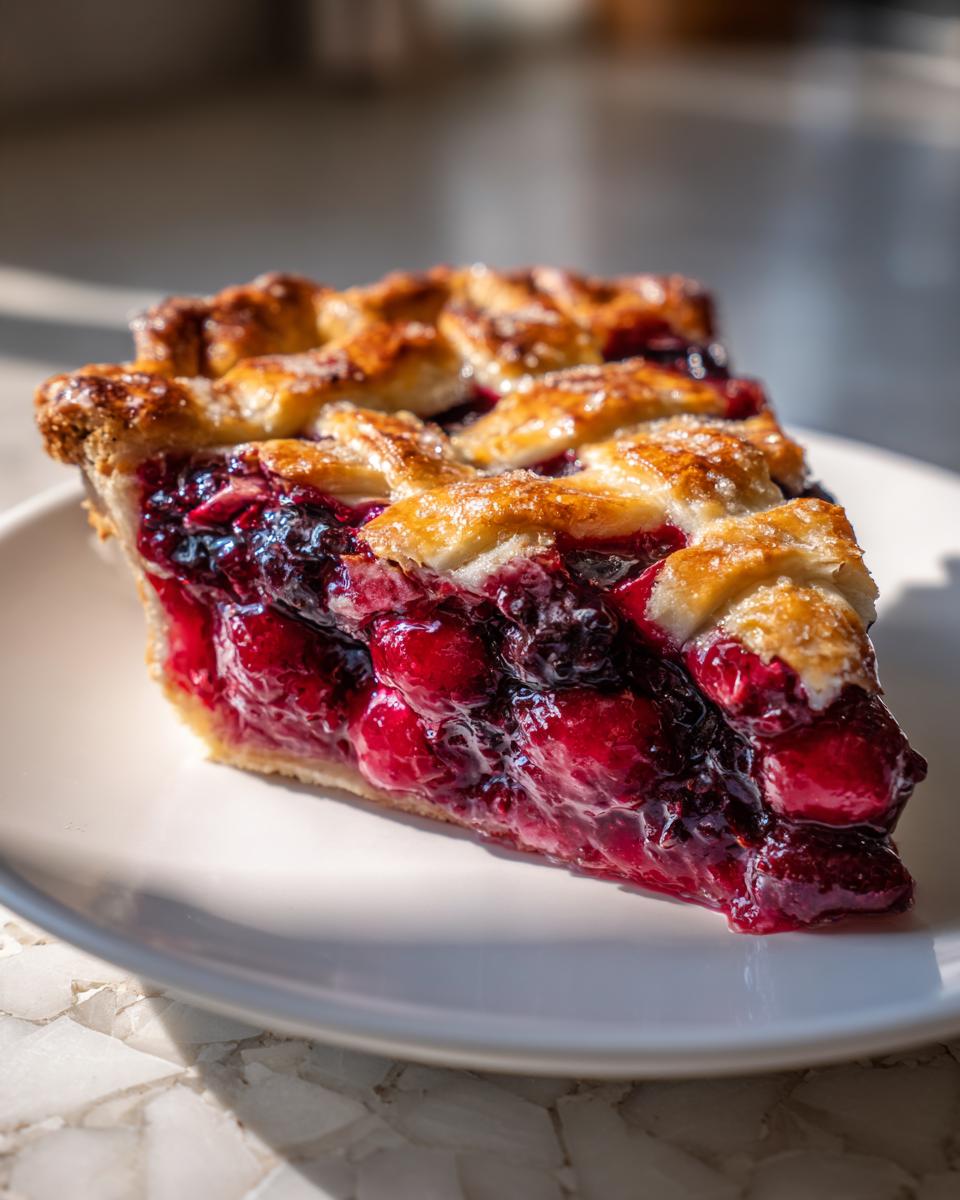
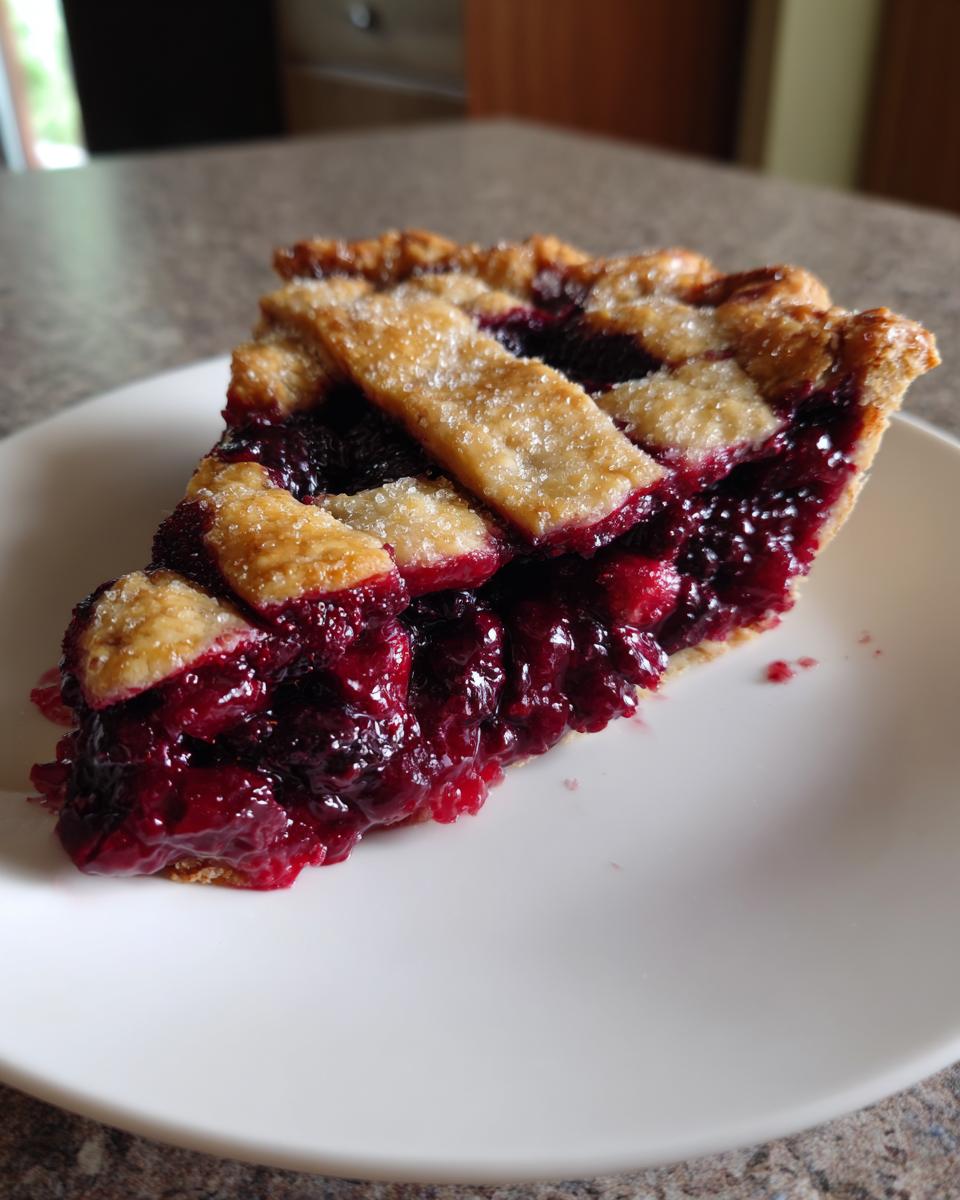
Oh, friends, if you are looking for an Easy Summer Dessert that makes everyone stop talking as soon as it hits the table, you’ve found it! There is just something magical about a fruit pie bursting with fresh flavors, right? But let’s be honest: most of my early attempts ended in disaster—a beautiful crust full of hot, soupy, runny berry nonsense. Not anymore! After months of rigorous testing here at Devour Dish (you know I can’t share anything until it’s absolutely trusted!), I’ve perfected this triple berry pie recipe. Trust me; this method guarantees a perfectly set, beautiful filling that slices cleanly every single time. Welcome to summer perfection!
- Why This Is the Best Triple Berry Pie Recipe You Will Make
- Ingredients for Your Easy Homemade Triple Berry Pie
- How to Prepare the Best Triple Berry Pie
- Tips for a Perfect Triple Berry Pie Every Time
- Variations on the Classic Triple Berry Pie
- Make Ahead Pie Filling and Storage for Your Triple Berry Pie
- Serving Suggestions for Your Homemade Fruit Pie
- Frequently Asked Questions About Making a Triple Berry Pie
- Share Your Perfect Triple Berry Pie Experience
Why This Is the Best Triple Berry Pie Recipe You Will Make
I know you’ve probably seen a million berry pie recipes floating around, but mine is different. Why? Because I’ve taken the guesswork out of the equation! Nobody wants to spend an afternoon baking only to serve pie that pours out of the crust. This recipe is born from rigorous testing, ensuring that every time you bake it, you get that picture-perfect slice, making it the absolute best triple berry pie around. We are focusing on bringing you those Juicy Berry Pie Secrets without any of the mess!
It’s truly the perfect Easy Summer Dessert combination. Here’s what makes this recipe dependable:
- It handles fresh or frozen berries like a pro—no need to thaw them first!
- You get vibrant, sweet-tart flavor balanced perfectly.
- It’s fast enough that you can still enjoy the sunshine after baking.
Foolproof Filling That Sets Perfectly
This is the non-runny secret, folks! The magic relies entirely on the ratio of cornstarch to sugar, which I carefully measured and double-checked. When you whisk the cornstarch and sugar together *before* adding it to the fruit, you distribute that thickening agent evenly. This prevents clumping and ensures that when the berries release their juices, the starch immediately goes to work, creating that beautiful, thick, spoonable filling you dream about.
Buttery, Flaky Pie Crust Recipe Included
While I totally get that life is busy, and sometimes you just need to grab a refrigerated dough, a homemade crust takes this pie from good to absolutely legendary. If you want that signature golden, flaky texture that melts in your mouth—which is vital for a truly great triple berry pie—my dedicated flaky pie crust recipe is the way to go. It’s rich, buttery, and holds up perfectly against all those juicy berries!
Ingredients for Your Easy Homemade Triple Berry Pie
Okay, time for the fun part: gathering our beautiful fruit! For this recipe, I’m giving you the exact list that has given me the most reliable results. Remember, the quality of your berries really shines through since the filling is simple!
- 2 cups fresh or frozen blueberries
- 2 cups fresh or raspberry
- 2 cups fresh or frozen blackberries
- 1 cup granulated sugar
- 1/4 cup cornstarch
- 1 tablespoon lemon juice
- 1 teaspoon vanilla extract
- 1 package refrigerated pie crusts or your homemade pie dough for a flaky pie crust recipe
- 1 egg (for egg wash)
- 2 tablespoons sugar (for sprinkling)
Ingredient Notes and Substitutions for Triple Berry Pie
I always get questions about the berries, so let’s clear that up right now. This recipe works wonderfully whether you have plump, fresh berries from the farmer’s market or bags of frozen goodness pulled straight from the freezer aisle. Seriously, if you use frozen, you don’t even need to thaw them first—just toss ’em in! That’s one less step, which I love.
Now, about substitutions. The classic mix is what I call the ‘Triple Threat’—blueberries, raspberries, and blackberries. But if you happen to have a bounty of strawberries instead of, say, blackberries, feel free to swap them in! You’ll end up with an amazing Strawberry Blueberry Raspberry Pie. Just make sure you keep the total berry volume at 6 cups, and stick to that magic 1/4 cup of cornstarch to keep everything thick and gorgeous. If you ever need tips on making other fruit doughs, I have a great recipe for bread bowls, but for pie, stick with the berry mix!
How to Prepare the Best Triple Berry Pie
Alright, let’s get baking! This is where the magic happens, and I promise you, the steps are straightforward. We are moving fast but deliberately, so pay close attention to the cooling time at the end—that’s arguably the *most* important step for a clean slice of your triple berry pie! I’ve broken down the entire process right here so you can follow along easily. If you want more tips on getting your timing down, check out my general guide to easy baking recipes.
Assembling the Mixed Berry Filling
First things first: get that oven preheating to 375 degrees Fahrenheit. While it warms up, grab your biggest mixing bowl. Remember, if you’re using frozen fruit, toss it right in—no thawing required! Now for the crucial thickening agent: In a separate, much smaller bowl, you need to whisk together that sugar and the cornstarch until they are perfectly combined. Don’t skip this separation step! Once they’re fully blended, pour that dry mixture over your three types of berries. Add your lemon juice and vanilla extract. You want to gently toss everything until those berries look glossy and coated. Be gentle here! We want to break up the raspberries as little as possible.
Next, grab your 9-inch pie plate, lay down your bottom crust, and pour that gorgeous, coated berry filling right in there. Use a spatula to spread it out evenly. This is the base for your beautiful summer delight!
Baking Your Triple Berry Pie with Lattice Crust
Time for the top! Lay on your second crust. You can do a full top with vents, or if you’re feeling fancy, weave a nice lattice crust—it lets the steam escape beautifully while looking classic. Crimp those edges really well to seal everything tight so none of that delicious juice oozes out prematurely when baking.
Now for the finishing touches that make it look professionally done. In a tiny bowl, whisk that egg with just a splash of water—that’s your egg wash. Brush this lightly all over the top crust. Then, sprinkle that extra 2 tablespoons of sugar right on top. This gives you that gorgeous sparkle and crunch! Pop the pie onto a baking sheet—I always do this, trust me, it catches drips—and slide it into the oven. Bake standard time is 50 to 60 minutes. If you notice the edges of your crust getting too dark around the 40-minute mark, just grab a piece of foil, crumple it loosely into a ring, and place it over the edges. It’s my go-to trick for preventing burnt crusts!
And here’s the big secret that takes patience: Once the crust is golden brown and the filling is bubbling happily, take it out. Resist the urge to cut it immediately! You have to let this baby cool on a wire rack for a minimum of 4 hours. Seriously, four hours. This resting period lets that cornstarch fully set the juices. If you cut it hot, you’ll have soup!
Tips for a Perfect Triple Berry Pie Every Time
You’ve got the recipe down, but what separates a good triple berry pie from something Mom used to make? It’s all about these little details that I’ve picked up over trial and error. Because as you know, at Devour Dish, we aim for that bakery-worthy result, even when we’re just baking on a Tuesday!
My biggest piece of advice, hands down, relates to temperature. When you are working with butter for your crust, it has to be COLD. I mean, borderline frozen! If your butter gets warm during the rolling process, the crust will bake up tough instead of flaky. If you notice your dough warming up, wrap it back up and pop it into the fridge for 15 minutes. This chilling time is non-negotiable for that light, shatteringly crisp texture.
Secondly, let’s talk about the cooling again, because it’s so important I’m bringing it up twice. That 4-hour wait time isn’t a suggestion; it’s a commitment to success. If you’re making this for a big holiday dinner, just assemble the pie (minus the egg wash) the night before and keep it chilled. Then, in the morning, you can brush the egg wash on, sprinkle the sugar, and bake it so it’s perfectly warm by dessert time. You can even check out my tips for making a great Caesar dressing if you need another easy recipe to get done ahead of time!
Finally, don’t be afraid of the browning! A deep, golden brown crust signals that the sugars have caramelized beautifully and the crust is fully cooked through. If you’re worried about the fruit bubbling over onto the baking sheet, make sure you check out the full baking instructions and use that foil shield technique I talked about. Seeing a perfectly browned top crust tells you everything you need to know before you even slice into that unbelievably juicy filling. For more great tips on achieving perfectly sliced fruit desserts, check out the tips from my friends over at Bake & Savor!
Variations on the Classic Triple Berry Pie
This amazing recipe is built for adaptability. While the classic three-berry combination is what I stand behind—it hits that perfect sweet and tart note—I love seeing how you all tweak things to make it your own! It’s all about having fun in the kitchen, right?
If you are looking for a texture change or maybe you just ran out of pie dough but have oats in the pantry, you have to try swapping that top crust for a crumbly, crunchy topping. This transforms your pie into a glorious Triple Berry Crumble Pie! It’s so satisfyingly rustic, and honestly, it’s even faster to assemble.
To do this, you just skip putting on the second pie crust entirely. Instead, you whisk together 1 cup of flour, 1/2 cup of brown sugar, 1/2 cup of rolled oats (the regular kind works best), and 1/2 cup of very cold butter that you cut into little cubes. Use your fingers or a pastry blender to work that butter into the dry ingredients until it looks like coarse, sandy crumbs. Sprinkle that mixture evenly over your berry filling, and bake it just as the instructions say. It turns golden brown and adds a wonderful textural contrast to that soft fruit underneath.
Another easy switch is changing up the fruit lineup. If you have an abundance of one berry, lean into it! You can make a fantastic dessert using just blueberries and raspberries, or if strawberries are cheap, you can use them as the base. If you wanted to go completely different but keep the format the same—maybe you’re not feeling all that berry tartness—you could try my easy homemade cherry pie filling recipe instead. The cornstarch ratio usually works perfectly for most sturdy fruits, so you can just swap out the 6 cups of berries for 6 cups of firm fruit!
Make Ahead Pie Filling and Storage for Your Triple Berry Pie
I know how it is—sometimes you want to serve pie, but you just can’t manage making everything the day you need it. The good news about this delicious triple berry pie is that the filling is excellent for meal planning! This is a huge bonus, especially when summer holidays mean your oven is already booked hosting a big roast or side dishes.
If you want to get ahead, you can totally prepare the mixed berry pie filling mixture ahead of time. This is one of those great make ahead pie filling options. Follow Step 1 through Step 3 of the instructions—mixing the berries, sugar, cornstarch, lemon, and vanilla. Once everything is gently coated, you can transfer that mixture into an airtight container. Keep it in your refrigerator for up to 24 hours. Seriously, that’s it!
When you’re ready to bake the next day, pull that filling out. It might look a little soupy right when it comes out because the berries have been chilling, but just give it a super gentle stir to make sure everything is still mixed. Then, proceed with rolling out your bottom crust and pouring the chilled filling right in. You might need to add about 5 extra minutes to the baking time since the filling starts out colder than room temperature, but you should be fine following the standard steps.
Now, what about the finished product? Once your pie is completely baked and cooled—remember, we wait that crucial 4 hours so the filling sets—you can store it covered on the counter at room temperature for about a day, maybe two if your kitchen isn’t too warm. If you need it to last longer, wrap slices tightly in plastic wrap and keep them in the fridge for up to four days. Honestly, though, my pies rarely last that long! If you freeze leftover pie, it’s best to freeze slices rather than the whole pie, as freezing and thawing can sometimes mess up the texture of the crust slightly.
Serving Suggestions for Your Homemade Fruit Pie
We made it! Your beautiful, perfectly set triple berry pie is ready to come out of the cooling rack and make its grand debut. Now, the only question left is: how are you going to serve this masterpiece? While this homemade fruit pie truly sings all on its own, a perfect pairing can elevate it from a great dessert to an unforgettable moment. I always keep my accompaniments simple because the star of the show is those sweet and tart berries!
My absolute, number one, cannot-live-without recommendation is a scoop of high-quality vanilla ice cream. Doesn’t matter if it’s store-bought or homemade, that creamy coldness against the slightly warm, spiced berry filling? Perfection! If you’re feeling ambitious and want to make your own creamy topping, you have to try my recipe for easy banana ice cream recipe (no churn)—it’s wonderful alongside berries, too!
If you prefer something lighter than ice cream, a generous dollop of freshly whipped cream studded with a tiny bit of vanilla or maybe even a hint of lemon zest is incredible. It just melts right into the cracks of the filling. For those of you who like a little savory balance to your sweet, try serving a slice with a small piece of sharp cheddar cheese alongside it—yes, cheese! It sounds wild, but the sharpness cuts through the sweetness of the filling perfectly. It’s a classic American pairing, and it feels so comforting when you’re enjoying this pie during the holidays or a summer cookout!
Frequently Asked Questions About Making a Triple Berry Pie
I totally get it—sometimes you have a specific question about a recipe before you commit to baking it. That’s smart! Since I tested this triple berry pie recipe rigorously, I’ve gathered the most common queries people have when they’re aiming for that perfect home-baked feel. Ask away!
Can I substitute strawberries for blackberries in this Berry Pie Recipe?
Absolutely, you can! This is a wonderfully flexible Berry Pie Recipe. Blackberries are fantastic because they hold their shape well, but if you have a ton of gorgeous fresh strawberries, go for it. Just remember that strawberries are a bit softer than blackberries, so while the cornstarch will handle the liquid, the overall texture might be slightly less structured. You’ll still get an amazing, sweet-tart flavor, though. It just leans a little more strawberry-forward!
What is the secret to preventing a runny Mixed Berry Pie Filling?
If I were only allowed to tell you one thing about this recipe, it would be this: don’t skip the cooling time! That’s secret number one. You MUST let your pie cool for at least 4 hours after it comes out of the oven. The cornstarch is still setting up that whole time. Secret number two, which we covered earlier, is whisking the cornstarch and sugar together first; this ensures there are no dry pockets of thickening agent left to clump up.
The combination of the precise cornstarch amount and that long rest period means you get that perfect, sliceable, non-runny Mixed Berry Pie Filling we all dream of. If you’re short on time, you can try chilling it in the fridge for an hour, but honestly, trust me on the 4 hours at room temperature for the absolute best set!
Is this recipe suitable for a Gluten Free Berry Pie adaptation?
Yes, we can definitely make notes for a Gluten Free Berry Pie! The filling, thank goodness, is naturally gluten-free since we use cornstarch as the thickener, not flour. The only part you need to change is the crust. If you’re making your own dough, you can easily substitute the all-purpose flour with a good quality 1:1 gluten-free flour blend. Make sure the blend you choose contains xanthan gum, as that helps mimic the elasticity that gluten usually provides. If you use a refrigerated crust, just look for one clearly labeled as gluten-free. The rest of the recipe—the incredible berry combination—stays exactly the same!
I have some great ideas for quick recipes, like my easy chicken tacos, where gluten-free swaps are simple, but pie crust definitely takes a little more attention. Happy baking!
Share Your Perfect Triple Berry Pie Experience
Now that you have the secrets to a perfectly set, flaky-crusted triple berry pie, the best part is waiting for you—the eating! But before you dive in with a fork (and maybe a scoop of vanilla ice cream!), I would absolutely love to hear from you. Food is about connection, right? And sharing what you create is half the fun!
If you made this recipe, please take a moment to leave a rating and a quick comment below. Did the filling set perfectly? Did you try the crumble topping variation? Your feedback helps me know that these recipes truly work for everyone in their own kitchens. If you took a gorgeous picture of your finished homemade fruit pie, tag me on social media! Seeing your beautiful, bubbling berry masterpieces makes all my recipe testing completely worth it.
And if you ever have questions while you’re in the middle of things, don’t hesitate to reach out via the contact page. I’m here to help you feel confident in your baking every step of the way. Happy devouring!
PrintEasy Homemade Triple Berry Pie with Flaky Crust

You can make this delicious triple berry pie using fresh or frozen berries. This recipe focuses on a buttery, flaky pie crust and a simple filling that sets perfectly so you avoid a runny mess. It is a classic American pie perfect for summer gatherings or holidays.
- Prep Time: 25 min
- Cook Time: 55 min
- Total Time: 4 hours 20 min
- Yield: 8 servings 1x
- Category: Dessert
- Method: Baking
- Cuisine: American
- Diet: Vegetarian
Ingredients
- 2 cups fresh or frozen blueberries
- 2 cups fresh or frozen raspberries
- 2 cups fresh or frozen blackberries
- 1 cup granulated sugar
- 1/4 cup cornstarch
- 1 tablespoon lemon juice
- 1 teaspoon vanilla extract
- 1 package refrigerated pie crusts or your homemade pie dough for a flaky pie crust recipe
- 1 egg (for egg wash)
- 2 tablespoons sugar (for sprinkling)
Instructions
- Preheat your oven to 375 degrees Fahrenheit (190 degrees Celsius).
- If using frozen berries, do not thaw them first. In a large bowl, gently combine the blueberries, raspberries, and blackberries.
- In a separate small bowl, whisk together the granulated sugar and cornstarch. This step is key for a perfectly set filling.
- Pour the sugar and cornstarch mixture over the berries. Add the lemon juice and vanilla extract. Gently toss everything together until the berries are evenly coated.
- Line a 9-inch pie plate with one pie crust. Trim the edges if necessary.
- Pour the mixed berry filling into the prepared crust.
- Top the pie with the second crust. You can create a lattice crust or place the top crust on whole, cutting several slits in the top to allow steam to escape. Crimp the edges to seal.
- In a small bowl, whisk the egg with 1 teaspoon of water to create an egg wash. Brush the top crust lightly with the egg wash. Sprinkle the remaining 2 tablespoons of sugar over the top crust for a sweet finish.
- Place the pie on a baking sheet to catch any drips. Bake for 50 to 60 minutes, or until the crust is golden brown and the filling is bubbly. If the edges brown too quickly, cover them loosely with foil.
- Let the pie cool completely on a wire rack for at least 4 hours before slicing. This resting time allows the filling to fully set, giving you perfect slices every time.
Notes
- For the best results and a truly flaky pie crust recipe, keep your butter and water very cold when making your dough from scratch.
- If you prefer a crumble topping over a top crust, substitute the second crust with a mixture of 1 cup flour, 1/2 cup brown sugar, 1/2 cup rolled oats, and 1/2 cup cold butter cut into pieces.
- This recipe works well for make ahead pie filling; prepare the filling mixture and store it in the refrigerator for up to 24 hours before assembling and baking.
Nutrition
- Serving Size: 1 slice
- Calories: 380
- Sugar: 30g
- Sodium: 280mg
- Fat: 20g
- Saturated Fat: 10g
- Unsaturated Fat: 10g
- Trans Fat: 0g
- Carbohydrates: 50g
- Fiber: 3g
- Protein: 4g
- Cholesterol: 35mg