
Oh, have you ever just needed something so intensely rich, so deeply chocolatey, that you needed a dessert that felt like a warm, luxurious hug? I know that feeling well! It usually strikes right when you need a showstopper dessert for a celebration, or maybe just for yourself on a quiet Saturday night. That’s precisely why I’m sharing my ultimate formula for the Rich and Creamy Chocolate Cheesecake with Ganache Topping. This isn’t just any dessert; it’s decadent, smooth as velvet, and that glossy ganache topping makes it look like it came straight from a gourmet bakery!
When I started Devour Dish, my goal was always to take those intimidating desserts and make them simple and foolproof for real life. This incredible chocolate cheesecake follows that philosophy perfectly. We are concentrating on achieving that famously smooth and velvety cheesecake texture without any fuss—I promise, all the steps are straightforward, even the water bath part.
If you’re looking for the absolute best baked cheesecake experience without hours of complicated layering, you’ve landed in the right spot. Let’s dive into making sheer chocolate magic!
- Why This Rich and Creamy Chocolate Cheesecake Recipe Works
- Gathering Ingredients for Your Chocolate Cookie Crust Dessert
- Step-by-Step Instructions for the Best Baked Cheesecake
- Making the Chocolate Ganache Cheesecake Topping
- Tips for Success with Your Homemade Cheesecake Recipe
- Ingredient Notes and Substitutions for Decadent Chocolate Dessert
- Storing and Reheating Your Chocolate Cheesecake
- Serving Suggestions for This Showstopper Dessert Recipes
- Frequently Asked Questions About Making Chocolate Cheesecake
- Share Your Decadent Chocolate Dessert Experience
Why This Rich and Creamy Chocolate Cheesecake Recipe Works
I’ve tested dozens of recipes over the years, and this one is the keeper because it delivers luxury without the headache. When I say creamy, I mean it—we are achieving that perfectly smooth and velvety cheesecake texture that melts in your mouth.
Here’s why this version beats out the rest:
- Achieving That Smooth Texture: We obsess over the temperature of the cream cheese and avoid overmixing the eggs. This is how we get that non-gritty, totally indulgent filling every single time.
- Showstopper Presentation: The glossy chocolate ganache topping isn’t just delicious; it makes this a truly stunning dessert. It looks fancy, but trust me, the steps are simple!
- Reliable Baking: While it is a baked dessert, the use of the water bath—which I walk you through in detail—prevents those frustrating cracks that plague so many homemade cheesecakes. It’s the secret handshake of great baking!
Gathering Ingredients for Your Chocolate Cookie Crust Dessert
Before we even think about turning on the oven, we need to gather our lineup. Think of this as prepping for the ultimate rich chocolate dessert experience! Because we are aiming for that incredible, smooth and velvety cheesecake texture, the quality and preparation of these ingredients really matter.
You’ll need ingredients for the crust, which uses that wonderful chocolate cookie crust dessert base, and then the filling, which relies on good quality chocolate.
For the crust, grab about 1 3/4 cups of chocolate cookie crumbs—if you’re using Oreos, just make sure to scrape out the filling first if you don’t want it extra sweet! We combine that with 1/4 cup sugar and 6 tablespoons of melted butter.
Now for the main event, the filling! Make sure you have:
- Three 8-ounce packages of cream cheese. Seriously, make sure they are fully softened!
- 1 1/2 cups granulated sugar, plus that tiny bit for the crust.
- 1/2 cup unsweetened cocoa powder—use one you like the taste of!
- A splash of vanilla extract and a pinch of salt to balance things out.
- 3 large eggs, waiting patiently.
- 1/2 cup heavy cream to give the filling that extra richness.
Finally, for that spectacular topping, we need 4 ounces of bittersweet chocolate, melted and cooled slightly, plus another 1/2 cup of heavy cream for the ganache. That’s it! Gather these up, and we are ready for the next stage.
Step-by-Step Instructions for the Best Baked Cheesecake
Okay, deep breath! Making a beautiful, crack-free chocolate cheesecake might sound intimidating, but if you follow these steps exactly, you’ll see why this is my favorite way to bake. We’re going to work step-by-step, paying special attention to that water bath—it’s non-negotiable for that smooth and velvety cheesecake texture we are after!
Preparing and Pre-baking the Chocolate Cookie Crust Dessert
First things first, let’s get that base locked in. Preheat your oven to 325 degrees F. Wrap the outside of your 9-inch springform pan super tightly with heavy-duty foil—use a couple of layers just to be safe against the water bath!
Mix your crumbs, the quarter cup of sugar, and the melted butter together until it all looks like damp sand. Press this mixture firmly into the bottom of the foil-wrapped pan. Pop that into the oven for just 10 minutes to set it up nice and solid. Let it cool down while you tackle the filling.
Creating the Smooth and Velvety Cheesecake Filling
This is where texture counts! Grab that bowl! Beat your softened cream cheese completely smooth solo. Don’t rush this part; we need zero lumps here. Once it’s velvety, gradually mix in the main amount of sugar, the cocoa powder, vanilla, and salt. Scrape down the sides of the bowl often!
Now for the eggs—and this is key: add them one at a time, mixing only until each one just disappears into the batter. If you mix too much once the eggs are in, you incorporate air, and that air creates cracks later. Finally, gently fold in the half cup of heavy cream until everything is blended beautifully. That’s your creamy filling ready!
Baking the Chocolate Cheesecake Using a Water Bath
Assembly time! Pour that gorgeous filling over your cooled crust. Remember that roasting pan we talked about? Place the springform pan inside it. Carefully pour *hot* water into the roasting pan until it comes about halfway up the sides of your springform pan. This water bath cooks the chocolate cheesecake gently.
Bake this setup for about 55 to 65 minutes. You are looking for the edges to be set, but when you nudge the pan gently, the center should still have a little wobble—like soft gelatin. If it’s completely firm, it’s already overdone!
Crucial Cooling and Chilling Steps for Perfect Chocolate Cheesecake
The cooling process is almost as important as the baking! Turn that oven off. Do not take the cheesecake out. Just crack the oven door open a little bit—a wooden spoon works well to prop it open—and let the cheesecake hang out in that residual warmth for a full hour. This slow transition prevents major temperature shock, keeping your gorgeous chocolate cheesecake crack-free.
After that hour, gently remove it from the water bath, take off the foil, and let it cool on a wire rack for another hour. Only once it’s completely cool should you cover and chill it. We need a minimum of six hours, but seriously, let that chocolate cheesecake chill overnight. That long chill is what finalizes that perfect, dense, smooth, and velvety cheesecake structure.
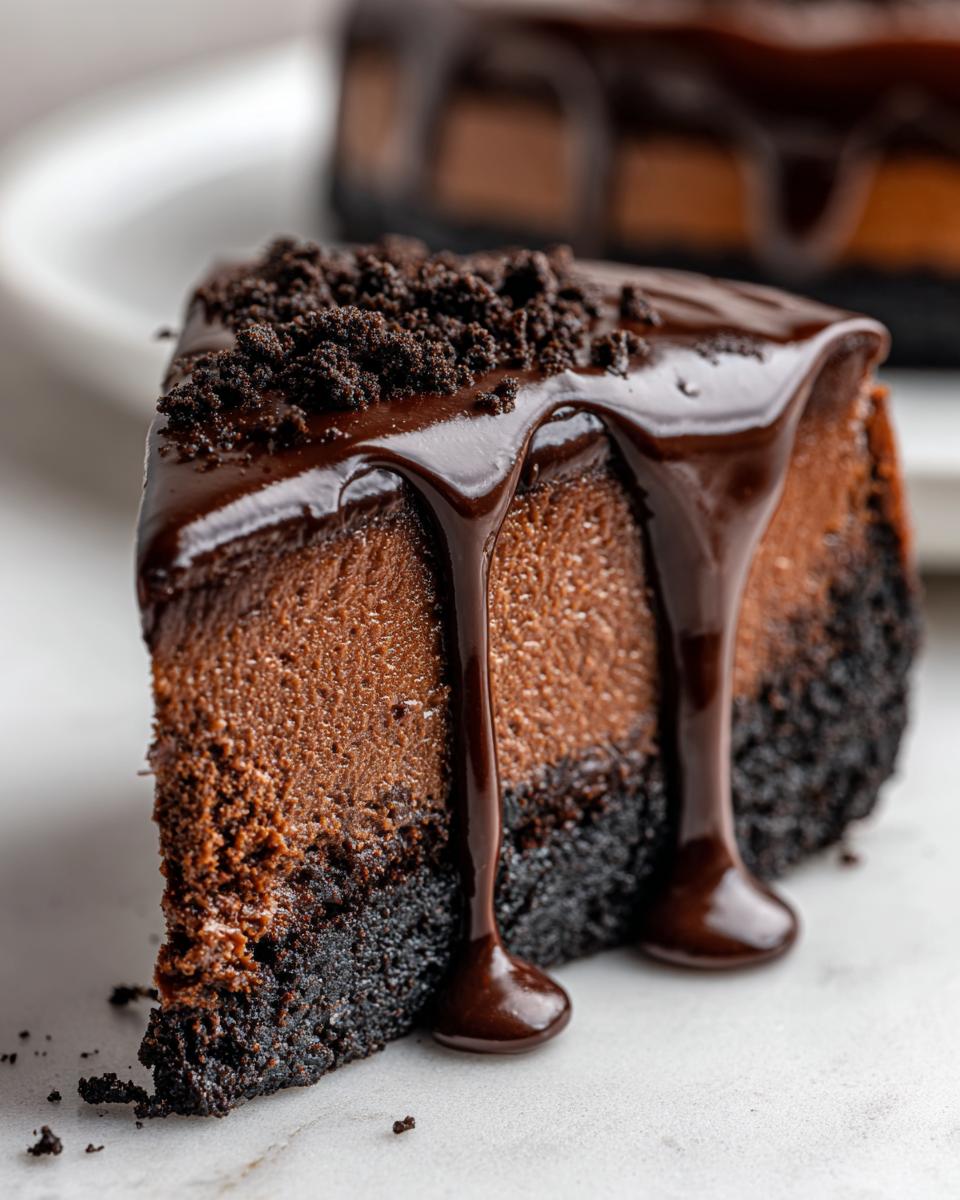
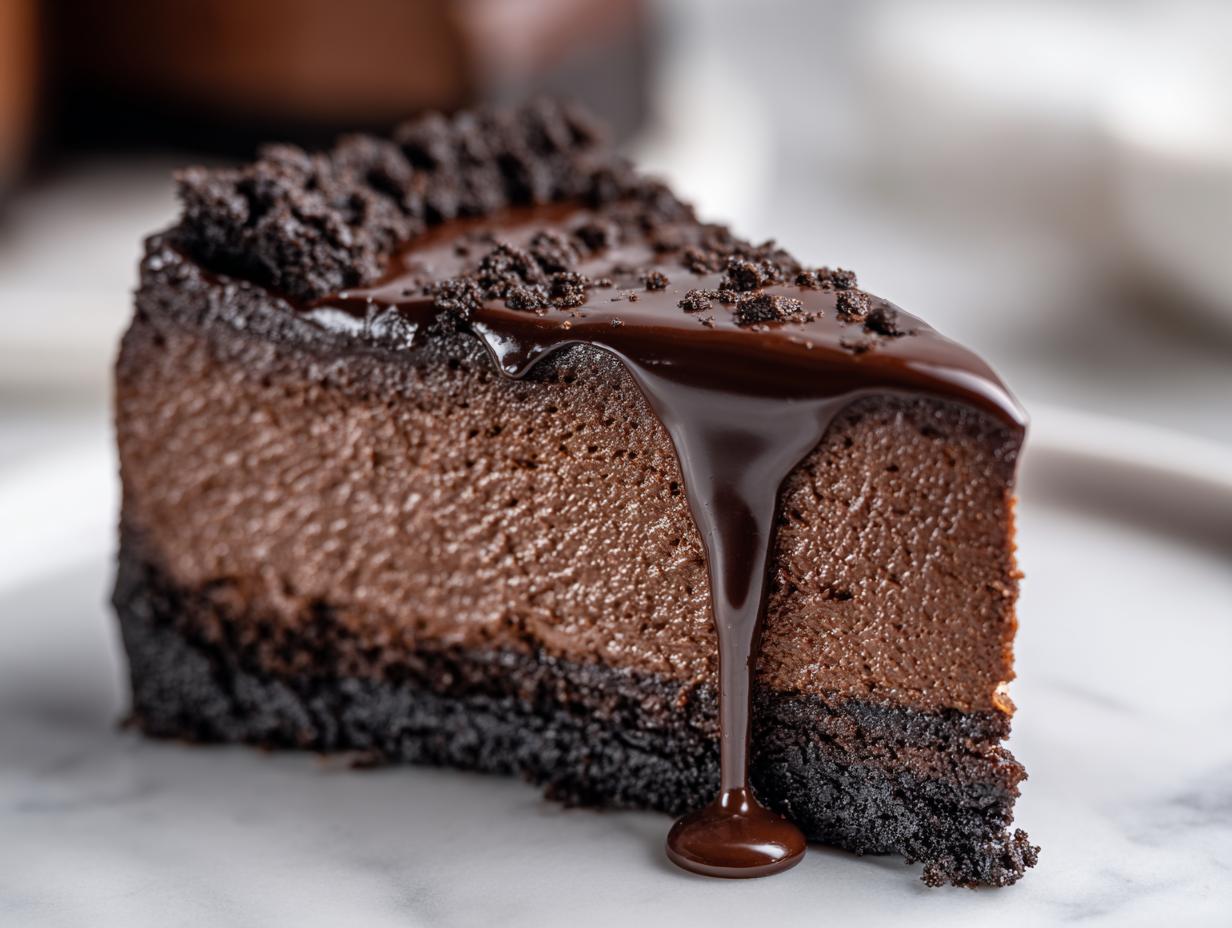
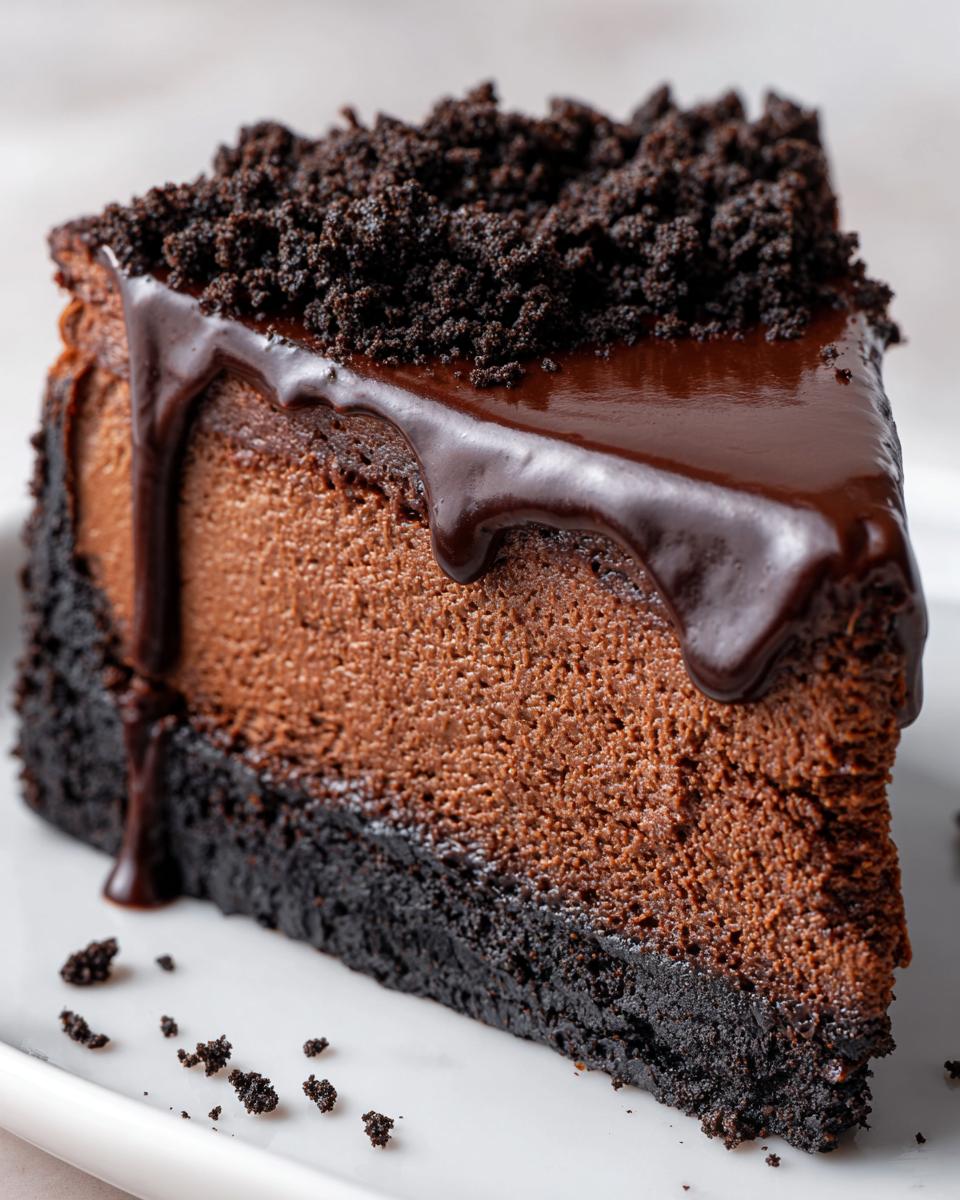
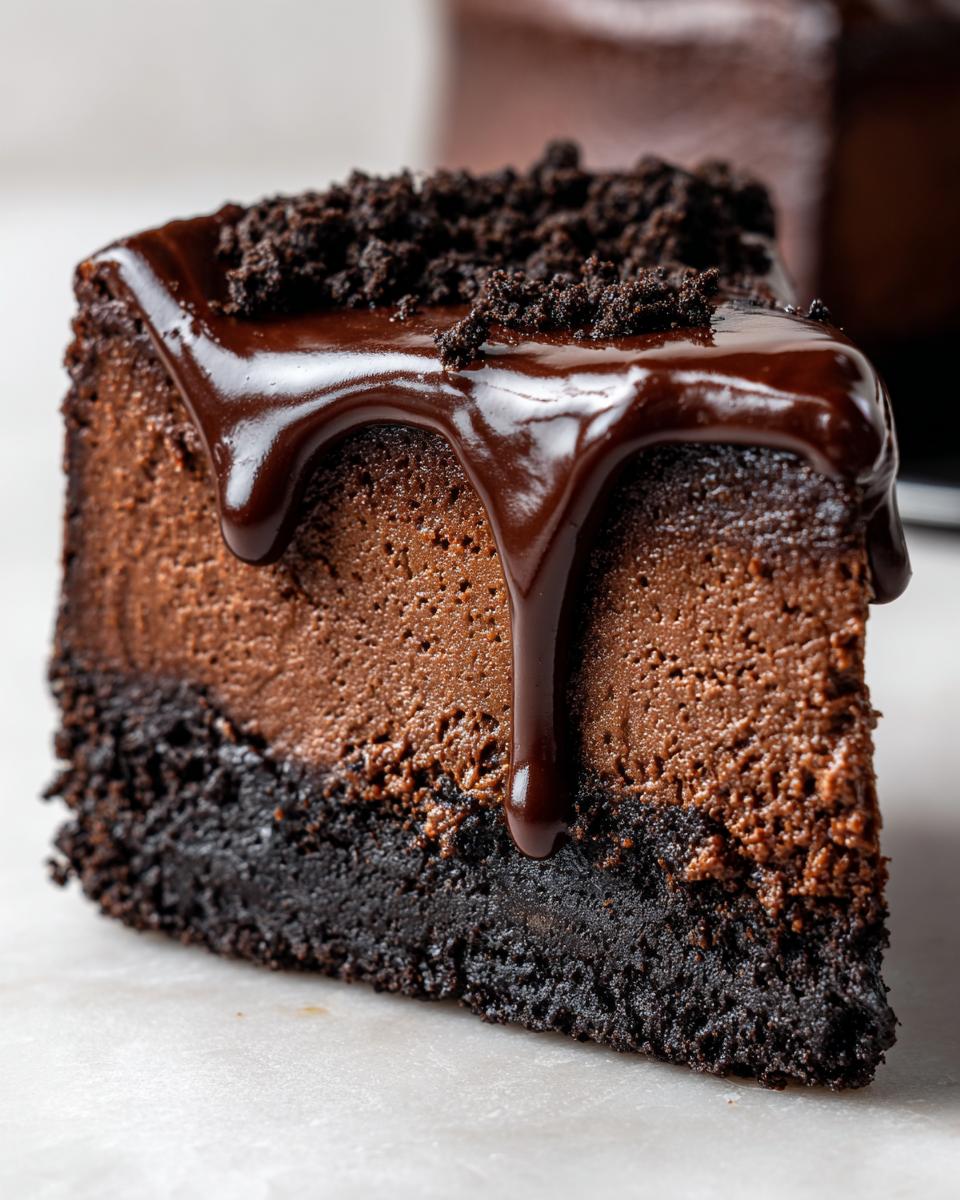
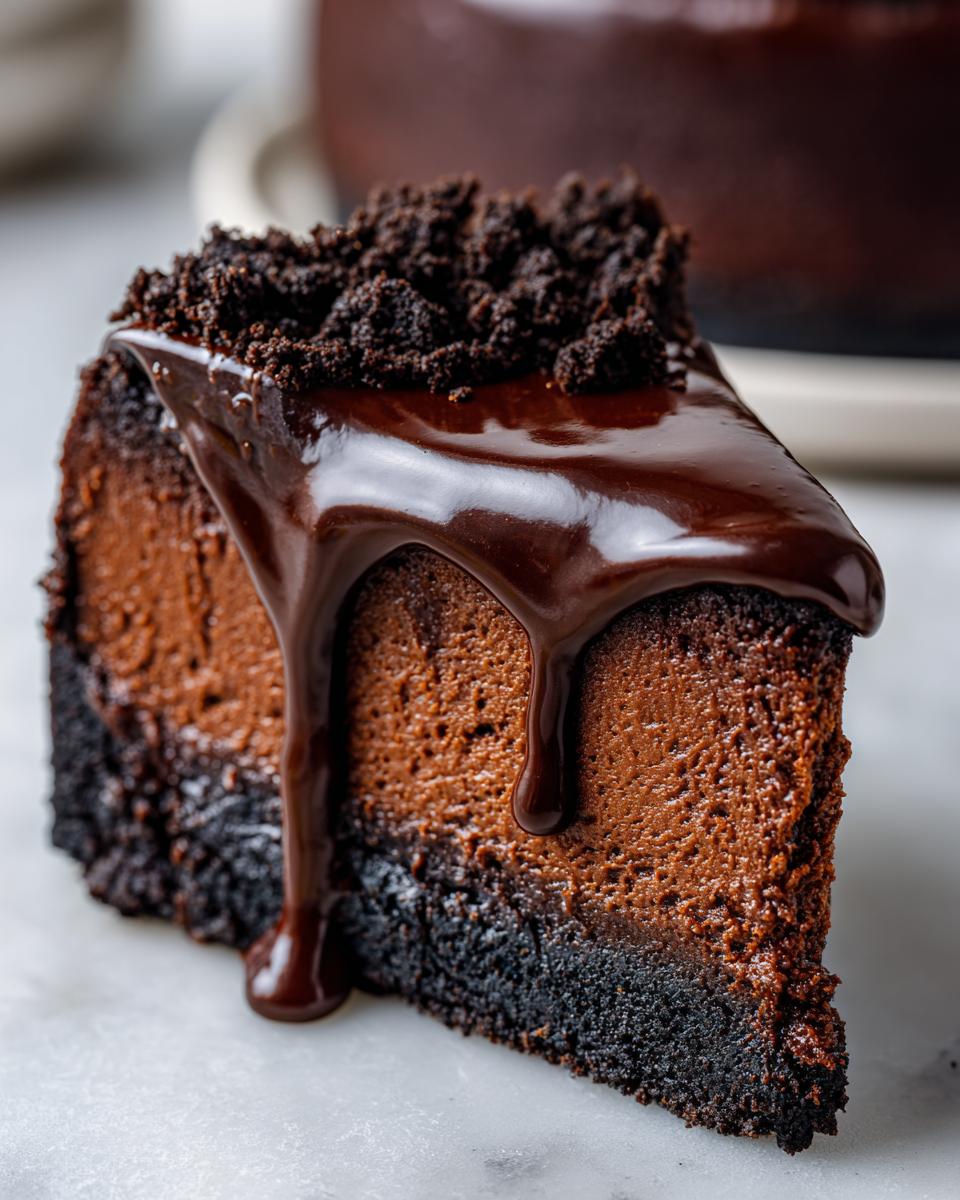
Making the Chocolate Ganache Cheesecake Topping
Okay, your decadent chocolate cheesecake is perfectly chilled, firm, and begging for its crowning glory—the ganache! This topping is what takes this dessert from great to “stop the show.” It’s super easy, but it really seals the deal for that gourmet chocolate experience.
For the best look, make sure your 4 ounces of bittersweet chocolate is melted first and has cooled down just a tiny bit—we don’t want to scorch it!
Then, take a small saucepan and heat the 1/2 cup of heavy cream until it’s just simmering around the edges. If you want that extra-shiny finish that people rave about for a showstopper dessert, stir in that optional tablespoon of light corn syrup right now.
Pour that hot cream mixture directly over your cooled, melted chocolate. Now, don’t touch it for about five minutes! Let the heat do its work. After five minutes, just whisk gently starting in the center until it comes together into one smooth, glossy sauce. This is your liquid gold! Pour this beautiful chocolate ganache right over your chilled chocolate cheesecake and let it drip down the sides naturally. Chill it for another 30 minutes just to let that ganache set up before slicing!
Tips for Success with Your Homemade Cheesecake Recipe
Friends, I want you to have the absolute best experience making this ultimate rich chocolate dessert. Over the years, I’ve learned the little secrets that transform a good cheesecake into the best baked cheesecake you’ve ever made. The biggest tip revolves around temperature!
Your cream cheese absolutely must be room temperature. If it’s cold, you’ll end up with lumps in your filling, no matter how good your mixer is. Give it a solid hour on the counter before you even think about starting. Remember how I warned you about the water bath? I only skipped it once in the early days—I thought I could cheat the system. Big mistake! The outside cooked too fast, and I ended up with a huge crack right down the center of my chocolate cheesecake. Don’t let that happen to you!
Also, wrap that pan tightly; double or triple layer the foil. Water seeping into your crust ruins that crucial chocolate cookie crust dessert foundation. Follow those cooling steps religiously, and you’ll get the smooth and velvety cheesecake texture we’re aiming for every time.
Ingredient Notes and Substitutions for Decadent Chocolate Dessert
Let’s talk ingredient specifics, because even though this is a simple recipe, the details count when you’re trying to achieve that supreme richness! If you’re worried about finding the right supplies for your homemade cheesecake recipe, don’t stress. Most of these things are already in your pantry.
For the cream cheese, I usually stick to the standard block-style brands; they seem to bake the most consistently compared to some of the lighter, whipped varieties. If you only have those, just know they might have slightly more water content, so make sure they are really well drained!
When it comes to cocoa powder, I prefer using natural unsweetened cocoa powder here because we’re mixing it with baking soda later. If you use Dutch-process cocoa, you might notice a slightly different color or rise, but honestly, for cheesecake, the result is usually fantastic either way. It’s all about getting that deep, dark chocolate flavor!
Lastly, the crust! We use chocolate cookies, but if you run out or just want to shake things up, classic graham crackers work perfectly fine as a base. Just know that swapping them will change the flavor profile slightly, making it less intensely chocolatey throughout the entire dessert.
Storing and Reheating Your Chocolate Cheesecake
You’ve done the hard part, now we need to make sure this gorgeous chocolate cheesecake stays perfect! Once that ganache is set, cover the entire springform pan tightly with plastic wrap—I usually go for two layers to make absolutely sure no fridge odors sneak in. It needs to stay refrigerated. Honestly, this chocolate cheesecake is always far better on day two, so if you can possibly wait overnight, do it! That long rest time really solidifies the smooth and velvety cheesecake texture.
Now, do you reheat cheesecake? Nope, not really! This dessert is meant to be served chilled. If you absolutely must reheat a slice (maybe you left it out too long?), keep it very brief—a few seconds in the microwave, tops—just enough to take the chill off, but not enough to ruin that perfect texture we worked so hard for!
Serving Suggestions for This Showstopper Dessert Recipes
Now that you have this stunning, rich chocolate cheesecake sitting there looking perfect, how should you present it? Presentation is everything for a showstopper dessert, right?
Since the cheesecake itself is so deeply decadent, I love pairing it with something bright to cut through that richness. Fresh raspberries or sliced strawberries look absolutely beautiful against the dark ganache. A light dusting of extra cocoa powder right before serving adds a gorgeous matte contrast to the shine.
And honestly? A small, piping hot cup of strong coffee alongside a chilled slice is heavenly. It really enhances that dark chocolate flavor. If you’re feeling extra ambitious, you could even scoop some of my easy no-churn ice cream on the side!
Frequently Asked Questions About Making Chocolate Cheesecake
It’s totally normal to have a few queries when tackling a decadent dessert like this! Baking is chemistry, but I’ve made sure this chocolate cheesecake is forgiving. Here are the things I get asked about most often!
Can I make this chocolate cheesecake recipe without a water bath?
You technically *can*, yes. If you skip the water bath, you drastically increase your chances of getting cracks because the edges cook much faster than the center. If you simply must skip it, make sure you watch it closely toward the end of baking and compensate by definitely using that slow, one-hour cool-down period inside the turned-off oven. Chilling longer will also help firm up any texture differences caused by skipping the bath for this rich chocolate dessert.
How long does the chocolate cheesecake need to chill?
Patience, friend! While you can slice into it after a bare minimum of 6 hours—if you absolutely can’t wait to see your handiwork—I strongly, strongly recommend letting this chill overnight. That lengthy chilling time is what allows the fats to fully set and gives you that incredible smooth and velvety cheesecake texture we worked so hard to achieve. It makes slicing so much cleaner, too!
What is the best way to get a clean slice of chocolate cheesecake?
This is my favorite trick for serving any fancy cheesecake! Forget trying to use a knife straight from the drawer. Get a tall glass of very hot water. Dip a long, sharp knife into the hot water, wipe the blade clean and dry, and then make one smooth slice straight down. Repeat this process—dip, wipe, slice—for every single cut. It keeps that ganache topping perfectly neat and your slices looking professional!
Share Your Decadent Chocolate Dessert Experience
Now that you’ve created this stunning, rich dessert, I truly want to hear all about it! Did that ganache shine just right? Please come back and leave a star rating below so other bakers know how much you loved this decadent chocolate dessert. If you snapped a picture of your slice, tag me on social media! Sharing our kitchen wins makes cooking always feel worth the effort. Happy Devouring! Don’t forget to check out my easy honey garlic butter baked salmon recipe for your next dinner!
PrintRich and Creamy Chocolate Cheesecake with Ganache Topping
You can make this rich and creamy chocolate cheesecake easily. It features a simple chocolate cookie crust and a smooth ganache topping, making it a decadent treat perfect for special occasions.
- Prep Time: 30 min
- Cook Time: 65 min
- Total Time: 7 hours 35 min
- Yield: 12 servings 1x
- Category: Dessert
- Method: Baking
- Cuisine: American
- Diet: Vegetarian
Ingredients
- 1 3/4 cups chocolate cookie crumbs (about 30 cookies)
- 1/4 cup granulated sugar
- 6 tablespoons unsalted butter, melted
- 3 (8 ounce) packages cream cheese, softened
- 1 1/2 cups granulated sugar
- 1/2 cup unsweetened cocoa powder
- 1 teaspoon vanilla extract
- 1/4 teaspoon salt
- 3 large eggs
- 1/2 cup heavy cream
- 4 ounces bittersweet chocolate, melted and cooled slightly (for ganache)
- 1/2 cup heavy cream (for ganache)
- 1 tablespoon light corn syrup (optional, for shine)
Instructions
- Preheat your oven to 325 degrees F. Wrap the outside of a 9-inch springform pan tightly with heavy-duty aluminum foil.
- Prepare the crust: Mix the chocolate cookie crumbs, 1/4 cup sugar, and melted butter in a bowl until combined. Press the mixture firmly into the bottom of the prepared springform pan. Bake for 10 minutes. Let the crust cool while you prepare the filling.
- Prepare the cheesecake filling: In a large bowl, beat the softened cream cheese with an electric mixer until smooth. Gradually beat in the 1 1/2 cups sugar, cocoa powder, vanilla extract, and salt until fully combined and smooth. Scrape down the sides of the bowl as needed.
- Beat in the eggs one at a time, mixing just until each egg is incorporated. Mix in the 1/2 cup heavy cream until the batter is smooth. Do not overmix.
- Pour the filling over the cooled crust. Place the springform pan inside a larger roasting pan. Carefully pour hot water into the roasting pan until it reaches halfway up the sides of the springform pan (this is a water bath).
- Bake for 55 to 65 minutes, or until the edges are set but the center still jiggles slightly when gently nudged.
- Turn off the oven, crack the oven door open slightly, and let the cheesecake cool inside the oven for 1 hour. This prevents cracking.
- Remove the cheesecake from the water bath and let it cool completely on a wire rack. Once cool, cover and chill in the refrigerator for at least 6 hours, or preferably overnight.
- Prepare the chocolate ganache: Place the melted bittersweet chocolate in a heatproof bowl. Heat the 1/2 cup heavy cream and corn syrup (if using) in a small saucepan until just simmering. Pour the hot cream mixture over the chocolate. Let it sit for 5 minutes, then whisk until smooth and glossy.
- Pour the warm ganache over the chilled cheesecake. Spread evenly or allow it to drip down the sides for a decorative effect. Chill for another 30 minutes to set the ganache before serving.
Notes
- If you want an easy chocolate cheesecake, you can skip the water bath, but chilling time is essential for a smooth and velvety cheesecake texture.
- For a chocolate cookie crust dessert, use Oreo cookies, scraping out the cream filling first if you prefer a less sweet base.
- This recipe works well as a showstopper dessert for holiday cheesecake recipes.
Nutrition
- Serving Size: 1 slice
- Calories: 550
- Sugar: 45g
- Sodium: 350mg
- Fat: 38g
- Saturated Fat: 23g
- Unsaturated Fat: 15g
- Trans Fat: 0.5g
- Carbohydrates: 50g
- Fiber: 2g
- Protein: 9g
- Cholesterol: 120mg