
Honestly, is there anything sadder than a store-bought english muffin? They’re usually flat, dry, and they crack the moment you try to butter them. Seriously, we deserve better for our weekend brunch! I promise you, once you try this recipe, you’ll never go back to the plastic bag. I’m Avery, and here at Devour Dish, I focus on bringing you reliable, simple recipes for real life, and this one definitely fits the bill. We are making the softest, fluffiest homemade english muffins—right on your stovetop—that boast those legendary nooks and crannies designed to capture all that melted butter. Get ready for the best breakfast bread you’ve ever made!
- Why This Homemade English Muffin Recipe Is Superior
- Gathering Ingredients for Your English Muffin Recipe
- Step-by-Step Instructions for Stovetop English Muffins
- Tips for Perfect Homemade English Muffins Every Time
- Storage and Make-Ahead Options for Your English Muffins
- Creative Ways to Serve Your Fluffy English Muffins
- Common Questions About Making English Muffins
- Estimated Nutritional Data for One English Muffin
- Share Your Homemade English Muffin Creations
Why This Homemade English Muffin Recipe Is Superior
I know you’ve bought those bags before, and they just don’t hit the spot. My goal here is to deliver you the absolute best homemade english muffins, and that means achieving that pillowy, soft English muffins texture we all dream about. Because this recipe uses active dry yeast and relies on a gentle rise, the interior stays beautifully airy. Plus, we are skipping the oven entirely! Cooking them on the griddle is far easier and locks in that fresh flavor immediately. If you’re looking for other easy homemade breads, you should check out my recipe for homemade cream of chicken soup—just kidding! That’s not bread, but this simple recipe really is that easy!
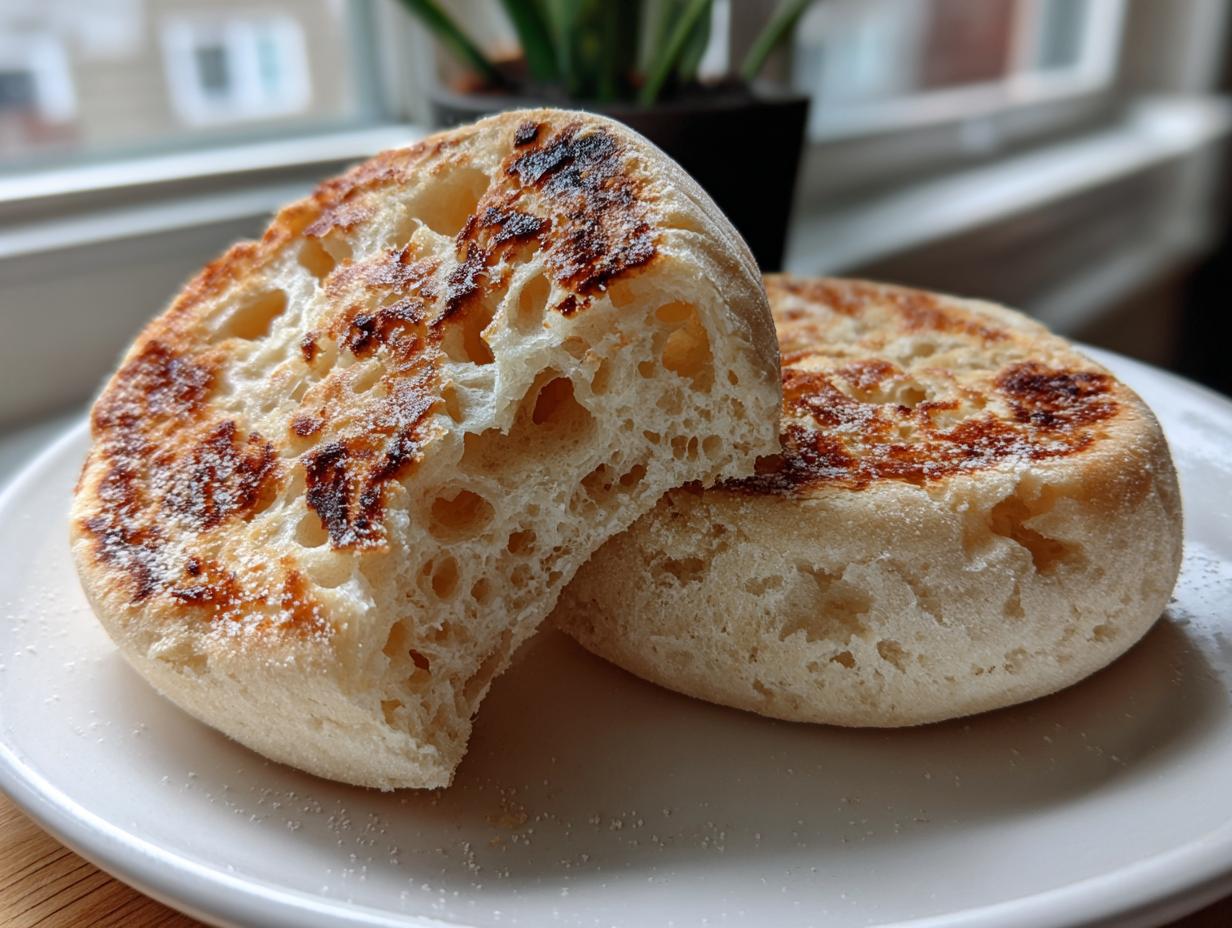
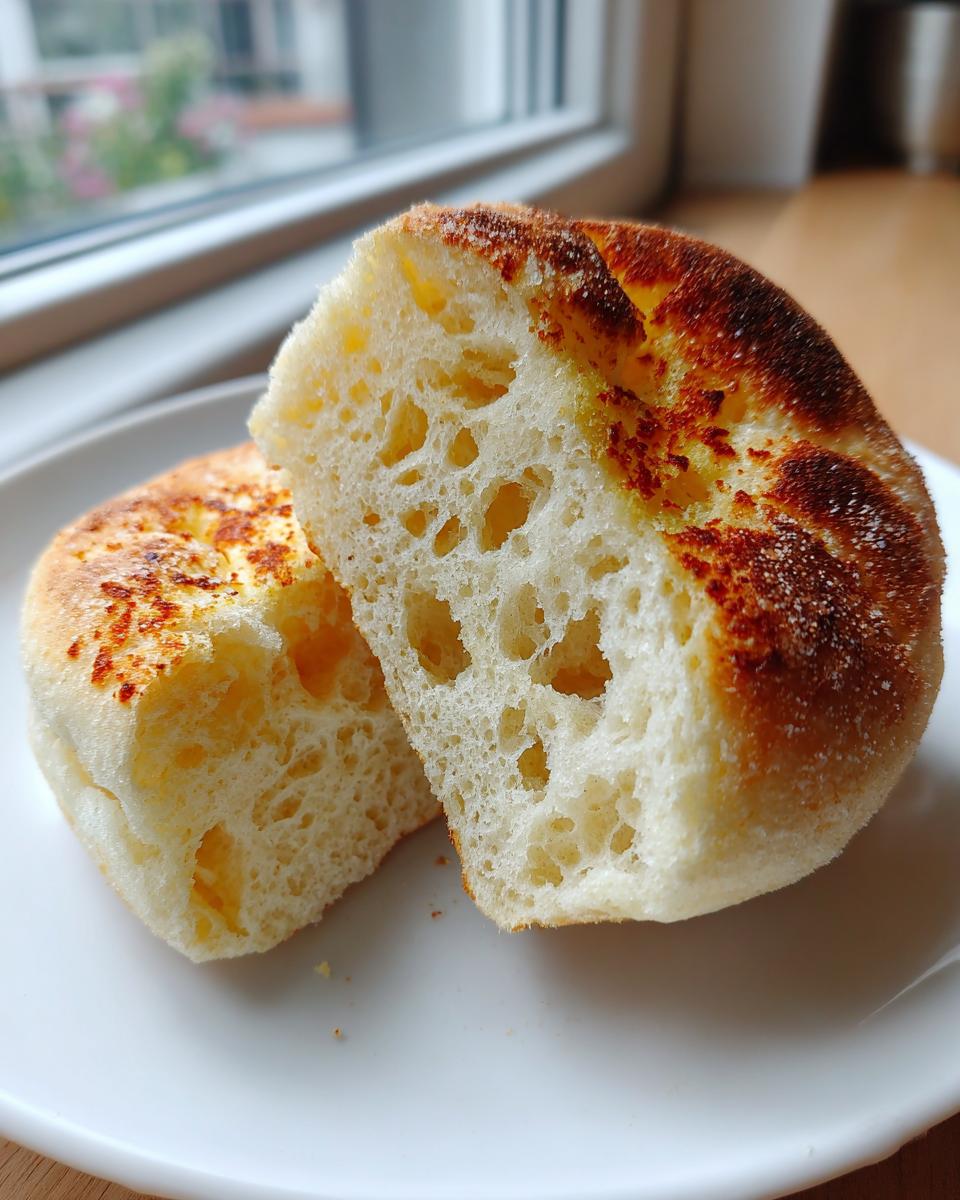
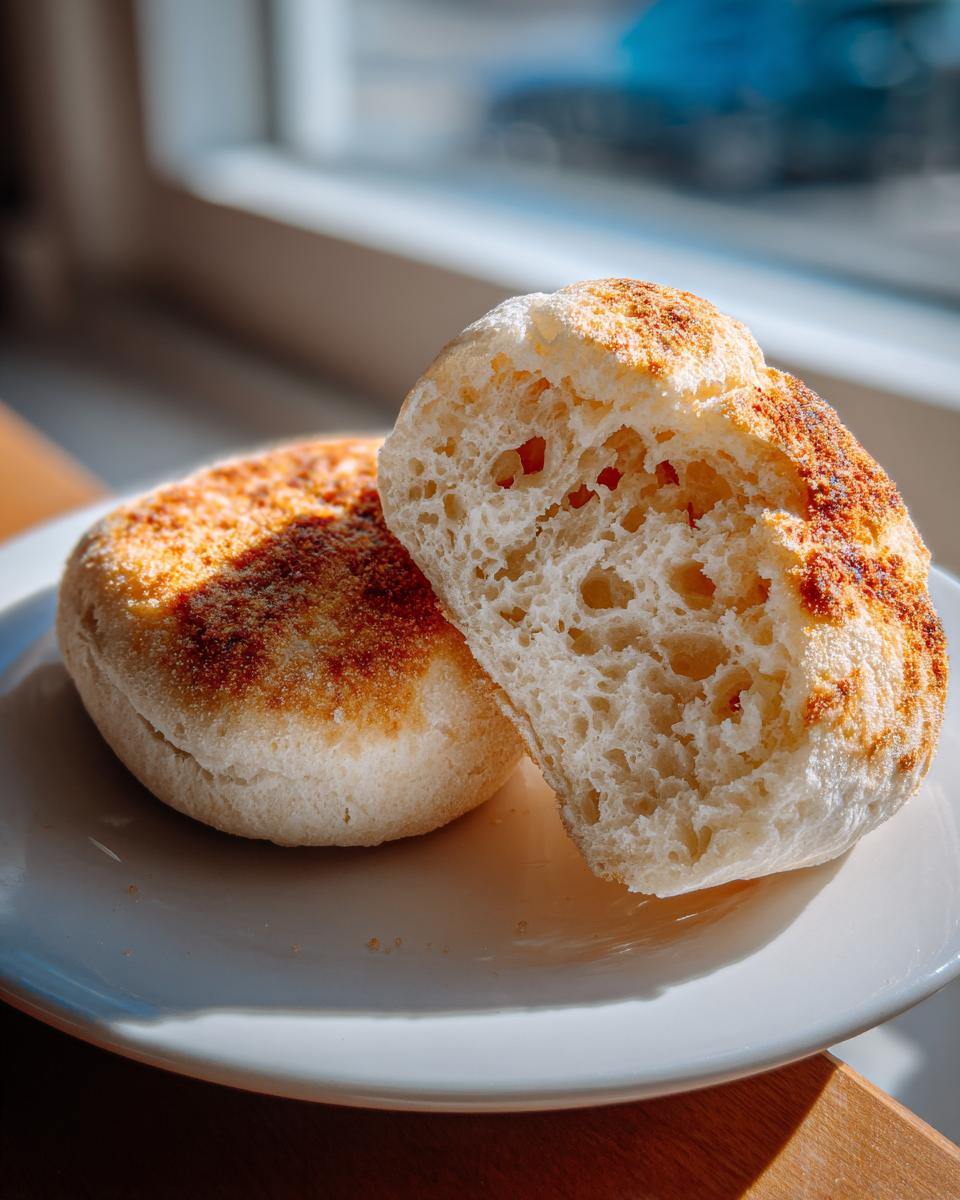
Achieving Perfect English Muffin Nooks and Crannies
The signature English Muffin Nooks and Crannies? They are absolutely non-negotiable! The real secret here is keeping your heat low and slow when you cook them on the skillet. Don’t rush them! If the heat is too high, the outside burns before the inside steams open. That steaming action is what creates those beautiful air pockets inside. Trust me, we’ll revisit the *other* nooks and crannies secret later, but this low temperature cooking is step one.
Gathering Ingredients for Your English Muffin Recipe
I am so thrilled that you are ready to make these incredible homemade English muffins from scratch! The best part? You likely have most of this on hand already. We are keeping this list super straightforward because complicated ingredients are definitely not my style here at Devour Dish. We need basic staples to create that wonderfully soft dough. Just make sure your water is the perfect temperature when you start the yeast; that warmth is crucial for waking up the yeast and getting that beautiful rise we need for fluffy English muffins.
- 1 cup warm water (105-115°F)
- 2 1/4 teaspoons active dry yeast
- 1 tablespoon granulated sugar
- 3 cups all-purpose flour, plus more for dusting
- 1 teaspoon salt
- 1/4 cup cornmeal, for dusting
- Butter or cooking spray, for griddle
Once these are done, if you need something amazing to slather on top, you absolutely have to try my easy homemade garlic butter. It’s heavenly on a toasted muffin!
Step-by-Step Instructions for Stovetop English Muffins
Okay, let’s get baking! Making these easy English muffins is more about waiting patiently than intense physical work. Since this is a no-knead dough, you just mix it up and let the yeast do the heavy lifting. Remember what I said about the heat? We are keeping everything gentle so we don’t burn the outsides before the magic happens inside. Just follow these steps closely, and you’ll be amazed at how quickly you go from simple flour to beautiful, fluffy English muffins. If you love this hands-off approach, you should look at my recipe for easy homemade bread bowls too!
Activating Yeast and Mixing the Dough for Soft English Muffins
First things first, we have to wake up our yeast. In your big bowl, pour in that warm water, the sugar, and the yeast. Give it a quick stir, and then seriously, just walk away for five to ten minutes. We are looking for a foamy top—that milky layer tells you the yeast is alive and well! Once it’s bubbly, toss in your flour and salt. Use a sturdy wooden spoon and stir until you have a shaggy mess. Stop when it’s just combined. I mean it—do not overmix! This is the secret to getting those soft English muffins; we don’t want to develop any tough gluten strings here.
First Rise and Shaping Your From Scratch English Muffins
Now we need the dough to puff up. Cover that bowl tightly and put it somewhere warm for about an hour to an hour and a half. It needs to double in size. Once it’s nice and puffy, lightly flour your counter and gently scrape the dough out. Don’t punch it down hard, just pat it gently into a half-inch thick rectangle. Grab your 3-inch round cutter, and start punching out those raw english muffins! If you end up with scraps, just pat them together gently and cut out a few more. Waste not, want not!
The Crucial Second Rest and Skillet English Muffins Cooking
Take a rimless baking sheet and dust it really well with cornmeal; this stops them from sticking and gives them a nice bottom texture. Arrange your cut rounds on the cornmeal and cover them loosely. They need one final, short rest—about 30 minutes. Preheat your skillet or griddle over medium-low heat. Yes, medium-low! We are cooking these skillet English muffins low and slow for about 8 to 10 minutes per side until they look beautifully golden brown. If they start darkening too fast, pull that heat down immediately!
Tips for Perfect Homemade English Muffins Every Time
You’ve cooked these beauties on the griddle, and now they smell exactly like a cozy bakery! But wait—don’t grab that serrated knife just yet. To really nail the homemade English muffin experience, we need to handle the final splitting step correctly. That’s what separates a decent homemade muffin from a truly stellar one. I’ve got a couple of quick pointers to ensure you get the softest, most porous interior possible, which is vital for soaking up butter or enjoying them in a weeknight dinner—oh wait, no, I mean breakfast! If you want to see another successful recipe, check out this recipe link for inspiration.
Splitting Your English Muffin: The Secret to Texture
This is mandatory, folks: You simply cannot slice your english muffin with a knife! A knife squishes and flattens all those beautiful air pockets and ruins your signature nooks and crannies right at the cutting surface. Instead, once your muffin is toasted and perfectly hot, lay it cut-side up and use a fork to prick and gently tear the edges apart. It sounds fussy, I know, but this technique physically separates the crumb structure, creating those little valleys and hills that hold melted goodness. This is the trick professionals use for the best texture!
Storage and Make-Ahead Options for Your English Muffins
Okay, I always recommend making a double batch because, let’s be real, these disappear fast! If you somehow manage to have leftovers, good news: these homemade English muffins are wonderfully freezer friendly bread. The most important thing is that they must be completely cool on the wire rack before packaging them up. If you seal them while they’re warm, that steam turns into soggy spots, and nobody wants that!
Once they are totally cool, stack them up and toss them into a heavy-duty freezer bag. Squeeze out as much air as you can before zipping it shut. They stay perfect for about three months. When you need one, just pull it out the night before and let it thaw on the counter, or you can reheat them straight from frozen right into the toaster. It’s genius! For more great make-ahead ideas, check out my thoughts on freezing leftovers from my easy one-pan chicken and rice casserole—though I doubt you’ll have any leftover muffins!
For shorter storage, keep them in an airtight container at room temperature for about three days. If you want to see how another great blogger handles their leftovers, check out this link!
Creative Ways to Serve Your Fluffy English Muffins
Now that you have mastered the art of making the best English muffin recipe, the real fun begins: eating them! Because these are soft, fluffy English muffins, they go way beyond just toast and jam—though that is a delightful way to start. Since we are making bakery-style muffins right here, we need to treat them like they are special. And they are! They are perfect for elevating your regular breakfast or making a weekend brunch feel fancy without needing hours of work.
The Ultimate English Muffin Sandwich
Forget those thin, cardboard discs you get in the store for your breakfast sandwiches. When you use these homemade versions, you’re creating something truly legendary. Toast your split muffin halves until they are just slightly crisp on the edges. Then, load it up! I love a classic combo of crispy bacon, a perfectly fried egg, and a slice of sharp cheddar cheese melting right into those nooks and crannies. It’s an instant upgrade!

But don’t stop at breakfast! These muffins are amazing tools for so many meals. You can turn them into mini pizzas—just top with sauce, mozzarella, and pepperoni and bake until bubbly. Or, if you want something sweet and decadent, try using them as the base for my stuffed French toast recipe instead of regular bread. The texture holds up beautifully to all that egg batter.
Common Questions About Making English Muffins
When you’re venturing into making bread from scratch, especially something as specific as these stovetop English muffins, you’re bound to have questions. That’s totally normal! I remember the first few times I tried, I worried mine would end up flat discs instead of my dream fluffy English muffins. Don’t stress; I’ve gathered the most common issues right here so you can move forward with confidence. This troubleshooting guide will help you ensure your next batch is the best English muffin recipe you’ve ever tried!
Why are my homemade English muffins flat instead of fluffy?
If your muffins came out flat, it’s almost always one of two things, or maybe both! First, check your yeast; if it wasn’t foamy, it wasn’t active enough, meaning the dough didn’t rise properly. Second, and this is a big one, did you flatten the dough too much when you patted it out? We only want it about a half-inch thick. If you press it down harder than that, you squeeze out the air created during that first rise. For truly fluffy English muffins, handle that dough gently!
Can I use milk instead of water in this recipe?
That’s a great question for anyone looking to make easy English muffins! You absolutely can swap in milk for the warm water. But here’s my tip: if you use milk, lukewarm milk works best—it shouldn’t be hot, or you’ll shock the yeast. Using milk will make your final product a touch richer and softer, almost more like a traditional dinner roll texture, but it works wonderfully! If you want to experiment with other flavors, you can always check out my recipe for chicken tinga—just kidding again! Stick to the basics for this one, though milk is a valid swap.
What if I want to skip the second rest period?
I totally understand wanting to speed things up when you’re hungry for a toasted english muffin! However, that second 30-minute rest is really important because it lets the gluten relax after you cut the rounds. If you skip it, those rounds might shrink a bit when they hit the hot griddle, and they won’t puff up as nicely in the middle. You might still get nooks and crannies, but they won’t be as light or as evenly cooked. If you really must skip it, make sure that griddle is set to the lowest possible temperature!
Why is cornmeal used on the baking sheet?
The cornmeal isn’t just for looks, although it does give them that authentic bakery look! It acts as a protective barrier against the direct heat of your griddle. Without it, the bottom of the english muffin sticks right to the metal and burns before the inside cooks through. That cornmeal keeps the bottom perfectly golden and prevents sticking, ensuring your stovetop English muffins stay soft all the way through. For more great baking tips, you can read this article.
Estimated Nutritional Data for One English Muffin
When we bring these delicious homemade english muffins into our lives, it’s important to know what we’re eating! I want to be totally upfront here: since every single ingredient—from how much flour you dust with to the exact brand of yeast you use—can slightly shift the final totals, this data is an estimate based on breaking down the full recipe for all ten muffins. This is helpful for tracking your breakfast, but remember it’s a guideline!
Compared to the overly processed store-bought versions, I find these homemade delights offer a much better texture and cleaner ingredients profile. Here is what you can generally expect for one serving of these fluffy English muffins:
- Calories: Around 180
- Fat: Just about 1 gram
- Carbohydrates: Roughly 37 grams
- Protein: About 5 grams
- Sugar: Very low, usually 1 gram (mostly from the sugar needed to feed the yeast!)
See? Simple ingredients lead to simple, satisfying numbers. Enjoy them toasted!
Share Your Homemade English Muffin Creations
Whew! You did it! You created perfect, fluffy English muffins from scratch, likely right on your stovetop! I hope your kitchen smells incredible right now. Making food that brings comfort and joy to your table is exactly why I started Devour Dish, and knowing you successfully made these superior breakfast breads makes my day.
I absolutely want to see what you created! Did they come out looking perfectly golden? Did you follow my instructions and use a fork to split them open and get those amazing nooks and crannies? Head down to the comments right now and leave a rating for the recipe.
And tell me this: what was the very first thing you spread on that warm, toasted homemade English muffin? Was it simple butter, a layer of homemade jam, or maybe you smothered it in my easy, smooth chocolate frosting (hey, dessert for breakfast counts sometimes, right?). Hearing about your creations helps other bakers feel confident to try this recipe next. Happy cooking, and thank you so much for trusting me with your brunch plans!
Print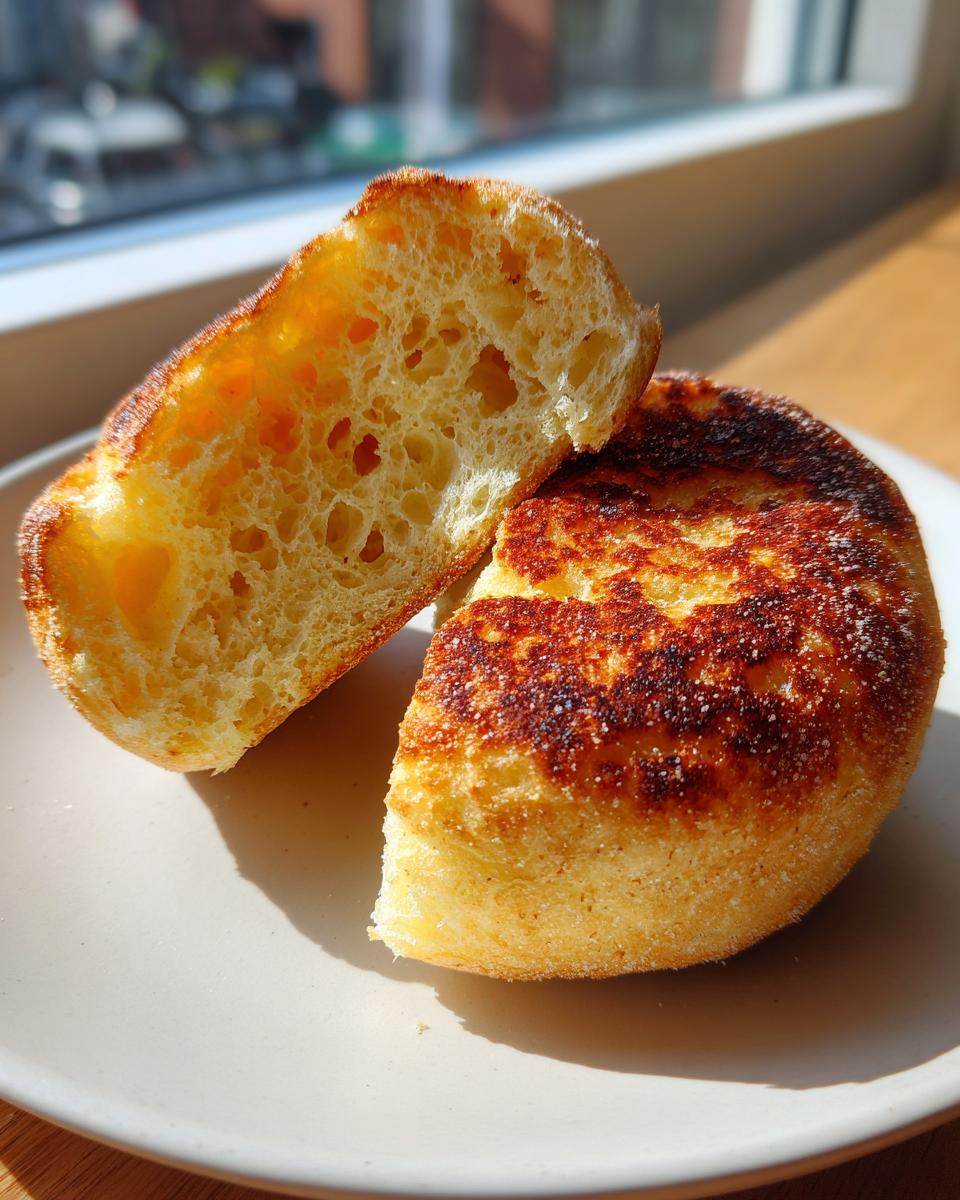
Fluffy Homemade English Muffins with Classic Nooks and Crannies

You can make soft, fluffy homemade English muffins right on your stovetop. This easy recipe delivers those signature nooks and crannies that hold melted butter perfectly, making them better than store-bought.
- Prep Time: 20 min
- Cook Time: 25 min
- Total Time: 1 hour 55 min
- Yield: About 10 muffins 1x
- Category: Breakfast Bread
- Method: Stovetop Cooking
- Cuisine: American
- Diet: Vegetarian
Ingredients
- 1 cup warm water (105-115°F)
- 2 1/4 teaspoons active dry yeast
- 1 tablespoon granulated sugar
- 3 cups all-purpose flour, plus more for dusting
- 1 teaspoon salt
- 1/4 cup cornmeal, for dusting
- Butter or cooking spray, for griddle
Instructions
- In a large bowl, combine the warm water, yeast, and sugar. Let this mixture sit for 5 to 10 minutes until it becomes foamy. This shows your yeast is active.
- Add the flour and salt to the yeast mixture. Stir with a wooden spoon until a shaggy, sticky dough forms. Do not overmix; this is a no-knead dough.
- Cover the bowl with plastic wrap and let the dough rise in a warm place for 1 to 1.5 hours, or until it has doubled in size.
- Lightly flour a clean work surface. Gently scrape the dough out onto the surface. Dust the top of the dough lightly with flour. Pat the dough out into a rectangle about 1/2 inch thick.
- Using a 3-inch round cutter, cut out the English muffins. Gather the scraps, gently pat them together, and cut out any remaining rounds.
- Sprinkle cornmeal liberally over a baking sheet or rimless cookie sheet. Place the cut dough rounds onto the cornmeal, spacing them slightly apart.
- Cover the rounds loosely with plastic wrap and let them rest for 30 minutes. This second rise is important for texture.
- Heat a large, heavy-bottomed skillet or griddle over medium-low heat. Lightly grease the surface with butter or cooking spray.
- Carefully place the dough rounds onto the hot griddle. Cook for 8 to 10 minutes per side. You are looking for a golden-brown color, not a deep brown. Adjust the heat as needed to prevent burning; low and slow cooking helps develop the interior texture.
- Once cooked, remove the English muffins from the griddle. Let them cool completely on a wire rack.
- To achieve the classic nooks and crannies, split the cooled muffins using a fork around the edges, rather than slicing with a knife.
- Toast before serving with your favorite spreads or use them for breakfast sandwiches.
Notes
- For the best ‘nooks and crannies’, avoid slicing the muffins with a knife; always use a fork to split them open after toasting.
- These homemade English muffins freeze well. Cool them completely, place them in a freezer-safe bag, and freeze for up to 3 months. Thaw overnight or reheat directly from frozen.
- If you want a slightly tangier flavor, consider using a sourdough starter instead of commercial yeast.
Nutrition
- Serving Size: 1 muffin
- Calories: 180
- Sugar: 1
- Sodium: 250
- Fat: 1
- Saturated Fat: 0.5
- Unsaturated Fat: 0.5
- Trans Fat: 0
- Carbohydrates: 37
- Fiber: 1
- Protein: 5
- Cholesterol: 0