
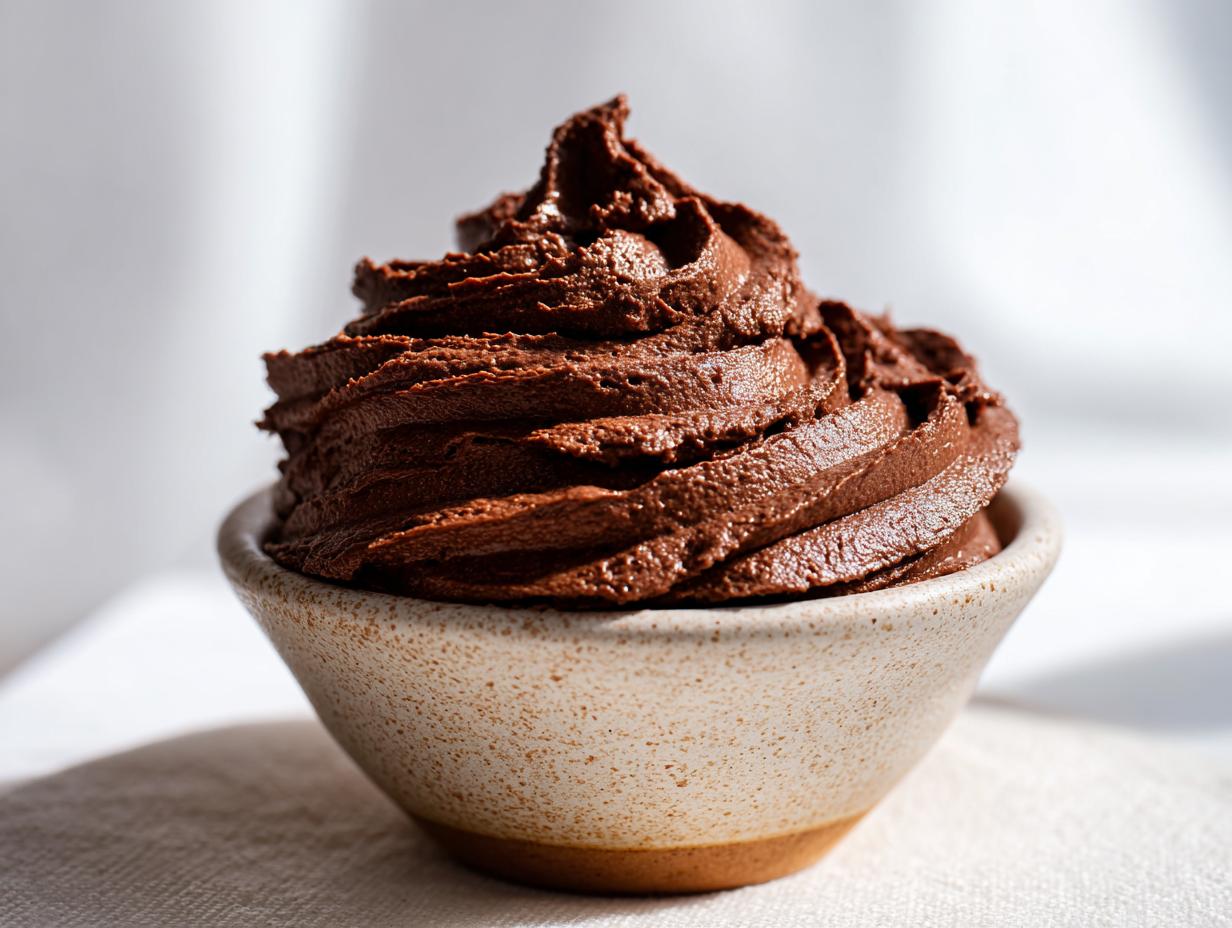
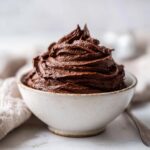
Oh, the frosting hunt! Haven’t we all been there? You’ve baked the perfect cake—maybe even Avery’s moist vanilla cupcakes—and you need a topping that doesn’t clump, doesn’t taste like pure sugar, and actually spreads like a dream. For years, I wrestled with stiff, grainy concoctions. But I found the answer, and it’s now my go-to for every birthday, celebration, or secret Tuesday night brownie craving. I call this the Ultimate Silky Chocolate Buttercream Frosting Recipe because it truly delivers on richness and that perfect, decadent texture. This isn’t just any chocolate frosting; it’s the smooth, reliable superstar of my Devour Dish kitchen!
- Why This Is the Best Chocolate Frosting Recipe You Will Ever Make
- Ingredients for Your Silky Chocolate Frosting
- How to Prepare the Ultimate Chocolate Frosting
- Making Your Fluffy Cake Icing Look Professional
- Ingredient Notes and Substitutions for Chocolate Frosting
- Storage and Reheating Instructions for Homemade Frosting
- Troubleshooting Common Chocolate Frosting Issues
- Frequently Asked Questions About This Chocolate Frosting
- See What Else You Can Make With This Frosting
Why This Is the Best Chocolate Frosting Recipe You Will Ever Make
I know, I know. Everyone claims they have the “best chocolate frosting recipe,” but mine is different because it’s dependable. You never have to worry about splitting or getting that gritty mouthfeel when you pair it with something special, like my famous red velvet cupcakes. This rich chocolate buttercream sets the gold standard for flavor versus texture. It tastes deeply chocolatey without being overwhelmingly sweet, which is a common pitfall I worked hard to avoid.
When you need a frosting that pipes beautifully or spreads easily over a whole cake, this is the one you need in your arsenal. It holds its shape, but melts perfectly on your tongue, just like good homemade icing should.
- It is incredibly reliable—no secret stabilizers needed!
- It uses simple ingredients you likely have right now.
- It achieves that perfect balance between fluffy height and dense richness.
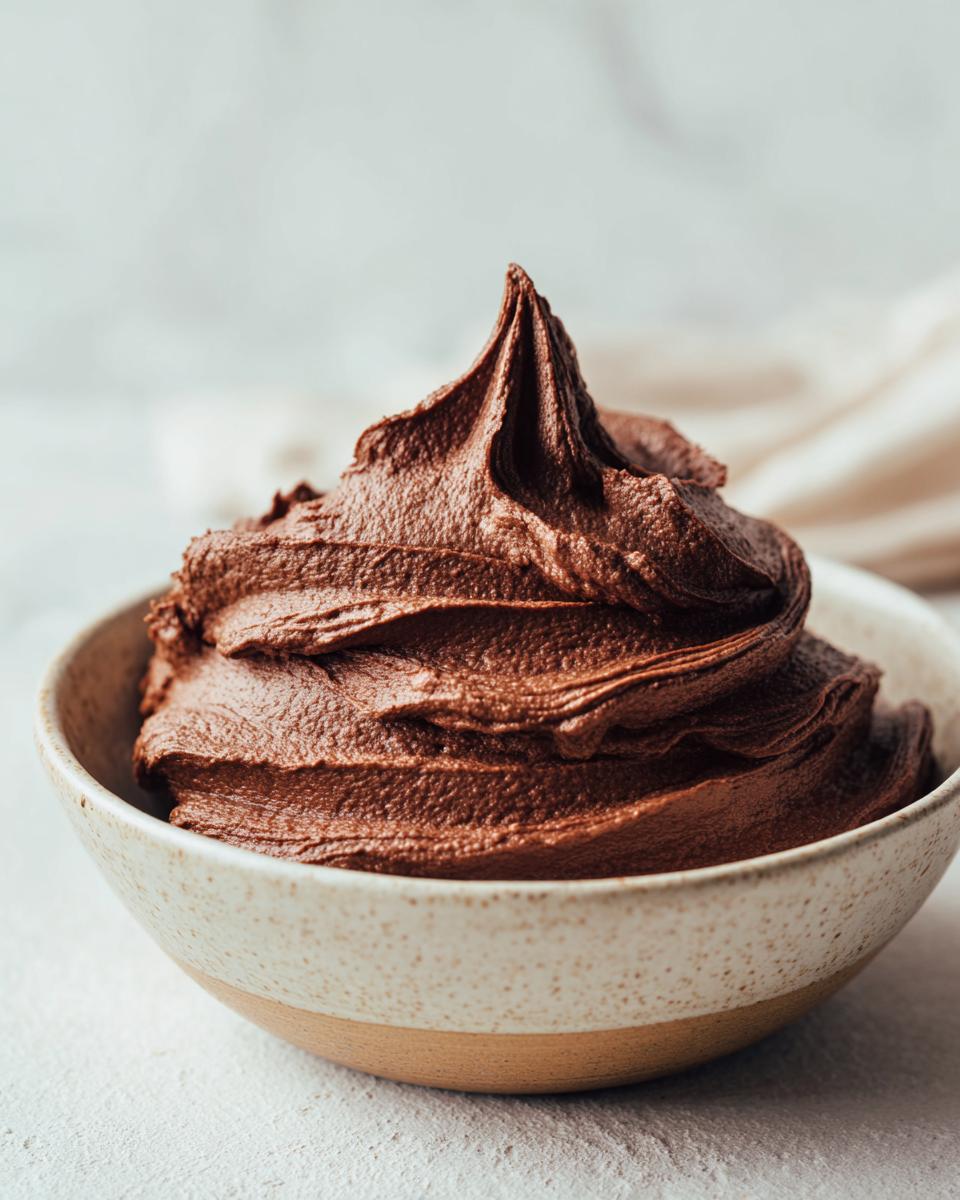
Achieving Silky Smooth Texture Every Time
The secret to avoiding that dreaded graininess is twofold, trust me. First, you MUST sift your powdered sugar. It might seem like an extra step, but those little clumps will ruin your smooth finish. Second, we beat the butter until it’s legitimately light and pale before adding anything else. That aeration is crucial; it incorporates air gently, ensuring a fine, silky crumb structure instead of a heavy, dense sludge.
Quick Dessert Topping Ready in Minutes
I developed this recipe partially because I get impatient! Who wants to wait an hour for frosting? This decadent chocolate topping is genuinely ready to go in about 10 minutes total prep time. It’s proof that you don’t need hours to make a luxurious, bakery-quality chocolate frosting. It’s the best way to spin those quick desserts into something spectacular.
Ingredients for Your Silky Chocolate Frosting
Okay, let’s talk about what goes into this amazing creation. The beauty of this chocolate frosting is that it relies on pantry staples, but their preparation is key! I highly recommend having everything measured out before you even turn on the mixer. We aren’t looking for any frantic searching mid-beat—that’s how you end up with lumpy frosting! I always use my favorite digital scale for the sugar, but spoons work just fine if you’re careful with leveling.
This batch is perfect for topping one standard 9-inch layer cake or, if you are icing a batch of my cupcakes, you’ll get enough for about 18 beautiful swirls.
- 1 cup unsalted butter, and look, it needs to be softened—really softened!
- 3/4 cup unsweetened cocoa powder (the better the quality, the richer the taste, honestly).
- 4 cups powdered sugar, and this absolutely must be sifted beforehand—no exceptions!
- 1 teaspoon vanilla extract (Use the good stuff here, if you have it!).
- 1/4 cup milk or heavy cream (Heavy cream gives it a little extra richness, but milk works great too).
- 1/4 teaspoon salt (Don’t skip this! It balances the sweetness).
If you’ve ever made my classic vanilla buttercream, you’ll notice the base is similar, but that cocoa powder really pulls it into decadent territory!
How to Prepare the Ultimate Chocolate Frosting
Now for the fun part—mixing! This is where we transform simple items into your new favorite chocolate frosting. You’ll need your trusty electric mixer for this one; hand-whisking this volume of powdered sugar can lead to serious arm fatigue! Remember, like the texture instructions mentioned earlier, the quality of your butter is key. It should be soft enough to dent easily but cool to the touch—definitely not greasy or melted. Follow these steps precisely, and you’ll have a gorgeous topping ready for coating your cakes or piping onto other easy homemade frosting projects!
- First things first: Grab that softened butter and beat it solo in your clean mixer bowl. Don’t add anything else yet! We want it light, fluffy, and pale, which takes about two solid minutes. This step is non-negotiable for airy results.
- Next, gently rain in that cocoa powder. Beat it in until it’s fully incorporated with the butter. Stop, scrape down the sides really well, and make sure there are no dry pockets of cocoa hiding out.
- This next part needs patience! Add the sifted powdered sugar slowly—cup by cup—mixing on the lowest speed possible until *just* combined. If you dump it all in, you risk a powdered sugar cloud explosion in your kitchen. Seriously, start low!
- Finally, pour in your vanilla and salt, add your milk or cream, and turn the mixer up to medium speed. Let it whip! Beat this for a good three to five minutes until it looks light, utterly smooth, and ready to spread.
Tips for Perfecting Your Rich Chocolate Buttercream
If you’ve followed the steps, you should be staring at a container of heavenly rich chocolate buttercream just waiting to top your dessert. But just in case, here are my golden rules to make sure it’s perfect the first time. These are the notes I scribbled on my recipe card years ago!
- Butter temperature is everything. If it’s too soft, your frosting will be soupy, not fluffy.
- Always, always sift that powdered sugar. I can’t stress this enough if you want that restaurant-quality smooth chocolate topping for cakes.
- Remember the yield: This amount covers one nice 9-inch layer cake or about 18 standard cupcakes. Adjust if you’re tackling a huge sheet cake!
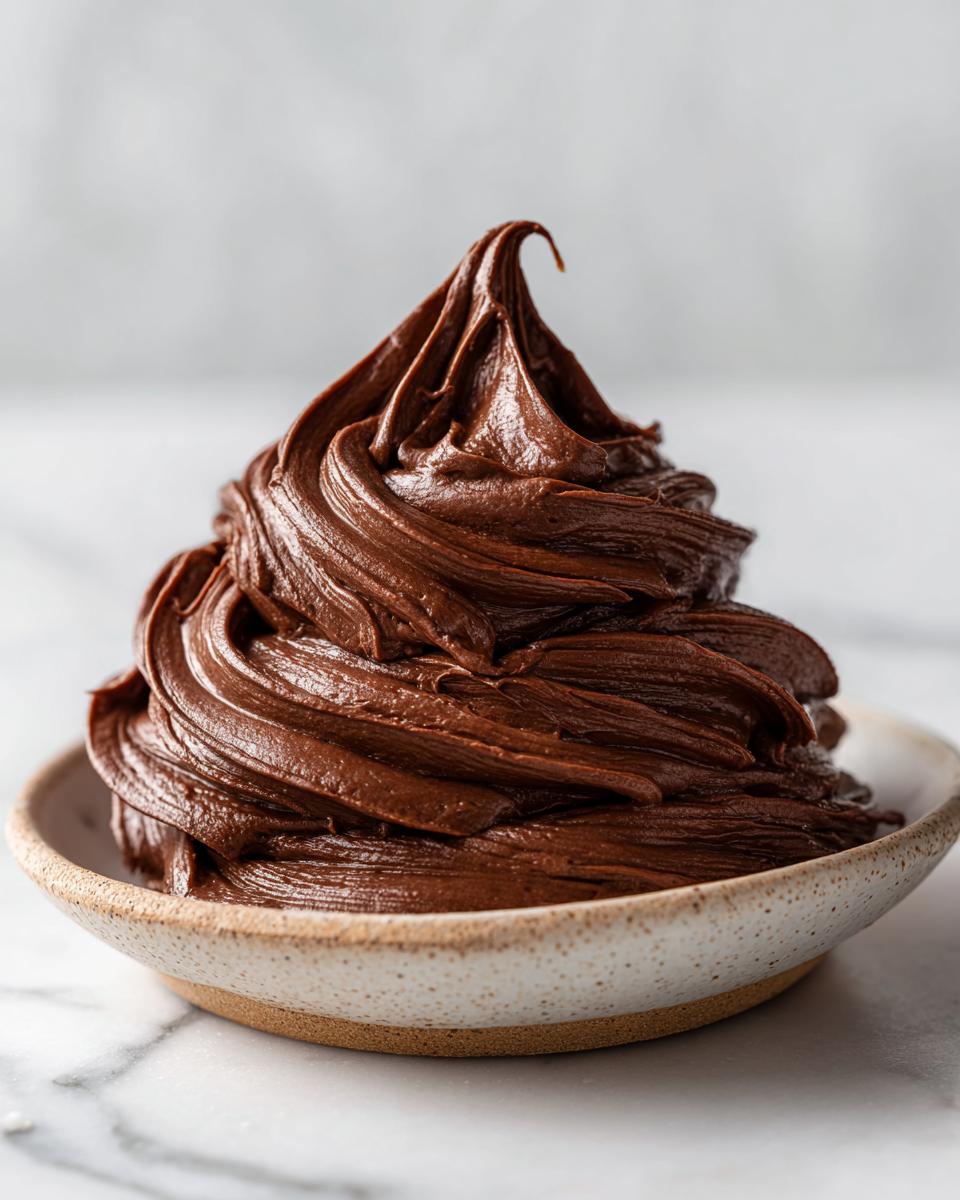
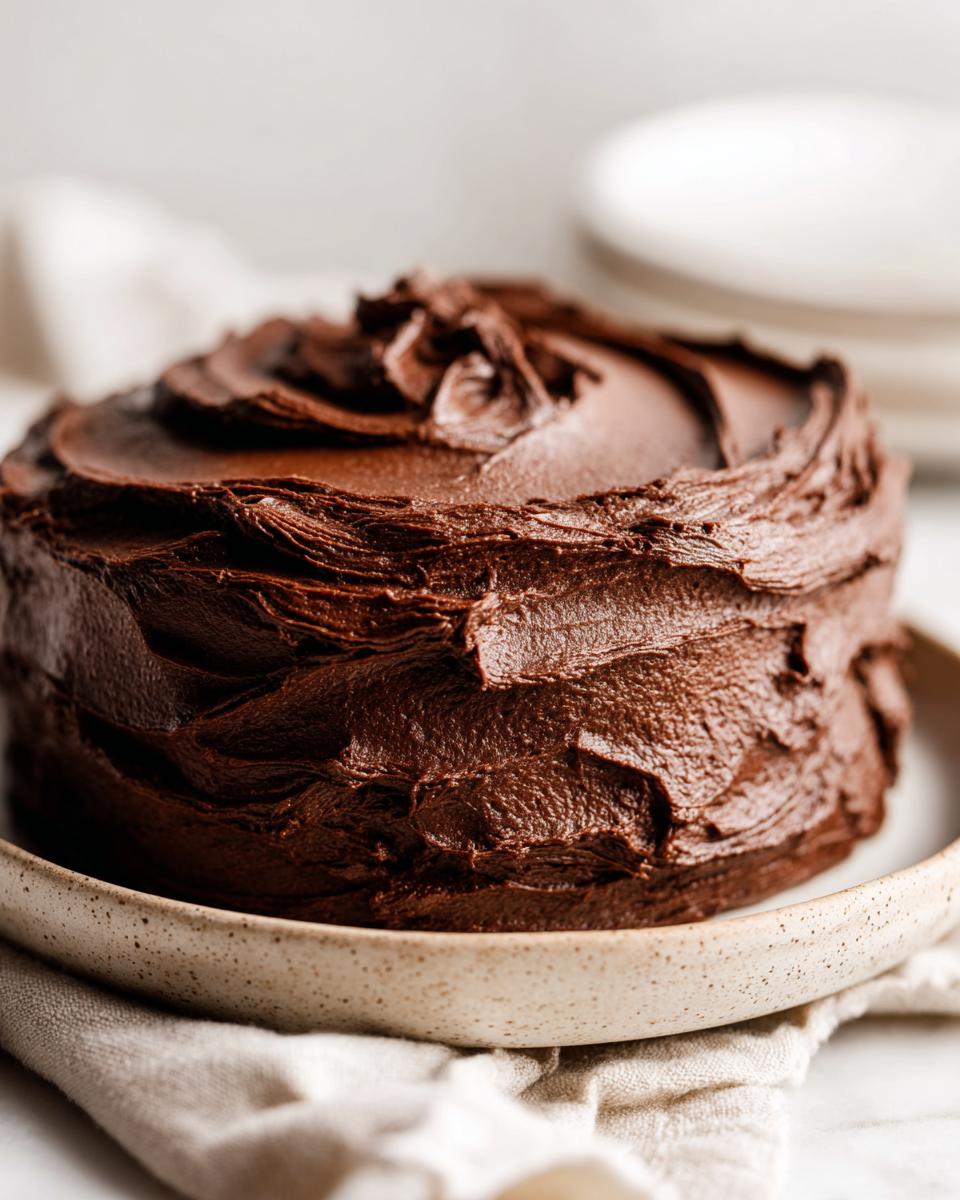
Making Your Fluffy Cake Icing Look Professional
Okay, you have this gorgeous, fluffy cake icing ready to go—don’t mess it up now! The moment you move this silky batch from the bowl to the cake, that’s when the magic happens. This chocolate frosting is fantastic for a simple, rustic spread over a sturdy layer cake, but it truly shines when piped onto cupcakes. If you want those gorgeous bakery swirls, make sure your frosting is slightly stiffer; if it seems too soft after the mixing stage, just whisk in one more tablespoon of powdered sugar.
While this recipe is perfect as is, sometimes you want a little extra flair. If you’re aiming for those tall swirls that look like they came from a professional bakery, using a piping bag with a large star tip (like a Wilton 1M) makes you look like a total pro, even if you’re just starting out! This is easily the best frosting for cupcakes because it holds those delicate ridges beautifully, unlike thinner glazes.

If you’re planning on frosting one of my fluffy vanilla cupcakes, let them cool completely first. Warm cake equals melted, sad frosting windows! Don’t rush this final step; take a moment to make it look as decadent as it tastes.
Ingredient Notes and Substitutions for Chocolate Frosting
One of the great things about this chocolate frosting is its flexibility, even though I stand by the core recipe! People often ask me about substitutions, especially when they are halfway through and realize they are out of heavy cream. If you use regular milk instead of cream, your frosting will be slightly lighter, which is totally fine, but you might need to add a tablespoon more powdered sugar to keep that perfect consistency.
Now, let’s talk cocoa powder, which really impacts the final color and flavor of your chocolate frosting. If you use natural unsweetened cocoa, you get a brighter, slightly tangier chocolate flavor. If you swap it for Dutch-processed cocoa (which is darker), your frosting will be much deeper brown and taste richer, almost like a homemade chocolate sauce. Both work wonderfully in this buttercream, but try Dutch-processed if you want maximum dark chocolate intensity!
Storage and Reheating Instructions for Homemade Frosting
Good news! This fantastic frosting keeps beautifully. If you have leftovers after topping your dessert, store your chocolate frosting in a fully airtight container. If you plan to use it within a day or two, room temperature is fine, provided your kitchen isn’t super warm. For longer storage, pop it into the fridge for up to a week.
When you pull that chilled container out, don’t panic if it looks rock hard! Just let it sit on the counter for about an hour to warm up slightly. If you’re in a rush, you can give it a quick 10-second zap in the microwave, but you MUST transfer it to a clean bowl first. Afterward, it needs a good, vigorous re-whip with your mixer to bring back that beautiful, fluffy texture it had right after mixing.
Troubleshooting Common Chocolate Frosting Issues
Even the best chocolate frosting recipe can throw a tiny curveball sometimes! Don’t sweat it if you run into a hiccup; fixing it is usually way easier than you think. The most common thing I hear is, “Avery, my frosting is way too sweet!” The immediate fix? Add a tiny pinch—seriously, just a little shake—of salt. Salt activates the chocolate flavor and cuts through that raw sugar sensation instantly.
What if your mixer is whipping away, and the frosting just looks totally liquid? That means it’s too thin! Resist the urge to panic and just start adding powdered sugar, one tablespoon at a time, until it firms up. If you’re having the opposite problem and your chocolate frosting is stiff and won’t spread, warm up your mixing bowl with your hands or add milk back in, just half a teaspoon at a time until it loosens up to your preferred consistency.
Frequently Asked Questions About This Chocolate Frosting
I get asked so many great questions about this recipe—it’s clear you all want that flawless finish! Here are some of the most common ones I hear about getting the best chocolate frosting recipe just right for your treats.
Can I make this chocolate frosting ahead of time?
Yes, absolutely! You can certainly prepare this easy homemade frosting a day or two in advance. Store it in the fridge in an airtight container. Just remember, it will firm up a lot when cold. Before using it to decorate, let it sit on the counter until it softens a bit, and then give it a quick whip with your mixer again to bring back that glorious fluffy texture!
What if I don’t have an electric mixer? Is this an old fashioned chocolate icing style?
If you’re aiming for truly old fashioned chocolate icing, you might actually be looking for a stovetop fudge frosting, but this buttercream *can* be done by hand if you have strong arms! I strongly recommend a hand mixer or stand mixer for the full five minutes needed to incorporate the air that makes it fluffy. If you use a whisk, you’ll need serious elbow grease to get that smooth texture we are aiming for.
Can I turn this into a chocolate fudge frosting recipe instead?
While this is a beautifully rich buttercream, it’s not quite a classic fudge frosting. For that deeply dense, melt-in-your-mouth experience, I actually have a dedicated chocolate fudge frosting recipe that skips some of the butter and uses a slightly different technique. If you want to stick with this one, the easiest way to make your chocolate frosting richer is simply using dark cocoa powder or adding an extra tablespoon of cream!
What’s the ideal consistency for piping decorations?
If you’re planning on making beautiful swirls for your no-fail chocolate icing moment on cupcakes, you want it on the thicker side. After the initial three-to-five-minute beat, if you feel it’s too soft, add one more tablespoon of powdered sugar. If you’re looking for quicker tips, check out what other bakers are doing on sites like Freddy Recipes for inspiration!
See What Else You Can Make With This Frosting
I just love seeing what delicious creations you all bring to life with this recipe! I hope this chocolate frosting moves to the top of your favorites list for topping everything from brownies to my chocolate pecan pie. Please let me know in the comments below what you ended up using your smooth chocolate topping for cakes on! Don’t forget to leave a star rating—it helps me know what you love.
Happy Cooking, Avery Collins
PrintThe Ultimate Silky Chocolate Buttercream Frosting Recipe
You need this easy chocolate buttercream frosting recipe for perfectly smooth, rich topping on your cakes and cupcakes. It is quick to make and tastes decadent.
- Prep Time: 10 min
- Cook Time: 0 min
- Total Time: 10 min
- Yield: About 3 cups 1x
- Category: Dessert Topping
- Method: Mixing
- Cuisine: American
- Diet: Vegetarian
Ingredients
- 1 cup unsalted butter, softened
- 3/4 cup unsweetened cocoa powder
- 4 cups powdered sugar, sifted
- 1 teaspoon vanilla extract
- 1/4 cup milk or heavy cream
- 1/4 teaspoon salt
Instructions
- Beat the softened butter in a large bowl with an electric mixer until it becomes light and fluffy, about 2 minutes.
- Add the cocoa powder to the butter mixture and beat until fully combined. Scrape down the sides of the bowl.
- Gradually add the sifted powdered sugar, one cup at a time, mixing on low speed until incorporated.
- Add the vanilla extract, salt, and milk or cream. Beat on medium speed for 3 to 5 minutes until the frosting is light, fluffy, and smooth.
- If the frosting is too thick, add more milk, one teaspoon at a time. If it is too thin, add more powdered sugar, one tablespoon at a time.
- Use immediately to frost your favorite cakes, cupcakes, or brownies.
Notes
- For the best texture, ensure your butter is truly softened but not melted.
- Sifting the powdered sugar prevents lumps in your final frosting.
- This recipe makes enough frosting for one 9-inch layer cake or about 18 standard cupcakes.
- If you want a richer flavor, use dark cocoa powder.
Nutrition
- Serving Size: 1/4 cup
- Calories: 320
- Sugar: 40g
- Sodium: 55mg
- Fat: 18g
- Saturated Fat: 11g
- Unsaturated Fat: 7g
- Trans Fat: 0.5g
- Carbohydrates: 42g
- Fiber: 1g
- Protein: 2g
- Cholesterol: 45mg