

Oh, the frantic scramble when guests text, “On our way!” I know that feeling—you need something impressive, but your energy reserves are zero. Forget complicated baking or hours of chopping! That’s why I live and die by this very recipe: the Quick and Creamy 10-Minute Whipped Feta and Olive Dip. Seriously, this amazing olive dip is my secret weapon for entertaining. It’s decadent, tangy, and has this incredible whipped texture that tastes way more gourmet than the five minutes of effort it requires. If you want a flavorful appetizer that shocks people because you made it so fast, stick right here with me. And hey, if you love quick dips, you absolutely must check out my guide on easy homemade onion dip from scratch too!

- Why This Quick and Creamy Olive Dip is Your New Go-To Party Dip Ideas
- Gathering Ingredients for Your 10-Minute Olive Dip Recipe
- Step-by-Step Instructions for the Best Olive Dip for Crackers
- Ingredient Notes and Substitutions for Flavorful Olive Spreads
- Tips for Success When Making This Mediterranean Dip
- Make Ahead Appetizers: Storing Your Olive Dip
- Serving Suggestions for Your Savory Spreads for Bread
- Frequently Asked Questions About This Simple Cold Dip
- Estimated Nutritional Snapshot for This Olive Dip
Why This Quick and Creamy Olive Dip is Your New Go-To Party Dip Ideas
When I’m hosting, I need dips that perform. I don’t want to spend an hour fussing over something that’s going to be gobbled up in two minutes flat. That’s the beauty of this whipped dip. It’s the best blend of speed and sophistication, and I promise you, it holds up perfectly on any party spread. We’ve tested this against countless others, and it always wins for reliability!
- It requires zero actual cooking. Zero! This is the ultimate Simple Cold Dip for when the oven is already full of whatever else you’re making.
- It handles sitting out on the appetizer table better than most creamy dips because the saltiness of the feta helps stabilize it.
- It uses pantry staples like olives, making it a fantastic last-minute lifeline.
Seriously, these kinds of reliable, Quick Appetizer Dips are what makes entertaining stress-free for me. If you need another fail-proof party snack, make sure you try my easy sausage pinwheels recipe next!
Ready in 10 Minutes: The Ultimate Quick Entertaining Ideas
I’m not kidding about the time! From the moment you grab the feta to the second you hit the “on” button on the food processor, setting the timer for 10 minutes is usually generous. This speed means you can whip this up while you’re showering or letting your guests arrive. It’s the perfect way to handle those unexpected hosting needs.
Texture and Flavor: Making a Truly Creamy Olive Dip
So, what makes this different from a chunky black olive tapenade? It’s all about the cheese foundation! By using both feta and cream cheese, we create this gorgeously smooth, almost cloud-like consistency. That whipped texture transforms the salty olives into something truly luxurious. This is what earns it the “Wow, this is a rich, Creamy Olive Dip!” reactions every single time.

Gathering Ingredients for Your 10-Minute Olive Dip Recipe
Okay, let’s get the assembly line rolling! When you’re working this fast, having everything measured out and ready to go is crucial. This recipe relies on really balancing the salty intensity of the olives with the tang of the feta and the richness of the oils. Because we aren’t cooking anything, the quality of these simple components really shines through. I always make sure my soft cheese is at room temperature so it blends effortlessly. This is the full manifest for the magic to happen. If you want some background on how great olive oil is, my recipe for olive oil bread dip goes into much more detail!
- 1 cup pitted green olives, drained
- 1 cup pitted black olives, drained
- 8 ounces feta cheese, crumbled
- 4 ounces cream cheese, softened
- 1/4 cup olive oil
- 2 cloves garlic
- 1 tablespoon fresh lemon juice
- 1/2 teaspoon black pepper
See? Not scary at all! Just grab your food processor, and we can move right into the easy part—blending everything until it’s silky smooth.
Step-by-Step Instructions for the Best Olive Dip for Crackers
Alright, we have our ingredients lined up; this is where the magic really happens, and trust me, it is fast. Since this is a true No Cook Dip, the food processor is doing all the heavy lifting for us so you don’t have to worry about any tricky saucepan techniques. We are transforming these components into the Best Olive Dip for Crackers in minutes!
First, you need to load everything into the bowl of your food processor. I just toss it all in there: the green olives, the black olives, the soft cream cheese, the feta, the oil, the garlic, the lemon juice, and that black pepper. Don’t overthink the order; just get it in there.
Now, lock that lid on tight! Turn it on and let it go. You’ll want to process this for about two minutes, stopping along the way. I cannot stress this enough: stop the processor, pull the lid off, and use a rubber spatula to scrape down every bit of cheese and olive clinging to the sides and the blade guard. If you skip this part, you end up with chunks of feta refusing to cooperate. You need to scrape it down at least twice!
Processing for Perfect Whip Consistency
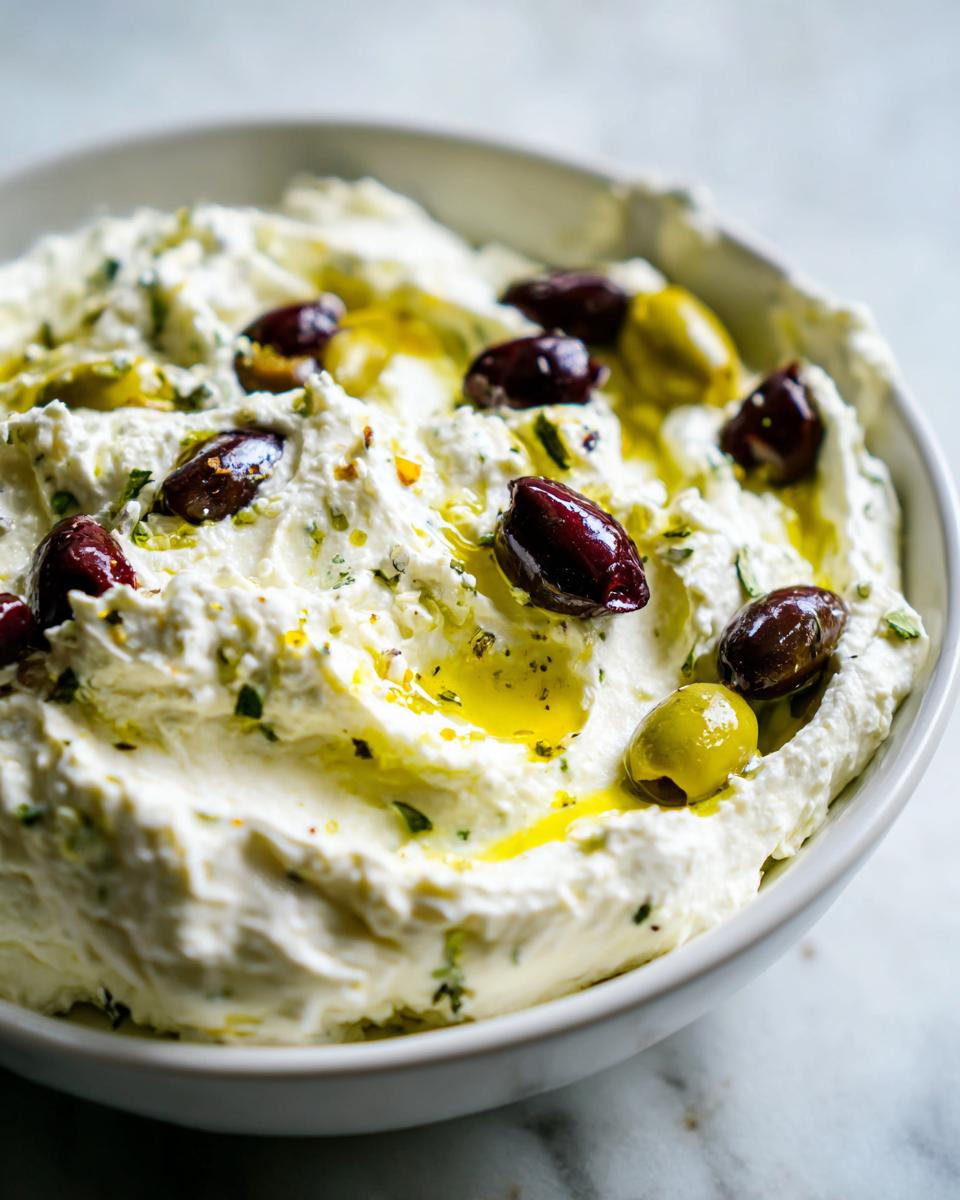
Keep that machine humming! Once you’ve scraped down the sides, give it another minute or two of processing time—I usually count up to three minutes total if the machine needs a little encouragement. This extended blending time is what moves us past a chunky tapenade and into the realm of a gorgeous, velvety texture. That smooth finish is what makes it a truly special Whipped Dip Recipe. When it looks fluffy, light yellow, and completely uniform, you’re done! Turn it off, transfer it to your favorite little bowl, and get ready for praise.

If you’re looking for other highly flavorful spreads that come together fast, check out my recipe for Cowboy Butter dipping sauce—it’s great on steak but amazing as a veggie dipper too!
Ingredient Notes and Substitutions for Flavorful Olive Spreads
Even though this recipe is super simple, a few small touches can really elevate your dip from good to absolutely show-stopping. I get asked all the time if you can swap out the cheese, and the answer is yes! Since this is meant to be one of those great Flavorful Olive Spreads that surprises people, experimenting a little is encouraged, provided you remember the core goal: creaminess.
The recipe calls for feta and cream cheese, but if you’re feeling bold, try this swap: replace half of the feta called for with goat cheese. Trust me on this one! The goat cheese brings a noticeable, beautiful tang that cuts through the saltiness of the olives beautifully. It makes for an even brighter olive dip.
Also, don’t forget the garnishes! I usually just drizzle a high-quality olive oil right over the top just before serving. It adds a glossy look and a fresh, peppery flavor layer. A little sprinkle of fresh parsley on top makes it look totally restaurant-worthy. Speaking of Mediterranean flavors, if you love this profile, you’ll want to try my easy Greek salad recipe for another light, bright side dish!
Tips for Success When Making This Mediterranean Dip
Making a great Mediterranean Dip isn’t just about dumping things in a processor; it’s about the little finishing touches that make people ask if you bought this from a fancy deli. Since this recipe relies on simple, fresh ingredients, those final few steps are what really build trust that this is a reliable recipe worth keeping!
The biggest mistake people make here is serving it straight from the fridge. If you bring this straight out of the refrigerator onto your snack table, it’s going to be too stiff. The cheese mixture seizes up when it gets really cold! I always pull the bowl out onto the counter about 15 minutes before I plan to serve everyone. That little bit of warming time allows the texture to relax back into that beautiful, perfect fluffiness we worked so hard to create in the food processor. That difference is huge!
And please, don’t skip the garnish! This dip looks a little pale when it first comes out, but oil and green always make things look intentional. I finish mine with a generous, looping drizzle of really good, bright green olive oil right over the top surface. It catches the light and looks so appealing. Then, I grab some fresh parsley—chop it coarsely, you don’t want tiny specks—and sprinkle it over the oil. It adds color, freshness, and takes this from a quick snack to a legitimate party centerpiece.
If you want another flavor profile that hits that bright, salty Mediterranean sweet spot, you have to try my easy high-protein Mediterranean bean salad. It’s fantastic alongside this dip for a full spread! And if you are specifically obsessed with that brighter, greener flavor, you can see how my friends at Sweet Caramel Sunday handle their version over at their site.
Make Ahead Appetizers: Storing Your Olive Dip
You know how the best party dips are the ones you *don’t* have to rush to make right before everyone arrives? Well, this olive dip shines as one of the best Make Ahead Appetizers you can keep in your back pocket! This is a lifesaver on busy hosting days.
The recipe’s composition means it keeps beautifully, thanks to the fat content from the cheeses and oil. You can absolutely make this dip, tightly cover it, and tuck it into the fridge where it will be perfectly fine for up to two whole days. That gives you so much breathing room!
But here’s the crucial part—and this is where you earn maximum creaminess points: you can’t serve it stone-cold. When that feta and cream cheese get chilly, they firm up way too much, and you lose that delightful whipped quality we worked for in the food processor. So, plan ahead! Take the container out of the fridge about 15 to 20 minutes before you need it on the table. Just let it sit on the counter while you set out the pita chips. That short time allows the dip to warm just enough so it becomes spreadable, silky, and luscious again. It truly makes all the difference! If you love making things early, you might want to check out my recipe for easy cranberry brie bites; those are another fantastic ‘make-ahead’ winner!
Serving Suggestions for Your Savory Spreads for Bread
So, you’ve made this incredible, no-cook olive dip—now what do you serve it with? This spread is so versatile because while it’s rich and tangy, it melts right into whatever you pair it with. Honestly, I’ve been known just to eat it with a spoon (don’t judge!), but for guests, presentation matters. We need vehicles that can handle that fantastic creamy texture!
For the absolute classic pairing, you cannot beat good quality crackers. I prefer ones that have a bit of a salty crunch to them to contrast the smoothness of the dip. Think water crackers, or even a sturdy butter cracker—whatever works best for you! If you are interested in making your own incredible crackers, I have a recipe for crispy homemade cheese crackers that’s surprisingly easy.
Pita bread is another must-have. I love to warm up soft pita wedges slightly in the oven until they are just pliable and golden. That warmth does wonders to pull out the garlic and lemon notes in the dip. This turns it into a truly fabulous Savory Spread for Bread. If you’ve got pita, you’ve got half a party!
But please, don’t forget the veggies for your guests who might want something lighter! This dip pairs amazingly well with crisp-tender veggies. Think about things that can scoop up a good dollop without breaking. I always include carrot sticks, some thinly sliced cucumber, and maybe some colorful bell pepper strips. These lighter choices really let the bold flavor of this creamy olive dip shine through. It’s the perfect combination for what I call my ‘easy grazing board’.
Frequently Asked Questions About This Simple Cold Dip
I know you might still have a few questions swirling around, especially when you’re trying to plan appetizers quickly! Since this is a Simple Cold Dip and doesn’t involve baking, people often wonder about ingredient swaps or how to store leftovers. I’ve gathered the questions I get the most after serving this to friends!
Can I make this olive dip using only black olives or only green olives?
Absolutely, you can! Remember, the combination is what gives this recipe its fantastic depth of flavor, but sometimes you only have one type on hand. If you use only black olives, the dip will be slightly richer and less tangy. If you use only green olives, it will be sharper and brighter, leaning toward a more traditional tapenade flavor. Just stick to keeping the 1 cup requirement, and you’ll be fine!
Can I warm up this creamy olive dip if I want a baked version?
This is a really common question, and I have to say, please don’t! The whole incredible appeal of this specific recipe is the creamy olive dip texture we achieve by whipping the soft cheeses. If you try to warm or bake this specific mixture, the cheeses will separate, it will become oily, and you’ll lose that lovely whipped quality we worked for in the food processor. If you want warm cheese, you need a different recipe—one heavier on mozzarella or Gruyère. This one is strictly designed to be served cold or at room temperature.
How long does this olive dip last if I have leftovers?
As I mentioned before, this stores wonderfully because of the fats and salts, which act as natural preservatives. Tightly sealed, it will last quite happily in the fridge for up to two days. If you find yourself with leftovers and you want to get them off your ‘to-do’ list fast, this mixture is actually fantastic stirred into a pasta sauce later in the week to boost the savory factor! If you’re looking for other great make-ahead dishes, my recipe for the best bruschetta dip is fantastic for prepping early!
What’s the best way to serve this if I want it to look special?
Presentation really matters for a party dip! Skip the container it was stored in and transfer it to a shallow, attractive serving bowl. Then, use a spoon to create little swoops and valleys across the surface. Before serving, drizzle a good stream of high-quality olive oil over those dips—the oil will pool nicely. Then, scatter some finely chopped fresh parsley over everything for a pop of green. It elevates this simple dip immediately!
For even more fast appetizer inspiration, you can see what my friends over at Midwest Foodie Blog suggest for a basic olive dip recipe if you need simple ideas!
Estimated Nutritional Snapshot for This Olive Dip
I always like to share a general idea of what you’re looking at nutritionally, especially since we are using rich ingredients like feta and cream cheese here alongside all those salty olives! Keep in mind that this is just an estimate, darling. Your exact numbers will shift depending on exactly which brand of feta you use or how much oil you decide to drizzle on top for garnish!
This information helps when you’re serving guests who might have dietary preferences. Since this is a high-fat, savory appetizer, the numbers reflect that rich profile. It’s certainly a treat, not a low-calorie light snack, but wow, is it worth it!
| Serving Size | 1/4 cup |
| Calories | 180 |
| Fat | 16g |
| Saturated Fat | 6g |
| Carbohydrates | 3g |
| Fiber | 1g |
| Protein | 7g |
| Sodium | 450mg |
| Sugar | 1g |
See? High in healthy fats from the olive oil and satisfying protein from the cheese, which is great because it keeps people feeling full and happy while they mingle! Enjoy every single bite of this incredibly easy olive dip!
PrintQuick and Creamy 10-Minute Whipped Feta and Olive Dip

Make this flavorful, creamy olive dip in just 10 minutes. It requires no cooking and uses simple ingredients, making it a perfect last-minute appetizer for entertaining.
- Prep Time: 10 min
- Cook Time: 0 min
- Total Time: 10 min
- Yield: About 2 cups 1x
- Category: Appetizer
- Method: No Cook
- Cuisine: Mediterranean
- Diet: Vegetarian
Ingredients
- 1 cup pitted green olives, drained
- 1 cup pitted black olives, drained
- 8 ounces feta cheese, crumbled
- 4 ounces cream cheese, softened
- 1/4 cup olive oil
- 2 cloves garlic
- 1 tablespoon fresh lemon juice
- 1/2 teaspoon black pepper
Instructions
- Place the green olives, black olives, feta cheese, cream cheese, olive oil, garlic, lemon juice, and black pepper into a food processor.
- Process the ingredients until the mixture is mostly smooth and creamy. Stop and scrape down the sides as needed.
- Continue processing for about 2 to 3 minutes until you achieve a whipped texture.
- Transfer the dip to a serving bowl.
- Serve immediately with crackers, pita bread, or vegetable sticks.
Notes
- You can make this dip ahead of time; cover and chill for up to 2 days. Let it sit at room temperature for 15 minutes before serving for the best texture.
- For a tangier dip, substitute half of the feta cheese with goat cheese.
- Garnish the top with a drizzle of good quality olive oil and a sprinkle of fresh parsley before serving.
Nutrition
- Serving Size: 1/4 cup
- Calories: 180
- Sugar: 1
- Sodium: 450
- Fat: 16
- Saturated Fat: 6
- Unsaturated Fat: 10
- Trans Fat: 0
- Carbohydrates: 3
- Fiber: 1
- Protein: 7
- Cholesterol: 25