
Sometimes you just need to bake something that makes you smile the moment it comes out of the oven, right? I love finding ways to make comfort food feel special, and if we can add a little bit of adorable, visual fun, even better! That’s exactly how this recipe came to be. It’s the perfect mashup: the gooey, cinnamon-packed flavor of a classic cinnamon roll baked in a cake pan—our ultimate hello kitty cinnamon roll cake dream! Trust me, this is one of those incredibly easy, low-stress bakes that delivers huge satisfaction. If you’re looking for a joyful project that doesn’t require spending all day in the kitchen, you’ve come to the right place. It’s designed to bring smiles immediately.
If you want to know more about my philosophy on keeping baking simple and fun, check out my story here!
- Why This Hello Kitty Cinnamon Roll Cake is Your Next Favorite Bake
- Gathering Ingredients for Your **Hello Kitty Cinnamon Roll Cake**
- Expert Tips for the Best **Hello Kitty Cinnamon Roll Cake**
- Step-by-Step Instructions for Your Cute Character Cakes for Beginners
- Decorating Your **Hello Kitty Cinnamon Roll Cake** for Maximum Appeal
- Storage and Reheating for Your **Hello Kitty Cinnamon Roll Cake**
- Ingredient Notes and Flavor Variations for Sweet Pastry Shaping Techniques
- Frequently Asked Questions About This **Hello Kitty Cinnamon Roll Cake**
- Sharing Your Adorable Dessert Inspiration
Why This Hello Kitty Cinnamon Roll Cake is Your Next Favorite Bake
I designed this recipe so that anyone, even if you call yourself a beginner, can pull off something magical. It’s seriously foolproof! If you are looking for cute character cakes for beginners, this is your winner. You get maximum visual payoff for minimal effort.
- It’s incredibly fast—only about 15 minutes of prep time!
- It delivers on the promise of wonderfully soft, fluffy baked goods with sweet filling that everyone adores.
- It’s a fantastic foundation for creating unique Kawaii inspired pastries with just a simple pink glaze.
You can find tons of other simple sweets over on my Desserts page!
Quick Assembly Using Store-Bought Dough
When I say 15 minutes of prep, I mean it! We sneak in that amazing cinnamon roll texture by using refrigerated dough. This cuts out all the kneading and rising time, making it perfect for a spontaneous baking session when you need something sweet, fast.
Perfectly Fluffy Baked Goods with Sweet Filling
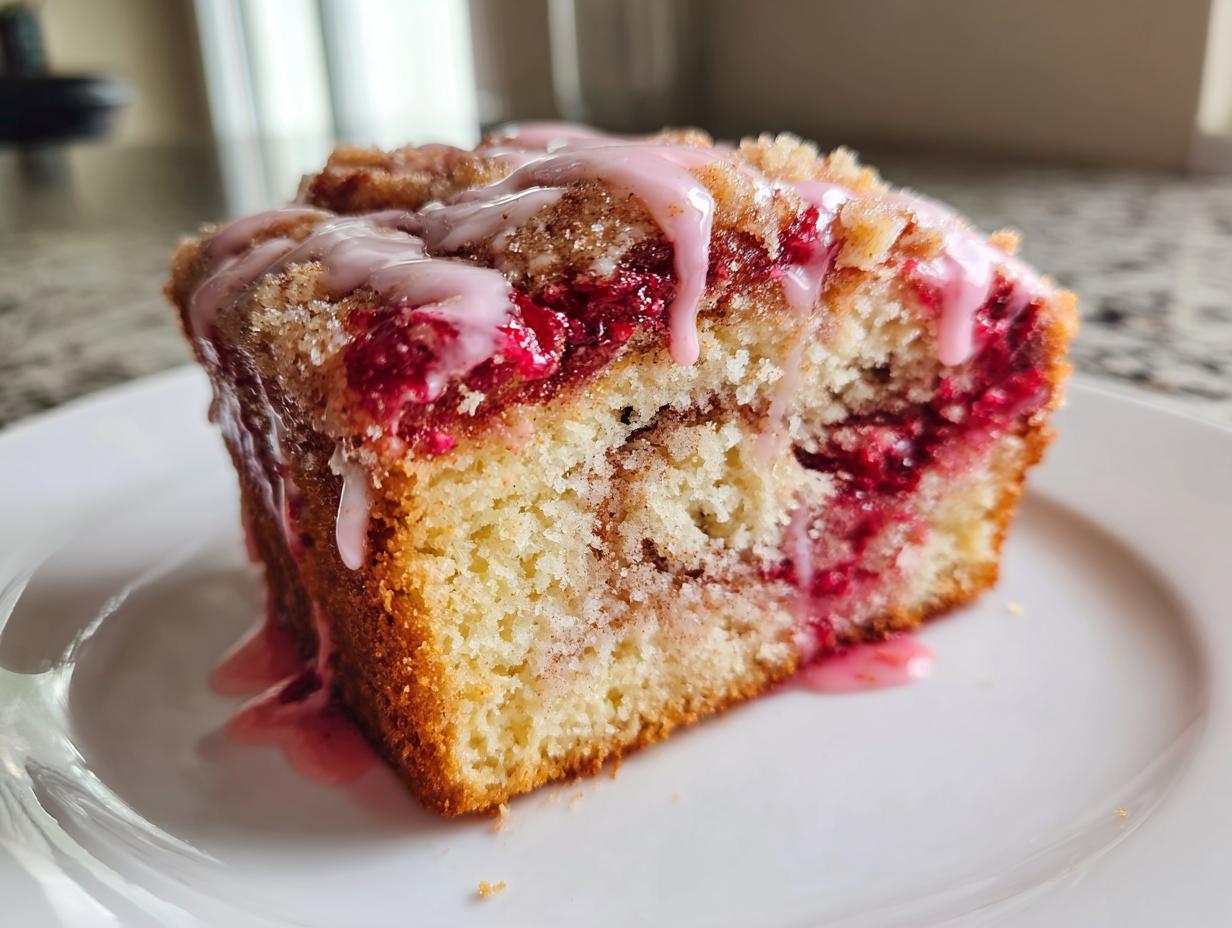
The way we layer the cake batter and the cinnamon swirl filling ensures that every single slice gets that desirable gooey center. It absorbs moisture beautifully, so even if you make it the day before, it’s still moist and tender when you serve it.
Gathering Ingredients for Your **Hello Kitty Cinnamon Roll Cake**
Okay, gathering ingredients should never feel like a scavenger hunt! That’s not my style here at Devour Dish. This recipe is fantastic because it relies on pantry staples plus one key shortcut—the refrigerated dough. When you’re whipping up this hello kitty cinnamon roll cake, make sure everything is pre-measured. Getting these basics ready streamlines the whole process and keeps us from accidentally overmixing later. I’ve broken down exactly what you’ll need for the cake base and that super cute pink topping.
If you love using refrigeration hacks to make baking smoother, you might want to check out my recipe for cinnamon rolls with heavy cream—it’s another game-changer!
For the **Hello Kitty Cinnamon Roll Cake** Base
This is where the structure and that wonderful cinnamon swirl come from:
- One package (about 13.2 ounces) of refrigerated cinnamon roll dough—make sure you keep the included icing packet aside, we won’t need it!
- 1/2 cup all-purpose flour
- 1/4 cup granulated sugar
- 1 teaspoon baking powder
- 1/4 teaspoon salt
- 1 large egg
- 1/2 cup milk
- 1/4 cup unsalted butter, melted (don’t let it get brown, just melted!)
- 1/4 cup packed light brown sugar
- 1 tablespoon ground cinnamon (use the good stuff!)
For the Signature Pink Glaze Dessert Tutorial
This simple glaze instantly gives us that adorable, Kawaii-inspired look we’re going for. The light pink color is essential for capturing that signature aesthetic!
- 1 cup powdered sugar
- 2 tablespoons milk
- 1/4 teaspoon vanilla extract
- 1 to 2 drops pink food coloring (Start with one drop—you can always add more!)
Expert Tips for the Best **Hello Kitty Cinnamon Roll Cake**
Even with an easy recipe like this, a few little tricks make the difference between good and absolutely amazing. Since we are aiming for the best cinnamon roll swirl cake recipe experience, paying attention to the mixing is vital. I learned these little secrets from wrestling with batter consistency when I was first learning to bake!
If you want tips on getting perfect structure in other bakes, check out my way of making tall, flaky scones over here!
Do Not Overmix the Batter
This is the most important rule for keeping our cake wonderfully soft. Remember we are adding liquid to flour, which develops gluten. If you mix too hard or too long, you develop too much gluten, and your cake won’t be among the fluffy baked goods with sweet filling we want—it’ll become tough and chewy, which is the opposite of what we are going for here.
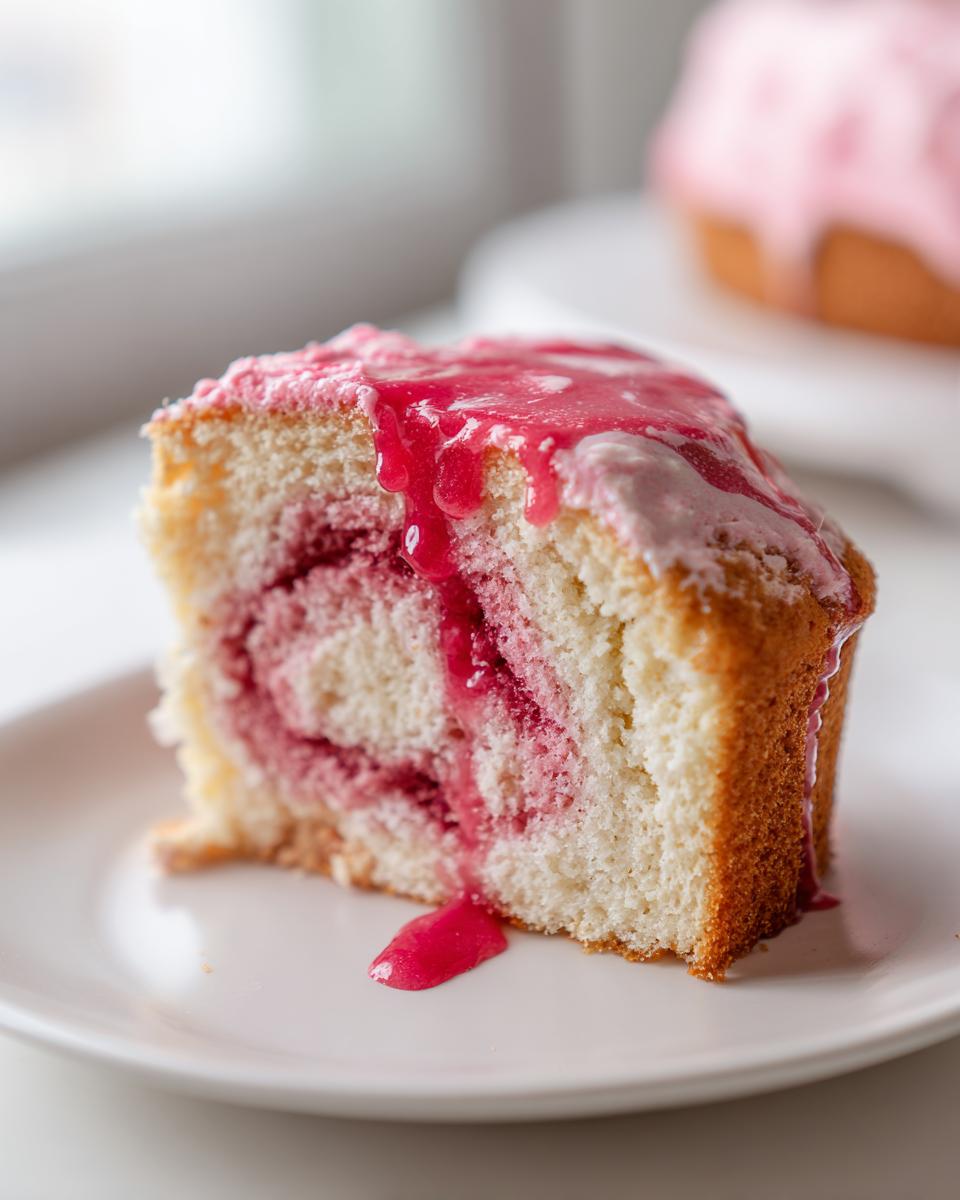
Achieving the Perfect Swirl Placement
We aren’t making neat rows here! When you drop those quartered cinnamon roll pieces randomly over the first layer of batter, try to space them out so they aren’t touching. When the second layer of cake batter goes on top, it will gently cushion them as they bake. This random placement guarantees those gorgeous, imperfect cinnamon swirls appear when you slice into the final product.

Step-by-Step Instructions for Your Cute Character Cakes for Beginners
Now for the fun part—bringing this adorable bake together! Since we already mixed all our ingredients earlier, this assembly goes super fast. Remember how I mentioned this recipe is great for cute character cakes for beginners? It’s because we aren’t doing any complicated shaping; we are relying on clever layering to create that beautiful internal pattern that looks like a sophisticated swirl cake! Pay attention when cutting the dough pieces, as that’s the main thing requiring a little focus.
If you need a refresher on getting simple doughs just right, my guide on homemade English muffins has some great general tips on handling yeast doughs!
Preparing the Batter and Filling
First things first, get that oven warmed up! Preheat your oven to 375 degrees Fahrenheit right away. Grab an 8-inch round cake pan and grease it really well, then dust it lightly with flour. While that’s ready, take two bowls. In one, whisk your dry cake ingredients (flour, granulated sugar, baking powder, and salt). In the other, whisk the egg, milk, and melted butter together until they’re incorporated.
Assembling the Layered **Hello Kitty Cinnamon Roll Cake**
It’s time to break down the store-bought dough! Unroll your refrigerated cinnamon rolls, but don’t toss them! Cut every single roll into quarters. Now, mix your brown sugar and cinnamon together for that amazing filling boost. Pour half of the cake batter into the prepared pan. Sprinkle half of your cinnamon-sugar mixture over that batter. Next, randomly drop those quartered dough pieces over everything. Sprinkle any remaining filling on top, and gently cover it all with the final bit of plain cake batter. This layering technique really helps achieve those incredible swirl patterns.
Baking and Cooling Protocol
Pop this beauty into your preheated oven and let it bake for 30 to 35 minutes. You’ll know it’s done when a toothpick inserted right into the center comes out clean—no wet batter sticking to it! Once it’s baked, let it hang out in the pan for just 10 minutes. That short rest is important! Then, carefully invert the cake onto a wire rack to cool down completely before we move on to the fun part: the glaze!
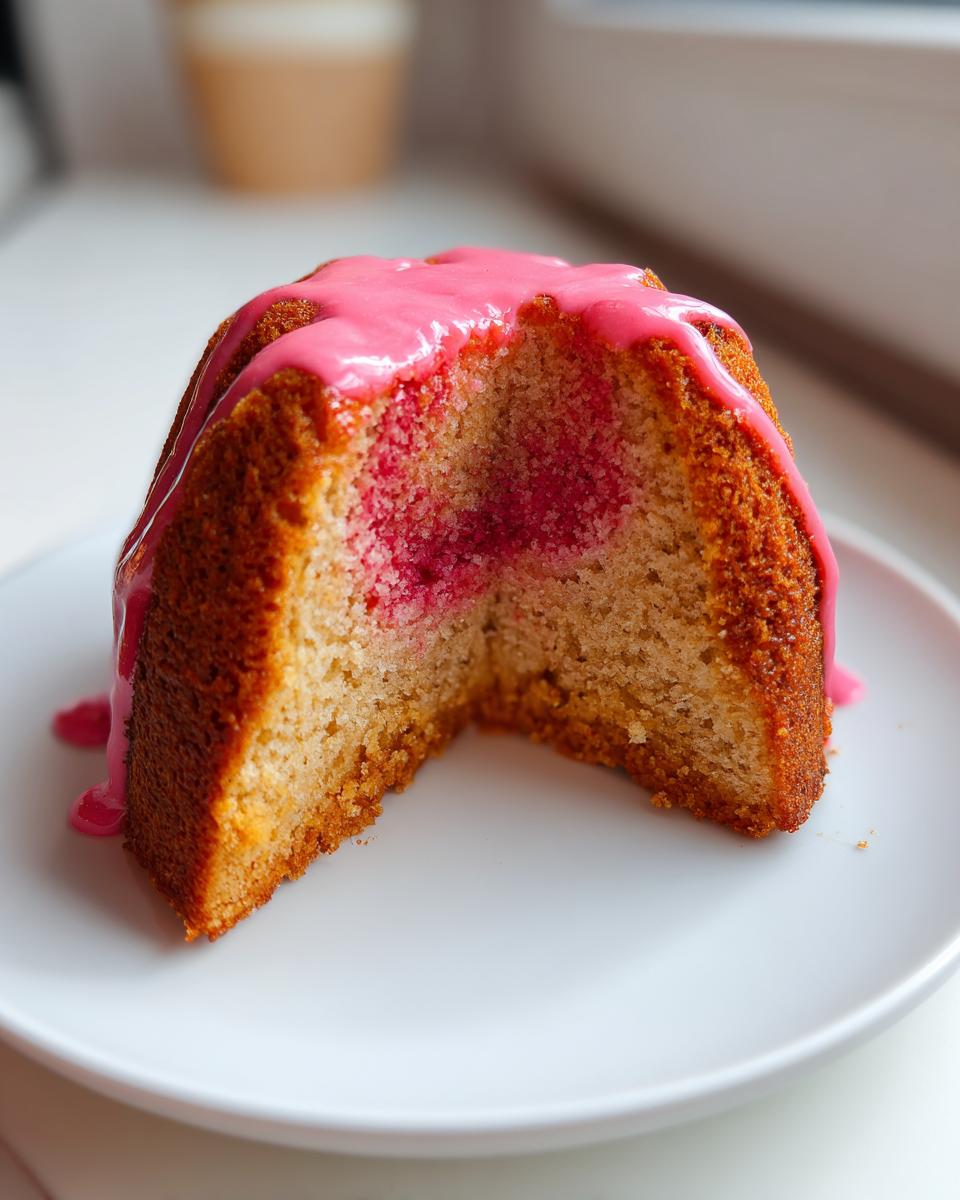
Decorating Your **Hello Kitty Cinnamon Roll Cake** for Maximum Appeal
This is where all the fun happens! Getting the right flavor is essential, but making this cake look precious is what transforms it into a truly memorable bake. We aren’t aiming for professional bakery precision here—we want that sweet, homemade charm that fits perfectly into the world of Hello Kitty baking ideas. The simple drizzle of pink glaze takes this from just a tasty dessert to an adorable centerpiece.
If you ever need icing that stays perfectly in place, I have a great guide on how to make sugar cookie icing harden, which uses similar principles!
Creating the Perfect Pink Glaze Dessert Tutorial
While the cake is cooling completely—this is important so the glaze doesn’t just melt off—we’ll mix up our sweet topping. Whisk together the powdered sugar, milk, and vanilla extract until it’s totally smooth. Now for the color! Add just one drop of pink food coloring. Seriously, start small! You want a soft blush, not a shocking magenta. A light pink is so much cuter and keeps that sweet, minimalist vibe going strong.
Simple Character Embellishments
Once the light pink glaze is covering the top, you can personalize it. For that little bit of extra character, I highly recommend using a very small piping bag—or just snipping the corner off a Ziploc bag—to add a tiny white detail. You can use a little leftover white icing, or just mix a thinner batch with no color. Pipe simple little eyes and whiskers, or go for the signature touch: a cute little bow shape right on top. It keeps the decoration simple, which fits right in with current minimalist cake designs for children!

Storage and Reheating for Your **Hello Kitty Cinnamon Roll Cake**
The beauty of this cake is that it stays wonderfully moist, mostly thanks to those cinnamon roll pieces baked right in! You can absolutely make this ahead of time. Store any leftovers covered tightly at room temperature for up to two days. Because we used commercial dough, we don’t want to leave it out much longer than that.
If you need to keep it longer, pop it into the fridge, but try to bring it back to room temp before serving. If you’re short on time, a quick 15 seconds in the microwave warms a slice up perfectly so the filling gets gooey again. For more tips on storing delicious bakes, take a look at my thoughts on easy homemade butter chicken recipe—no, wait, that’s not right! Just kidding, happy storing!
Ingredient Notes and Flavor Variations for Sweet Pastry Shaping Techniques
Even though this recipe skips the complexities of making dough from scratch, we still have room to tweak the flavor profile if you want to elevate those comforting cinnamon notes! I always encourage people to look at the provided notes—they usually hold the secrets to making a recipe your own, especially when you’re trying to master sweet pastry shaping techniques using mixed components like this cake.
Speaking of elevating flavors, sometimes you want a richer topping. If you’re curious about what to do next, I have an amazing recipe for best chocolate frosting recipe that you could swap in if you were going for a different character theme entirely!
Boosting the Cinnamon Flavor
If your family is anything like mine, we can never have too much cinnamon! If you really want that deep, warm spice flavor to cut through the sweetness of the cake and the frosting, go ahead and boost the filling mixture. The recipe calls for one tablespoon, but I often sneak in 1 1/2 teaspoons more. Just mix it right in with the brown sugar. It really enhances the overall aroma while it’s baking, making the whole house smell incredible—it’s almost worth baking just for the smell alone!
Alternative Tinting Options
The pink food coloring gives us that perfect, controlled hue for our Kawaii look, but sometimes I prefer to avoid artificial dyes, especially if I’m baking for younger kids. If you don’t have pink food coloring on hand, you can absolutely use strawberry puree as an alternative for tinting the glaze. Just be aware that using fruit puree might change the consistency of your glaze slightly. You might need an extra tablespoon or two of powdered sugar to get it back to that perfect drizzle-able thickness. It adds a lovely subtle fruitiness, too!
Frequently Asked Questions About This **Hello Kitty Cinnamon Roll Cake**
I know when you’re trying a new recipe, especially one that’s a fun mashup like this, questions definitely pop up! I’ve tried to make this recipe so simple that you barely need anyone, but here are a few things readers often ask me when they are putting together their own easy decorated sweet rolls.
If you ever need to reach out with more specific questions about ingredients or techniques, don’t hesitate to use my contact page!
Can I use homemade dough instead of refrigerated for this **hello kitty cinnamon roll cake**?
You totally could, but I have to warn you! This recipe is specifically calibrated around the density and sweetness of the refrigerated dough package. The way the commercial dough interacts with our simple cake batter is unique and creates that amazing texture. If you use homemade dough, you’ll need to adjust the sugar content quite a bit, and I can’t guarantee the same awesome results. Stick to the pre-made kind for this one!
What is the best pan size for the **cinnamon roll swirl cake recipe**?
I designed this recipe to fit perfectly in an 8-inch round cake pan. That size helps everything cook evenly and gives us the right height. If you want easier removal, especially if you plan on doing more complex decorating later on, feel free to use a 9-inch springform pan instead. Just keep an eye on the oven, as sometimes stainless steel springform pans conduct just a little more heat.
How do I ensure this is a great **themed birthday cake inspiration**?
The pink glaze is critical, but if you want to really dial up the fun factor for a party, the decoration trick is adding texture! Once that pink glaze is set just slightly (maybe give it 10 minutes after drizzling), go wild with sprinkles. I love using small, pastel pink or white pearlized sprinkles or even some edible glitter. It catches the light and makes the whole cake sparkle—instant showstopper for any themed birthday cake inspiration!
Sharing Your Adorable Dessert Inspiration
I seriously can’t wait to see what beautiful, pink, swirly creations you all come up with! Baking should always be fun, and sharing what you’ve made is honestly the best part of what I do here at Devour Dish. I hope this simple hello kitty cinnamon roll cake gave you a big smile.
Did you manage to get a perfect bow piped on top, or did you go for an entirely different character decoration? Drop a comment below and let me know! Tell me how your family liked the cinnamon-swirl texture. Hearing from you really helps me keep making recipes that fit your real life, cooking needs, and, most importantly, bring you joy.
If you have any extra questions that didn’t get covered in the FAQ, or if you just snapped an amazing picture you want to share, feel free to reach out through my contact page anytime. Happy baking, friends!
PrintKawaii Pink Swirl Cake: A Simple Cinnamon Roll Cake
Make this soft, sweet cinnamon roll cake decorated with a simple pink glaze for a fun, adorable dessert perfect for any celebration.
- Prep Time: 15 min
- Cook Time: 35 min
- Total Time: 50 min
- Yield: 8 servings 1x
- Category: Dessert
- Method: Baking
- Cuisine: American
- Diet: Vegetarian
Ingredients
- 1 package (13.2 ounces) refrigerated cinnamon roll dough
- 1/2 cup all-purpose flour
- 1/4 cup granulated sugar
- 1 teaspoon baking powder
- 1/4 teaspoon salt
- 1 large egg
- 1/2 cup milk
- 1/4 cup unsalted butter, melted
- 1/4 cup packed light brown sugar
- 1 tablespoon ground cinnamon
- For the Glaze: 1 cup powdered sugar
- 2 tablespoons milk
- 1/4 teaspoon vanilla extract
- 1–2 drops pink food coloring
Instructions
- Preheat your oven to 375 degrees Fahrenheit. Grease and flour an 8-inch round cake pan.
- In a medium bowl, whisk together the flour, granulated sugar, baking powder, and salt for the cake batter.
- In a separate small bowl, whisk the egg, milk, and melted butter until combined.
- Pour the wet ingredients into the dry ingredients and mix until just combined. Do not overmix.
- Unroll the cinnamon roll dough and cut each roll into quarters.
- In a small bowl, mix the brown sugar and cinnamon together for the swirl filling.
- Pour half of the cake batter into the prepared pan. Sprinkle half of the cinnamon-sugar mixture over the batter. Drop the quartered cinnamon roll pieces randomly over the batter. Sprinkle the remaining cinnamon-sugar mixture on top. Pour the remaining batter over everything.
- Bake for 30 to 35 minutes, or until a toothpick inserted into the center comes out clean.
- Let the cake cool in the pan for 10 minutes before inverting it onto a wire rack to cool completely.
- To make the glaze, whisk together the powdered sugar, milk, and vanilla extract until smooth. Add pink food coloring one drop at a time until you reach a light pink color.
- Once the cake is cool, drizzle the pink glaze over the top. You can use a small amount of white glaze or frosting to pipe simple facial features or a bow for a cute character look.
Notes
- For a richer cinnamon flavor, use 1 1/2 teaspoons of cinnamon in the filling mixture.
- If you do not have pink food coloring, you can use a tiny amount of strawberry puree for a natural tint, though the consistency of the glaze may change slightly.
- This recipe works well in a 9-inch springform pan if you prefer easier removal.
Nutrition
- Serving Size: 1 slice
- Calories: 380
- Sugar: 45
- Sodium: 350
- Fat: 18
- Saturated Fat: 10
- Unsaturated Fat: 8
- Trans Fat: 0
- Carbohydrates: 52
- Fiber: 1
- Protein: 5
- Cholesterol: 35