

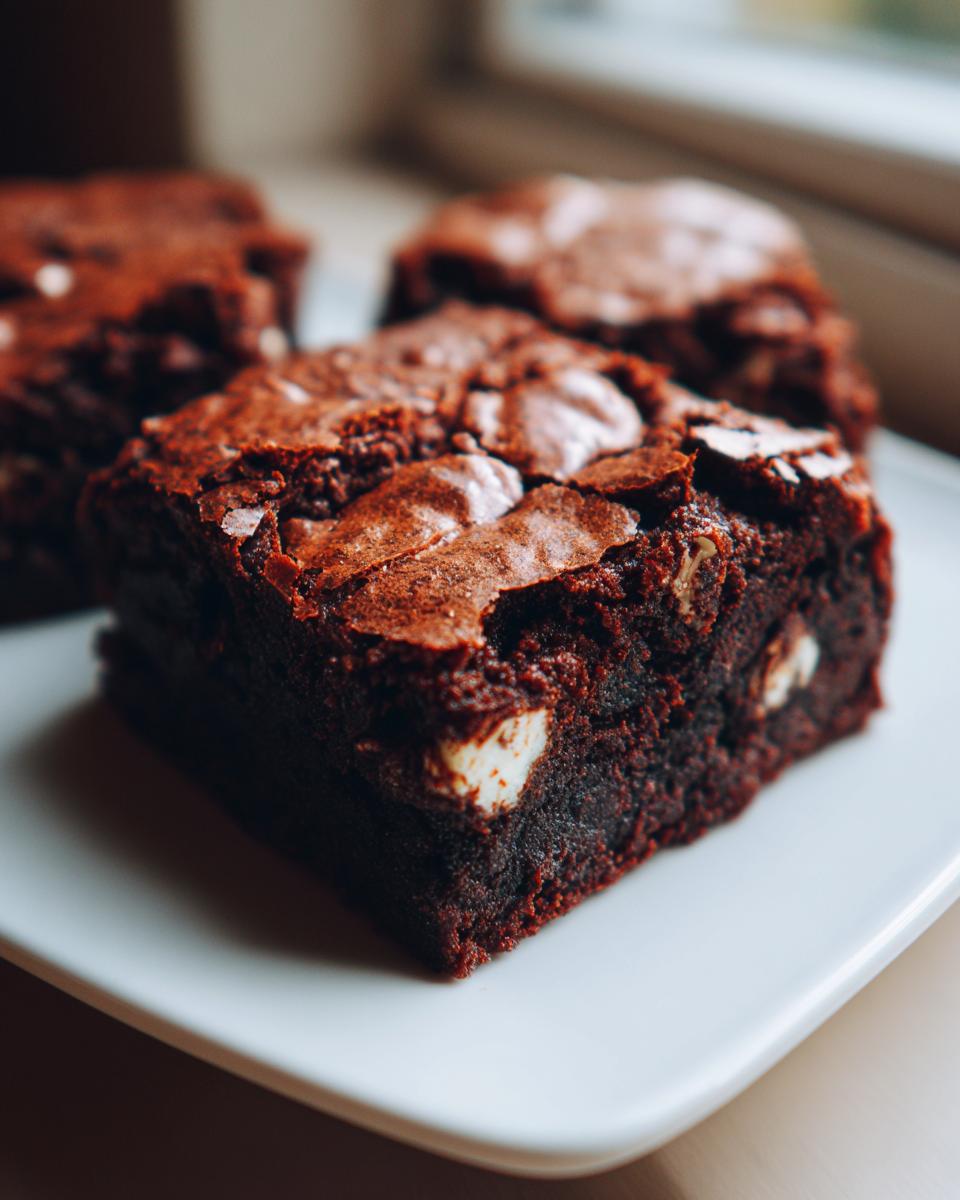
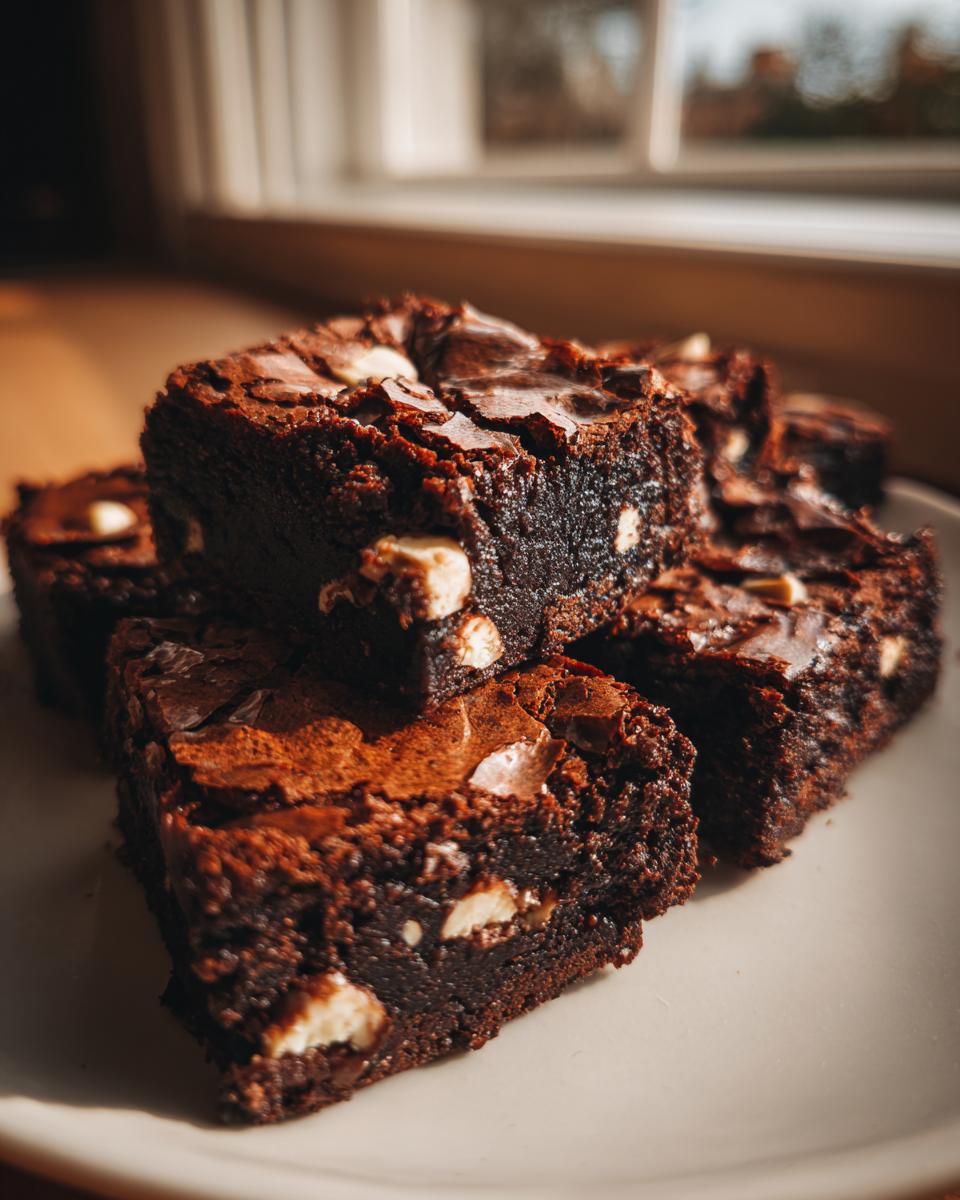
Oh, that moment hits, right? You’re scrolling around after dinner, and suddenly, nothing will satisfy that deep, dark chocolate craving except something ridiculously rich and chewy. Sometimes, standard chocolate chip cookies just won’t cut it; you need something serious. Well, let me stop you right there because I’ve perfected the one recipe that always hits the spot: my unbelievably easy oreo brownies.
When I started Devour Dish, I promised myself that every recipe would be straightforward without sacrificing that ‘wow’ factor. These aren’t just any brownies; they are thick, gloriously fudgy chocolate bars studded with creamy Oreo pieces. They deliver the ultimate indulgent chocolate dessert experience without needing complicated steps or hours of your time. If you ever need an emergency chocolate topping—maybe for a scoop of vanilla ice cream next to these bars—make sure you check out my recipe for easy silky homemade chocolate sauce! Trust me, getting that gooey, intense flavor while keeping the technique simple is my absolute specialty!

- Why This is the Best Recipe for Fudgy Oreo Brownies (E-E-A-T Focus)
- Ingredients Needed for Easy Oreo Brownies
- Step-by-Step Instructions for Layered Oreo Brownies
- Tips for Making the Best Oreo Brownies Every Time
- Storage and Serving Suggestions for Chocolate Oreo Bars
- Variations on Classic Oreo Brownies Recipe
- Frequently Asked Questions About Homemade Oreo Treats
- Estimated Nutrition for These Decadent Brownies with Oreo Chunks
- Share Your Ultimate Chocolate Indulgence
Why This is the Best Recipe for Fudgy Oreo Brownies (E-E-A-T Focus)
I’ve tested so many brownie recipes over the years, trying to clone those perfect bakery bars we all dream about. What makes this one stand out? It’s the textural contrast we achieve without adding twenty weird steps. These oreo brownies deliver that dense, moist middle we crave, plus a fantastic cookie crunch. If you love fudgy interiors, you’ll appreciate that I included a link to my red velvet brownie recipe if you ever want another dense chocolate fix!
The key here is balancing the fat and sugar ratios. That’s how you get that sought-after, shiny layer that screams professional baking, all while keeping things simple enough for a busy Tuesday night. This recipe perfectly matches the Devour Dish philosophy: maximum payoff, minimum fuss.
Achieving the Perfect Crackly Top Brownies
That elusive, shiny, crackly top, you know the one? It happens when you whisk the melted butter and sugars together really well *before* adding the eggs. This process dissolves the sugar beautifully, creating a meringue-like layer on top as they bake. It’s all about that specific setup—melted butter, lots of sugar, and gentle mixing afterward—to get those stunning crackly top brownies.
Ingredients Needed for Easy Oreo Brownies
When I say this is an easy oreo brownie recipe, I mean it. You likely have most of this stuff hanging out in your pantry already. The whole thing comes together in about fifteen minutes of hands-on time, and you get sixteen perfect little chocolate squares out of one 9×13 pan. That’s fantastic value for the effort, right?
For the true, decadent experience, remember the details: we need **room temperature eggs**—it helps everything emulsify better—and we aren’t pre-shredding anything here! If you’re looking for another simple bar recipe to keep on hand for potlucks, you absolutely must try my graham cracker toffee recipe. It’s ridiculously addictive!
Here is what you need to gather for the absolute best oreo brownies:
- 1 cup (2 sticks) unsalted butter, melted
- 2 cups granulated sugar
- 1 cup packed light brown sugar
- 4 large eggs, room temperature
- 1 tablespoon vanilla extract
- 1 cup all-purpose flour
- 3/4 cup unsweetened cocoa powder (use good quality, it really makes a difference!)
- 1 teaspoon salt
- 1/2 teaspoon baking powder
- 1 cup semi-sweet chocolate chips
- 12 Oreo cookies, roughly chopped (don’t crush them into dust!)
You can get this mixed up and into the oven in about 15 minutes of prep time, and they bake up in just under 35 minutes total. That gets you the perfect result for 16 servings!
Step-by-Step Instructions for Layered Oreo Brownies
Alright, let’s get baking! This is where the magic happens. Remember, for these chocolate oreo bars to turn out perfectly chewy and fudgy, patience in the mixing stage is totally non-negotiable. First things first: grab a 9×13 inch baking pan. You want to line it with parchment paper completely, leaving a little overhang on the sides—this is my trick so you can just lift the whole cooled slab out when they’re done. Give that paper a little bit of grease too, just to be safe!
Then, get your oven warmed up to 350°F (175°C). We’re going to start by handling the wet ingredients. Take your melted butter and whisk it fiercely with both the granulated white sugar and the packed light brown sugar until everything looks happy and combined. Then, pop in those room temperature eggs one by one, mixing well after each addition, followed by that lovely shot of vanilla extract.
In a separate bowl, take a moment to quickly bring your dry team together: flour, cocoa powder, salt, and baking powder. Give them a quick whisk so that cocoa doesn’t end up in big chunks later. Now, introduce the dry mixture slowly to the wet. And here’s what you need to watch out for: mix *only* until you can’t see white flour streaks anymore. Overmixing is the enemy of fudgy texture, so step away from the mixer!
Once just combined, gently fold in your chocolate chips and most of those chopped Oreos. If you want those gorgeous layered oreo brownies that people talk about, this is where you could choose to reserve half the batter, press half your Oreos into the bottom of the greased pan, pour the first half of the batter over it, and sprinkle the rest of the Oreos on top before the final batter layer goes on. If you’re keeping it classic, just fold them all in and spread the batter evenly.
Sprinkle those reserved chopped Oreos right over the top before it goes into the oven. If you need a simple dip to go with these amazing baked bars, check out my easy homemade onion dip for a savory break!
Mixing the Batter for Fudgy Oreo Brownies
The absolute secret to getting those intensely flavored, wonderfully fudgy oreo brownies is minimizing gluten development. We want dense and moist, not cakey! That means the moment you start adding the flour mixture to your buttery, sugary base, turn the blender onto the lowest setting or switch to a rubber spatula. Mix gently, just until the last streaks of flour disappear. You should still have a thick, brownie batter that is loaded with chocolate chips and cookie texture. It takes commitment to stop stirring when you think you should keep going, but trust me, that restraint pays off big time!
Baking Time and Testing for Doneness
Slide that pan into your preheated 350°F oven for anywhere between 28 to 35 minutes. Every oven is different, of course. For these brownies, we are intentionally aiming for underbaked territory, so don’t panic if you think they look a bit soft! When testing, forget the clean toothpick. We want a toothpick inserted near the center to come out with moist, fudgy crumbs clinging to it. If it comes out with wet batter, give it three more minutes and check again. If it comes out totally clean, you’ve gone too far and you’ve got a cakey brownie on your hands, which is fine, but not what we’re aiming for here!
Tips for Making the Best Oreo Brownies Every Time
I’ve learned a few things over the years testing this recipe—and trust me, some batches were a total disaster before getting this recipe just right. But these little secrets ensure you’ll end up with the best oreo brownies every single time, whether you’re aiming for super fudgy or something closer to a double-decker treat!
My first piece of advice, which I borrowed from my note file: Don’t you dare overmix after the flour goes in! That glossy, beautiful surface that everyone raves about? That shiny shine is built on sugar that has been properly incorporated into the wet ingredients, and if you mix too much once the flour hits, you just develop gluten, which sucks the moisture right out and ruins that crackly top. Stop stirring when you see the last bit of white powder disappear!
Speaking of variations, if you want to try a fun twist, you can try making a layered version. This basically turns them into a brookies recipe hybrid! Instead of mixing all the Oreos in, reserve half the batter at the end. Press half your chopped Oreos onto the bottom of the prepared pan, pour that first half of the batter over them, then sprinkle the rest of the Oreos on top before pouring the remaining batter over everything. It looks so impressive when you cut into those thick layers.
Also, let’s talk cocoa powder. Because these are already such an indulgent chocolate experience, the quality you use matters a ton. I always opt for a high-quality, dark unsweetened cocoa powder rather than the standard box brand. It deepens that rich chocolate flavor beautifully. If you’re obsessed with rich chocolate pastries, you might also want to check out my recipe for easy chocolate croissants!
And finally, the cooling process! You *must* let them cool completely. I know it’s torture, but slicing them when they are even slightly warm means you’ll get a gooey mess that just smears on the knife. If you can manage it, chilling them for about an hour after they’ve cooled on the rack helps set those dense centers up perfectly for those clean, bakery style brownies.
Storage and Serving Suggestions for Chocolate Oreo Bars
Okay, first things first: try to save some! These amazing chocolate oreo bars are definitely at their peak quality the day they are made, but thankfully they stick around well enough for satisfying cravings the rest of the week. Once they are completely cooled—and I mean *completely* cooled, or they’ll stick to everything—store them layered between sheets of parchment paper in an airtight container.
They are perfectly fine sitting right on your counter at room temperature for about four days. If you want them to really firm up, put them in the fridge, though sometimes they get a little too dense that way. If you do chill them, just let one sit out for about 30 minutes before you plan on eating it. That just softens them up perfectly for that decadent bite!
For serving, honestly, these don’t need anything extra. A simple dusting of powdered sugar works! But if you are feeling extra, go for a scoop of really good vanilla ice cream. Or, if you’re in the mood for something really fancy, you could try drizzling them with a homemade sauce, like the one I make for my easy salted caramel cheesecake—it elevates everything!
Variations on Classic Oreo Brownies Recipe
Part of the fun of any dependable recipe, like this oreo brownies recipe, is how easily you can tweak it to suit whatever craving you have next! I find that the base recipe is so structurally sound—fudgy, chocolaty, and holds up well—that it’s a perfect canvas for experimentation.
One of my favorite easy swaps is changing up the cookie flavor. Instead of the classic chocolate Oreos, try crushing up Golden Oreos! When you use those golden cookies in place of the chocolate ones, you get those beautiful, pale cookie chunks mixed into your dark brown base. This is how you sneak into brookies recipe territory without making a whole separate batch of cookie dough. It’s a totally different visual and flavor profile, but just as satisfying because you still have that perfect fudgy texture.
If you need a little caffeine kick to go with your ultimate chocolate indulgence, toss in about a teaspoon of instant espresso powder along with your dry ingredients. Honestly, espresso powder just deepens the chocolate flavor; it doesn’t make the brownies taste like coffee, but it makes them taste *more* chocolatey, which I’m always a fan of!
And for another layer of texture and flavor, you can’t go wrong with some chips! Peanut butter chips are incredible paired with Oreos—it brings a salty/sweet element that is to die for. Simply fold in about half a cup along with your chocolate chips and Oreos in the final step. If you’re looking for a great cozy pairing for those slightly advanced chocolate desserts, check out how to make my easy creamy pumpkin soup when the weather starts to cool down; it’s a surprisingly good contrast!
Experimentation is encouraged here, friends! But no matter what you add, remember the golden rule: don’t overmix once the flour is in. Happy customizing!
Frequently Asked Questions About Homemade Oreo Treats
I get so many questions about these brownies because everyone wants them to be perfect! And I totally get it—when you’re making an indulgent chocolate dessert, you want it to be spot on. Here are the top things I hear people asking about these homemade oreo treats.
How do I make these the fudgiest Oreo Brownies possible?
That beautiful fudginess, that’s the core goal! You already set yourself up for success by using the melted butter base and two types of sugar—the brown sugar really helps keep things moist. The biggest thing you have to nail, seriously, is the baking time. Unlike cake, you *want* them to look slightly underdone when you pull them out. Pull them when a toothpick comes out with moist, soft crumbs clinging to it, not wet batter, but not clean either. They finish setting up as they cool!
Can I use oil instead of melted butter in this recipe?
My answer is: please don’t! While you totally *could* substitute oil in a pinch for some recipes, for these specific fudgy oreo brownies, you really need the butter. Butter provides necessary structure, incredible flavor, and it helps create that shiny, desired crust when mixed properly with the sugar. Oil just creates a greasy chewiness that doesn’t allow that signature crackly top brownies technique to work its magic.
How long do these simple dessert bars last?
These simple dessert bars honestly taste better the next day once the flavors have settled in, but they don’t need refrigeration if your kitchen isn’t super hot. Store them airtight on the counter for up to four days. If you’re making a huge batch and need them to last longer, pop them in the freezer! Wrap individual squares tightly in plastic wrap, place those in a freezer bag, and they’ll be good for about two months. Thaw them on the counter!
Can I skip lining the pan and just grease it?
You can, but I really advise against it, especially since an overflow of chocolate is guaranteed! If you skip the parchment paper sling, cutting these perfect squares becomes a nightmare—they stick to the bottom corners, and the bottom layer gets all smashed when you try to pry them out. Use the parchment paper overhang; it lets you lift the whole block out onto your cutting board before slicing. It’s a game-changer for presentation!

If you ever feel like baking something truly refreshing after all this chocolate, you should check out my best easy homemade lemonade recipe. It’s perfect for washing down a rich brownie square!
Estimated Nutrition for These Decadent Brownies with Oreo Chunks
Now, I know we aren’t exactly whipping these up for their health merits, right? These are purely for joy and satisfying that ultimate chocolate craving! But because I believe in transparency—and because some of you dear readers sometimes ask—I’ve run the numbers on the ingredients used to make these rich brownies with oreo chunks.
Please keep in mind this should only be used as a general guide. Since every Oreo brand, cocoa powder, and even the size of your eggs can vary slightly, these values are an estimate. But it gives us a good baseline for this completely decadent treat!
Based on a yield of 16 generous squares, here is the estimated nutritional breakdown for one serving of these incredible oreo brownies:
- Serving Size: 1 bar
- Calories: 320
- Sugar: 35g
- Fat: 18g
- Saturated Fat: 10g
- Carbohydrates: 38g
- Protein: 4g
- Cholesterol: 65mg
See? Worth every single bite. If you need a serious palate cleanser after all that chocolate goodness, swing over and check out my recipe for the easy high-protein Mediterranean bean salad. It’s the perfect wholesome fuel to balance out all this chocolate goodness!
Share Your Ultimate Chocolate Indulgence
That’s it! You have officially made the ultimate, fudgy, crackly-topped, cookie-filled chocolate masterpiece. I am so excited for you and your family to dig into these oreo brownies—they are true comfort food perfection.
Now, I absolutely live to hear how my recipes turn out in your kitchens! Did you manage to keep your hands off them until they cooled completely? Spill the beans in the comments below! Tell me if you stuck to the classic recipe or if you tried adding peanut butter chips like I suggested—I love seeing your creative twists on these simple dessert bars.
Seriously, if your house smells like a dream right now because of the pure chocolate aroma, please send me a picture! Tag me on social media so I can celebrate your success. Knowing that one of my favorite, most comforting recipes is now filling your home with joy is exactly why I started Devour Dish.
If you loved how easy and satisfying this recipe was, I have tons of other simple ideas waiting for you. You might want to check out my recipe for the best crispy oven-roasted breakfast potatoes next time you are craving something equally reliable but savory!
Happy baking, and enjoy every single decadent, chewy bite!
PrintEasy Fudgy Oreo Brownies with a Crackly Top

Make the best, most decadent Oreo brownies with this simple recipe. You get a fudgy center, chunks of Oreo cookies, and that desirable shiny, crackly top.
- Prep Time: 15 min
- Cook Time: 35 min
- Total Time: 50 min
- Yield: 16 servings 1x
- Category: Dessert
- Method: Baking
- Cuisine: American
- Diet: Vegetarian
Ingredients
- 1 cup (2 sticks) unsalted butter, melted
- 2 cups granulated sugar
- 1 cup packed light brown sugar
- 4 large eggs, room temperature
- 1 tablespoon vanilla extract
- 1 cup all-purpose flour
- 3/4 cup unsweetened cocoa powder
- 1 teaspoon salt
- 1/2 teaspoon baking powder
- 1 cup semi-sweet chocolate chips
- 12 Oreo cookies, roughly chopped
Instructions
- Preheat your oven to 350°F (175°C). Line a 9×13 inch baking pan with parchment paper, leaving an overhang on the sides for easy removal. Lightly grease the paper.
- In a large bowl, whisk together the melted butter, granulated sugar, and brown sugar until fully combined.
- Whisk in the eggs one at a time, mixing well after each addition. Stir in the vanilla extract.
- In a separate bowl, whisk together the flour, cocoa powder, salt, and baking powder.
- Gradually add the dry ingredients to the wet ingredients, mixing only until just combined. Do not overmix.
- Gently fold in the chocolate chips and most of the chopped Oreo pieces, reserving a few for the top.
- Spread the batter evenly into the prepared baking pan. Sprinkle the remaining chopped Oreos over the top of the batter.
- Bake for 28 to 35 minutes. For fudgy brownies, aim for a toothpick inserted near the center to come out with moist, fudgy crumbs attached, not wet batter.
- Let the brownies cool completely in the pan on a wire rack before lifting them out using the parchment paper overhang.
- Cut into squares. You have made the ultimate chocolate indulgence!
Notes
- For the best crackly top, do not overmix the batter after adding the flour. The shiny surface forms when the sugar dissolves properly in the melted butter and eggs.
- If you want a layered look, reserve half the batter, press half the Oreos into the bottom of the pan, top with the first half of the batter, then add the remaining Oreos and top with the rest of the batter.
- For bakery style brownies, let them cool completely, preferably chilling them for an hour before slicing.
Nutrition
- Serving Size: 1 bar
- Calories: 320
- Sugar: 35
- Sodium: 180
- Fat: 18
- Saturated Fat: 10
- Unsaturated Fat: 8
- Trans Fat: 0
- Carbohydrates: 38
- Fiber: 1
- Protein: 4
- Cholesterol: 65