

When that chilly holiday air starts to smell like pine needles and cinnamon, you know it’s time for the simple, joyful sweets! Forget those complicated cookie recipes that take hours; we are making classic peppermint bark today, and I promise you, this is the easiest version you will ever see. Seriously, it’s just three ingredients, and don’t even worry about turning on your oven because this is totally no-bake! Here at Devour Dish, my philosophy, just like Avery Collins always says, is that the best food is made for your real life—tested, reliable, and absolutely delicious. This homemade chocolate bark is proof that simple sweets can be spectacular holiday treats. If you love quick fixes, you should also check out my recipe for easy no-bake haystack cookies recipe!
- Why This Easy Peppermint Bark Recipe Is a Holiday Must-Have
- Gathering Ingredients for Your Homemade Chocolate Bark
- Step-by-Step Instructions to Make Perfect Peppermint Bark
- Variations on Classic Peppermint Bark
- Tips for Success When Making Peppermint Bark
- Storing Your Homemade Peppermint Bark for Gifting
- Frequently Asked Questions About Peppermint Bark
- Estimated Nutritional Information for This Peppermint Bark
- Share Your Festive Holiday Treat Creations
Why This Easy Peppermint Bark Recipe Is a Holiday Must-Have
If your holiday schedule is already bursting at the seams, this peppermint bark is your secret weapon. Seriously, where else are you going to find such an impressive, festive holiday snacking treat that takes less than 20 minutes of total time? It means less stress and more joyful moments around the table.
This recipe is ideal for quickly assembling gorgeous peppermint bark for gifts. You just melt, spread, sprinkle, and chill. Plus, when you make it yourself, you know you’re getting the best peppermint bark possible, not that overly sweet store-bought stuff!
Speed and Simplicity: The 3 Ingredient Candy Recipe Advantage
That’s right, three ingredients! We are keeping this incredibly simple and totally no bake Christmas candy territory. With only 15 minutes of prep work, you are done before recess even ends. That speed is why I consider this the best peppermint bark for those last-minute neighbors or teachers you need a quick holiday treat for.
Perfect for Festive Holiday Snacking and Sharing
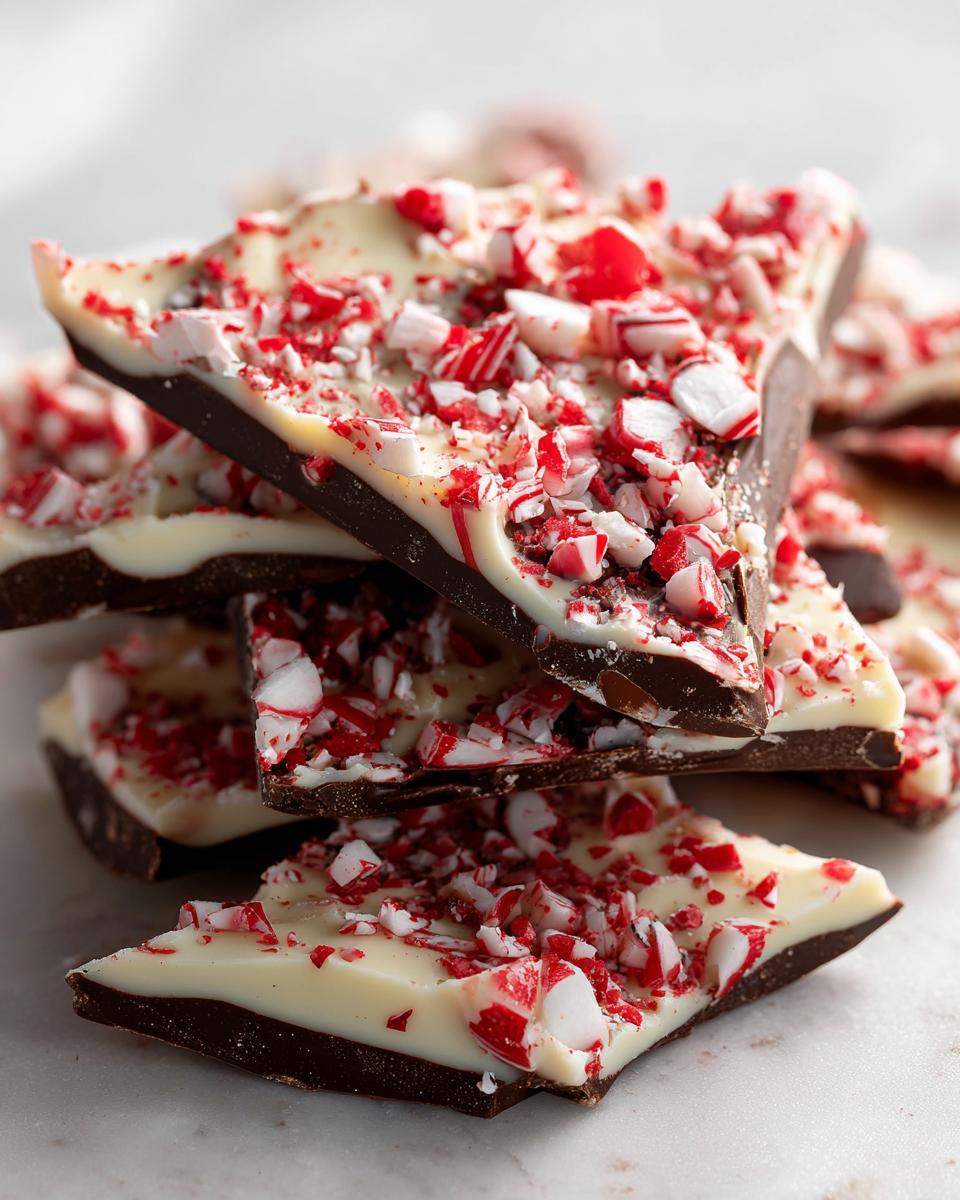
The visual factor here is huge! That sharp contrast between the dark, creamy chocolate and the bright white layer, topped with those glittering red and white candy bits? It just screams ‘holiday!’ It looks fancy, but it requires almost no effort on your part. It’s a classic flavor profile that everyone loves and always disappears first from the dessert platter.

Gathering Ingredients for Your Homemade Chocolate Bark
Alright, let’s talk supplies! Since this is such a pure, simple recipe, the quality of what you put in really shows up in the final result. Think of this as the foundation for your incredible rich, creamy homemade hot chocolate—you need good basics for a great final product. We only need three things, but let’s discuss them so you can make the absolute best peppermint bark.
Here is what you need gathered on your counter:
- 12 ounces dark chocolate, chopped
- 12 ounces white chocolate, chopped
- 1 cup crushed candy canes
Ingredient Notes and Substitution Tips for Peppermint Bark
You’ll notice I wrote “chopped” chocolate, not chips. Trust me on this! Chocolate chips have stabilizers so they keep their shape while baking. For this bark, we need them to melt totally smooth. If you want that gorgeous, fancy look like that commercial copycat peppermint bark, chop up good quality chocolate bars instead. It melts beautifully.
If you’re worried your bark won’t taste minty enough, here is a little secret: add about 1/4 teaspoon of pure peppermint extract right into the melted white chocolate layer before you spread it. It really amps up that cool, refreshing flavor!
Step-by-Step Instructions to Make Perfect Peppermint Bark
Okay, deep breaths! This is the fun part, and honestly, it’s so straightforward that you are going to feel like a confectionery genius. Since we are dealing with chocolate here—and we all know chocolate can be a little dramatic—we need to treat it gently. I rely on my microwave for quick melting, but you absolutely must go slow to avoid seized, grainy chocolate. If you want to see how I handle doughs and batters that need careful hands, check out this easy homemade soft pretzel bites recipe!
Preparing the Base Layer of Peppermint Bark
First things first, grab an 18 by 13 inch baking sheet—that’s a big jelly roll pan—and line it completely with parchment paper. This paper is your best friend; don’t skip it, or you’ll tug and break your beautiful bark later! Next, take your dark chocolate and put it in a microwave-safe bowl. Melt it in short bursts, like 30 seconds at a time, stirring well after every single burst until it’s totally smooth. Pour that lovely melted dark chocolate onto the parchment.
Take an offset spatula or the back of a spoon and spread that dark chocolate right to the edges. You want a nice, even layer—it doesn’t need to be super thick, just consistent. Now, while it’s still wet, sprinkle half of your crushed candy canes all over the top. Just let them sit there nice and pretty!
Layering and Topping the Candy Cane Bark Recipe
Now for the creamy middle layer! Melt your white chocolate exactly the same way—low and slow in 30-second intervals, stirring constantly so it doesn’t burn or seize up on you. Once that white chocolate is utterly smooth and glossy, pour it right over the dark chocolate layer. Spread this gently! You don’t want to mix the colors too much; we want distinct layers for this classic candy cane bark recipe.
This step needs speed! Right after you finish spreading the white chocolate, immediately sprinkle the *rest* of your crushed candy canes evenly across the top. Use your hands to press them in just a tiny bit so they stick firmly into the soft white chocolate background. They won’t sink all the way through, which is exactly what we want.

Chilling and Breaking the Finished Peppermint Bark
That’s it for the active work! Seriously, time to let science take over. Slide that sheet pan into the refrigerator for at least 30 minutes. We need it totally firm and settled before we try to break it up. If you’re in a huge rush during the holidays, you can pop it in the freezer for closer to 15 or 20 minutes, but I prefer the fridge chill.
When it’s rock hard and snaps easily, lift the entire sheet of parchment paper off the pan. Lay it on a cutting board. Now, the fun sound: just break it apart! You want irregular, rustic pieces—that’s what makes homemade chocolate peppermint dessert look so good! Store these beauties away until it’s time to share.
Variations on Classic Peppermint Bark
While I feel like this basic three-layer version is truly the top tier of chocolate peppermint dessert perfection, I totally get that sometimes you need a little switch-up! Once you master the classic method, tweaking it is so simple. It’s all about customizing your own dream combination of crunch and sweetness. If you enjoy playing around with chocolate layers, you really must see my recipe for white chocolate pretzel bark—it proves that mixing textures is always a good idea!
Making White Chocolate Peppermint Bark Only
What if you just aren’t a dark chocolate fan? No problem at all! You can absolutely make a pure white chocolate peppermint bark. To do this, just melt the 12 ounces of white chocolate as directed, spread it on your parchment-lined sheet, and then immediately sprinkle your crushed candy canes right on top as we did before. You skip the dark chocolate layer entirely! It’s sweeter, creamier, and incredibly festive looking, though it might need a little longer to set up firm since it’s not getting the firm base layer from the dark coating.
Adding Salt or Flavor Boosts to Your Peppermint Bark
This is where you can really elevate the treat, especially if you are making it for sophisticated grown-up snacking! A sprinkle of flaky sea salt over the top—right after the candy canes—adds this wonderful salty-sweet counterpoint to the mint that makes people ask, ‘What is in this?!’ You need to try it!
Also, remember that peppermint extract I mentioned? If you want to make your bark stronger overall, you can add just a drop or two to *both* the dark and white chocolate layers when they are ready to melt. If dark chocolate isn’t your thing but you still want the contrast, sometimes I’ll use milk chocolate instead of the dark for my base layer. It gives it a softer look, but wow, the flavor is rich and comforting!
Tips for Success When Making Peppermint Bark
Look, chocolate is temperamental, and I have ruined batches before—we’ve all been there! The number one thing you can do to ensure success with this easy peppermint bark recipe is to keep things dry. Even one little drop of water or steam can make your melted chocolate seize up into a sad, gritty mess. That’s why I never melt chocolate right over a direct, high heat source.
When melting, always use medium or low power in the microwave. It might feel slow, but those 30-second intervals allow you to stir every bit of the residual heat out before overheating. Patience here is key! If your white chocolate seems a little dull, try adding a splash of neutral oil, like canola, or even a teaspoon of coconut oil; it sounds odd, but it really helps bring the shine back.
Also, don’t rush the chilling step! If the bottom layer isn’t completely firm before you pour the white chocolate on top, they will swirl together, and you won’t get that clean, beautiful contrast. If you’re looking for other simple, smooth-textured recipes that don’t require fussing over temperatures, you have to try my easy creamy one-pot pizza pasta bake while you wait for your bark to set up!
Storing Your Homemade Peppermint Bark for Gifting
The best part about making this homemade chocolate bark is that it’s practically immortal—well, almost! Because this delicious chocolate peppermint dessert doesn’t have a lot of perishable ingredients, storing it is super easy. This durability makes it perfect for preparing well ahead of time and setting aside for all your peppermint bark for gifts needs.
Once the bark is completely firm from chilling, you need to get it into an airtight container right away. I usually line the container with a little extra parchment paper just to make sure absolutely nothing sticks to the sides while it rests on the counter.

Here is my rule: if your kitchen is on the cooler side, simple room temperature storage is totally fine, especially if you plan on giving it away within a week or two. If your home runs warm, or you’ve added extra dairy like cream cheese frosting (which I haven’t, but you could!), popping it in the fridge is safer. If you refrigerate it, just remember to take it out about 15 minutes before you plan to serve or break off pieces. A slightly softened piece of bark tastes so much better than a cold, hard snap!’
Frequently Asked Questions About Peppermint Bark
I know you’re going for that perfect look, so here are a few things I get asked all the time when I make this amazing candy cane bark recipe. Don’t stress if you’re new to making this; we’ll sort out any confusion right now so your festive holiday snacking is perfect!
Can I use chocolate chips instead of chopped chocolate for peppermint bark?
You definitely *can*, but I wouldn’t recommend it for the absolute best results. Chocolate chips have stabilizers added so they hold their shape well, which means they melt a little thicker and don’t give you that super smooth, glossy finish we want for the layers. For a truly professional-looking homemade chocolate bark, chop up good quality bars. It makes the final product much easier to spread evenly, which helps with the overall look of your peppermint bark.
What is the best way to crush candy canes?
You want crunch, not dust! Soggy, powdery peppermint really ruins the texture of this easy peppermint bark recipe. My favorite trick is to toss the candy canes (still in the plastic wrapper, if you can!) into a sturdy zip-top bag. Then, just take a rolling pin or even the flat bottom of a heavy saucepan and gently—or maybe not so gently—tap them until they are crushed into various sizes. You want some dust, but mostly nice little shards that stick nicely to the chocolate layers.
If you’re looking for something warm to sip on while you wait for your bark to chill, try my recipe for easy homemade applesauce recipe; it’s surprisingly cozy!
Estimated Nutritional Information for This Peppermint Bark
Everybody wants to know what they are eating, even when it comes to a phenomenal holiday treat like this! Keep in mind that because this peppermint bark relies on basic ingredients, the numbers are pretty straightforward. But since we are using both dark and white chocolate, these values are exactly what you can expect when you follow my simple guide for this classic holiday peppermint treat.
Please remember that these are just estimates based on my testing and that serving size of one glorious piece:
- Serving Size: 1 piece
- Calories: 120
- Sugar: 12g
- Sodium: 15mg
- Fat: 8g
- Saturated Fat: 5g
- Unsaturated Fat: 3g
- Trans Fat: 0g
- Carbohydrates: 13g
- Fiber: 1g
- Protein: 2g
- Cholesterol: 5mg
This looks like a perfect addition to any party spread, and I love that it comes in under 150 calories per piece! It’s proof that a delicious simple Christmas sweet doesn’t have to derail your whole day.
Share Your Festive Holiday Treat Creations
Now that you have made your very own gorgeous, shatteringly crisp peppermint bark, I absolutely insist that you tell me all about it! I love hearing how these simple, reliable recipes fit into your busy life. Did you add flaky sea salt? Did you manage to make it look exactly like the gourmet stuff? Don’t be shy!
Please take a moment to leave a rating right down in the comments below. If you made this, let me know how well this easy peppermint bark recipe worked for you. Sometimes a quick star rating is all you need, but a detailed comment helps me keep testing and perfecting these family favorites for everyone!
And oh my goodness, if you made a batch—especially if you are bagging them up for peppermint bark for gifts—please snap a picture! Tag me on social media. Seeing your homemade versions of this classic no bake Christmas candy filling up your feeds is genuinely the best part of my holiday season!
If you’re already looking ahead to what cozy holiday baking you might want to tackle next weekend, I have a wonderful recipe that always fills the house with warmth for the holidays. You should definitely check out my easy snickerdoodle cobbler recipe; it’s fantastic served warm with a scoop of vanilla ice cream.
PrintEasy 3-Ingredient Peppermint Bark

Make this simple, no-bake peppermint bark using only three ingredients for a perfect holiday treat ideal for gifting or snacking.
- Prep Time: 15 min
- Cook Time: 5 min
- Total Time: 20 min
- Yield: About 4 dozen pieces 1x
- Category: Dessert
- Method: No Bake
- Cuisine: American
- Diet: Vegetarian
Ingredients
- 12 ounces dark chocolate, chopped
- 12 ounces white chocolate, chopped
- 1 cup crushed candy canes
Instructions
- Line an 18×13 inch baking sheet with parchment paper.
- Melt the dark chocolate in a microwave-safe bowl in 30-second intervals, stirring between each, until smooth.
- Pour the melted dark chocolate onto the prepared baking sheet. Spread it into an even layer.
- Sprinkle half of the crushed candy canes evenly over the dark chocolate layer.
- Melt the white chocolate using the same method as the dark chocolate until smooth.
- Pour the melted white chocolate over the dark chocolate layer. Spread it gently to cover the dark chocolate.
- Immediately sprinkle the remaining crushed candy canes over the white chocolate layer. Press them lightly into the chocolate.
- Refrigerate the bark for at least 30 minutes, or until completely firm.
- Once firm, break the bark into irregular pieces. Store in an airtight container.
Notes
- For a copycat version, use high-quality chocolate bars instead of chips.
- If you want a stronger peppermint flavor, add 1/4 teaspoon of peppermint extract to the melted white chocolate before spreading.
- This recipe is excellent for making Christmas snack gifts for neighbors and friends.
Nutrition
- Serving Size: 1 piece
- Calories: 120
- Sugar: 12
- Sodium: 15
- Fat: 8
- Saturated Fat: 5
- Unsaturated Fat: 3
- Trans Fat: 0
- Carbohydrates: 13
- Fiber: 1
- Protein: 2
- Cholesterol: 5