
When the evening chill sets in, or when you just need a hug in a bowl, you don’t need fussy recipes. That’s my whole philosophy here at Devour Dish! I’m Avery Collins, and I promise you the best, most heartwarming flavors without any complicated steps. If you’re searching for that perfect simple yet elegant treat, look no further than these **baked pears**. We’re turning humble fruit into the most aromatic, comforting dessert using just a few pantry staples—it’s all about making delicious food for real life, just like I learned growing up. You can read more about my kitchen philosophy over on my About page!
These Classic Cinnamon Honey Baked Pears are my go-to. They smell incredible while they bake—all warm spice and natural sweetness—and they are genuinely tough to mess up. Whether it’s a holiday centerpiece or a solo weeknight indulgence, this easy recipe is tested, trusted, and ready for your table in under an hour. Seriously, if comforting baking sounds hard, I’m here to prove you wrong!

- Why You Will Love These Classic Cinnamon Honey Baked Pears
- Ingredients for Perfect Baked Pears Dessert
- How to Prepare Easy Baked Fruit Recipe Instructions
- Serving Suggestions for Your Warm Pear Dessert
- Storage and Reheating Instructions for Baked Pears
- Variations: From Dessert to Elegant Pear Appetizer
- Making Baked Pears: Nutritional Information Estimate
- Frequently Asked Questions About Baked Pears
- Share Your Experience with These Comforting Winter Desserts
Why You Will Love These Classic Cinnamon Honey Baked Pears
I bake these because they hit all the right notes without any fuss, which is exactly what we need in our busy lives. Trust me, once you try them, they’ll join your rotation of great go-to recipes.
- Absolutely Effortless: Prep time is barely ten minutes! It’s one of the easiest ways to make an elegant fruit dessert.
- Cozy Winter Vibe: The aroma of vanilla, honey, and cinnamon instantly makes your kitchen feel warm and inviting. Perfect for a chilly night or holiday gathering.
- Surprisingly Healthy: They rely on the fruit’s natural sugars boosted by a little honey, making these **baked pears** a much better choice than heavy cakes.
- Quick Turnaround: From start to finish, you’re looking at about 40 minutes total. That means warm dessert is never far away!
Ingredients for Perfect Baked Pears Dessert
Getting the groceries together for these **baked pears** is half the fun, and honestly, the list is so short! I always lay everything out first; it helps me make sure I don’t forget that vanilla splash or a pinch of spice. We are focusing on simple, high-impact flavor here, so use the best pears you can find!
- 4 firm but ripe pears (Bosc or Anjou work best for holding their shape!)
- 4 tablespoons honey
- 2 teaspoons ground cinnamon
- 1 teaspoon vanilla extract
- 2 tablespoons water
- Optional: 1/4 cup chopped walnuts or pecans
That’s it for the main ingredients! See? Not scary at all. Keep reading for my tips on picking the perfect fruit.
Ingredient Notes and Substitutions for Baked Pears
Choosing the right pear is key because we want them tender, not mushy, when they come out of the oven. Bosc and Anjou are my absolute go-to choices because they keep that nice shape even after roasting. If you don’t have honey, you can certainly swap it out! I often use half honey and half dark brown sugar for a richer, almost caramelized flavor. And if walnuts aren’t your thing, pecans give a lovely buttery crunch in their place.
How to Prepare Easy Baked Fruit Recipe Instructions
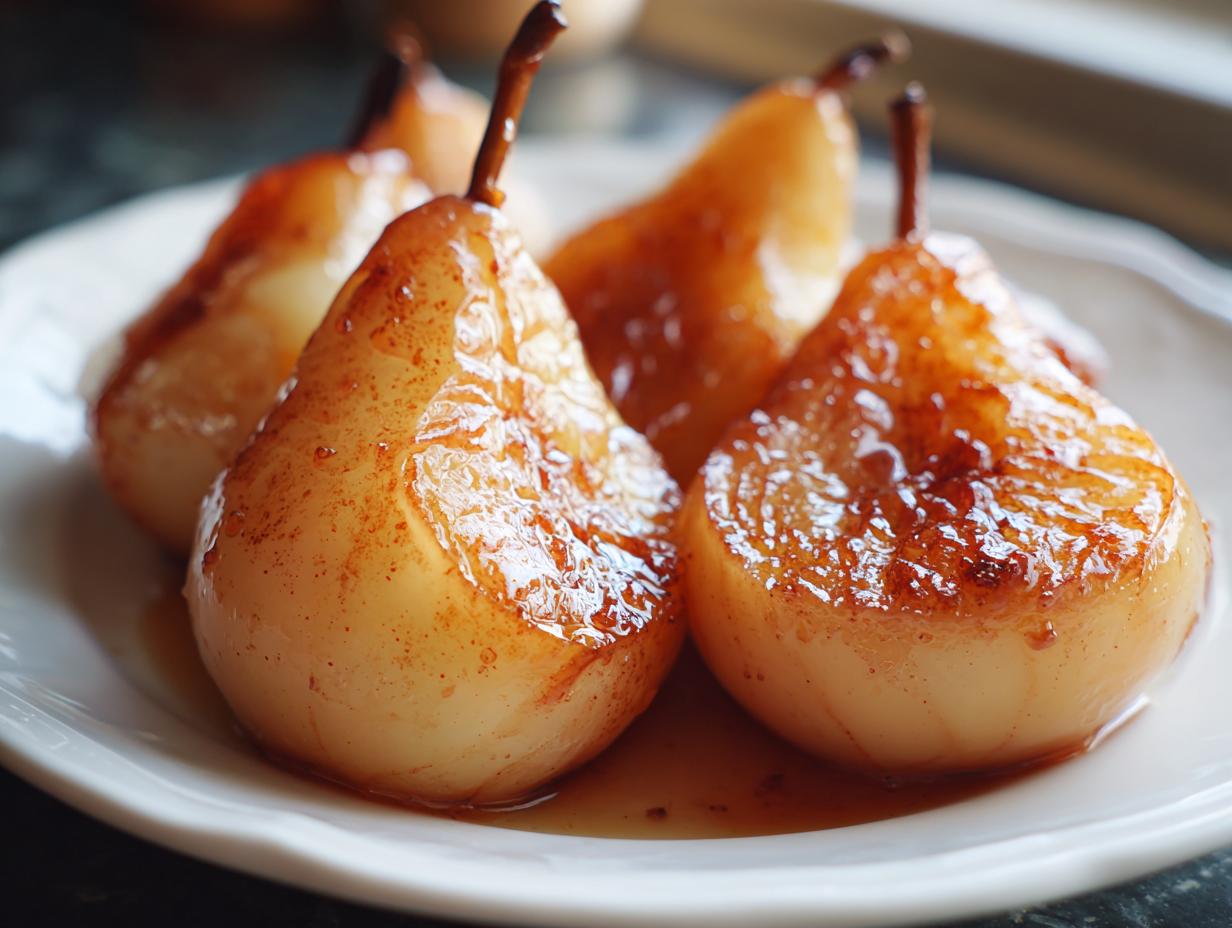
Okay, now for the actual baking! This is where the magic happens, and honestly, it’s truly one of the simplest processes you’ll ever do for a dessert. First things first, get that oven warmed up to 375 degrees Fahrenheit (that’s 190 Celsius for my friends using metric). Grab a small baking dish—nothing fancy needed here—and give it a quick grease so we aren’t fighting the pan later!
Next, we prep the fruit. Wash your pears well. Slice them right down the middle lengthwise, and then scoop out the center part where the seeds hide. I find a little melon baller works amazingly here, but a small spoon you use for coffee works just fine too. Don’t work too hard getting it perfect, though!
Time to make that gorgeous glaze! In a tiny bowl, just mix up your honey, cinnamon, and vanilla. Pour that sweet blend right over the cut surface of each pear half. Before sliding them into the oven, this is my big secret for perfect **baked pears**: pour those two tablespoons of water into the bottom of the dish. That steam keeps things from drying out and stops that honey glaze from scorching right away.
Pop them in the oven for about 25 to 35 minutes. You’ll know they are done when you can easily slide a fork right through the pear. If they feel too firm, keep baking! This simple technique usually yields the most tender **baked pears**.

Tips for Success When Making Baked Pears
Since I want every batch of your **baked pears** to turn out perfectly, let me share a couple of things I learned after countless tests. First, that water in the bottom of the pan? Non-negotiable! It creates steam and keeps the honey glaze from burning before the fruit has a chance to soften up. If you are using very ripe pears, keep a close eye on them; they might only need 20 minutes, so don’t walk away!
Also, if you tossed in nuts like pecans, you might want to sprinkle those on top only for the last 10 minutes of baking. That keeps them crunchy and perfectly toasted instead of getting totally submerged and soggy underneath the glaze. And when you pull them out, resist the urge to eat them immediately! They keep cooking for a minute or two, and letting them set slightly makes them easier to serve, especially if you plan on topping them with something cold, like the apple crisp topping I use sometimes!
Serving Suggestions for Your Warm Pear Dessert
Once these **baked pears** come out of the oven, the hardest part is waiting for them to cool down just enough to handle! They are so delicious simply spooned straight from the dish, but honestly, they turn into this fantastic, easy dessert with just one extra component.
The absolute, undisputed champion pairing for me is a big scoop of high-quality vanilla bean ice cream. The contrast between the ice-cold cream and the warm, spiced fruit is just heavenly. If you’re looking for something a little lighter, remember my notes mentioned Greek yogurt—that tangy coolness cuts through the sweetness of the honey perfectly. For a truly elegant finish, you can see how beautifully these caramelize when you check out ideas from others who love this dish, like they do at The Comfort Pan! A little dollop of fresh whipped cream never hurt anybody either, especially if you have company over!

Storage and Reheating Instructions for Baked Pears
I always hope there are leftovers because these **baked pears** taste fantastic the next day, which isn’t always true for fruit-based desserts! Once cooled completely, just pop your remaining pear halves into an airtight container. They keep really well in the fridge for about three to four days. Don’t worry; the cinnamon honey glaze keeps them nice and moist.
When you’re ready to enjoy them again, I highly recommend reheating them gently. A quick 5 to 7 minutes in a 350-degree oven works magic to warm them through without drying them out. If you’re short on time, the microwave is fine for about 30 seconds, but watch them closely so they don’t get too soft!
Variations: From Dessert to Elegant Pear Appetizer
My family loves the sweet dessert version, but sometimes you need something a little more sophisticated, right? That’s when we pivot to making these fruit halves for an appetizer, and it’s just as easy! If you’re looking to wow guests before dinner, skip the honey and those sweet spices.
Instead, try topping those halved pears with crumbled goat cheese. Just before baking, swap that honey glaze for a light drizzle of balsamic glaze. It sounds wild, but the tartness of the balsamic mixed with the creamy goat cheese melts beautifully into the warm fruit. It’s what I call the sweet and savory peak!
I’ve done this version when I want a lighter starter, sometimes even adding a few tart dried cranberries before they go into the oven. If you love playing with savory and cheese combinations, check out my recipe for bacon-wrapped stuffed dates; it uses a similar concept to get that perfect balance. You can find tons of inspiration for elegant pairings like this over at Recipes by Beatrice, too!

Making Baked Pears: Nutritional Information Estimate
Because I believe in being open about what goes into our food here at Devour Dish, I always try to include the nutritional breakdown for the recipe as accurately as possible. Remember, these numbers are just an estimate based on the Classic Cinnamon Honey Baked Pears recipe—if you add lots of ice cream or use extra honey, those figures will change, of course!
This data is specifically calculated for one serving, which is one pear half using the standard ingredients listed. It helps you see that this truly is a nice, light option when you want a warm, satisfying treat without feeling weighed down later.
- Serving Size: 1 pear half
- Calories: 210
- Sugar: 35g
- Sodium: 5mg
- Fat: 1g
- Protein: 1g
- Carbohydrates: 55g
- Fiber: 7g
See? Very straightforward, mainly coming from that beautiful fruit! This makes it a wonderful choice for those looking for a naturally sweet, easy fruit dessert. I always appreciate transparency in recipes, and I hope seeing these numbers builds trust in how light and simple this dish really is.
Frequently Asked Questions About Baked Pears
I get so many great questions after people try this recipe for the first time! It’s wonderful seeing how many of you are looking for simple fruit baking options, whether it’s for a weeknight treat or a **comforting winter dessert**. Here are a few things that pop up most often about making these classic **baked pears**.
What is the best type of pear for baking?
This is such an important question if you want that perfect texture! You really want a pear that holds its structure and doesn’t turn into sauce the second it hits the heat. For robust, reliable results—for both this recipe and my general tips on healthy baked fruit—I swear by using Bosc or Anjou pears. They stay firm enough to handle the baking time while softening beautifully.
Can I prepare these baked pears ahead of time?
Yes, absolutely, you can! I often prepare mine the morning of an event. You can core and halve the pears and mix up your cinnamon honey glaze. Keep the fruit stored in an airtight container in the fridge; squeeze in a tiny bit of lemon juice or water to keep them from browning too much. When you’re ready to serve, you just combine them in the baking dish, add the water to the bottom, and bake them fresh. They reheat beautifully, which makes them perfect for entertaining!
How can I make this recipe even healthier than it already is?
While these **baked pears** are already a wonderful, lighter choice compared to, say, a heavy cake, you can still sneak in some extra goodness! If you’re worried about the sugar, you can substitute half the honey with pure maple syrup, or even try using date paste instead—though that will change the texture slightly. Serving them with plain Greek yogurt instead of ice cream is another fantastic way to boost the protein while keeping it naturally sweet. It’s all about small swaps to fit your lifestyle!
Share Your Experience with These Comforting Winter Desserts
There you have it! My absolute favorite, foolproof way to make seriously delicious **baked pears**. This recipe is living proof that dinner doesn’t need to end with a complicated showstopper to be memorable. It’s the simple, warm flavors that stick with people, and I hope these cinnamon honey pears become one of your new favorites for those chilly evenings.
I truly want to know how it went for you! Did you use Bosc pears? Did you sneak in a scoop of ice cream like I always do? Please hop down to the comments below, leave a star rating for the recipe, and tell me what you thought. Hearing from you all helps me keep creating tested and trusted recipes that fit right into real life. If you made these **comforting winter desserts**, I would absolutely cherish it if you shared a photo on social media and tagged me—it makes my whole day to see my recipes shining on your tables!
If you have any lingering questions or need help adjusting things, don’t hesitate to reach out through my contact page. Until the next simple, delicious meal!
Happy Cooking,
Avery Collins
PrintClassic Cinnamon Honey Baked Pears

Make this simple yet elegant dessert that transforms ripe pears into a tender, aromatic treat using a cinnamon honey glaze. It is perfect for cozy nights or holiday gatherings.
- Prep Time: 10 min
- Cook Time: 30 min
- Total Time: 40 min
- Yield: 4 servings 1x
- Category: Dessert
- Method: Baking
- Cuisine: American
- Diet: Vegetarian
Ingredients
- 4 firm but ripe pears (Bosc or Anjou work well)
- 4 tablespoons honey
- 2 teaspoons ground cinnamon
- 1 teaspoon vanilla extract
- 2 tablespoons water
- Optional: 1/4 cup chopped walnuts or pecans
Instructions
- Preheat your oven to 375 degrees Fahrenheit (190 degrees Celsius). Lightly grease a small baking dish.
- Wash the pears. Cut each pear in half lengthwise and use a melon baller or small spoon to carefully scoop out the core and seeds.
- In a small bowl, mix together the honey, cinnamon, and vanilla extract to create the glaze.
- Place the pear halves cut-side up in the prepared baking dish. Drizzle the honey mixture evenly over the cut surface of each pear half.
- Pour the 2 tablespoons of water into the bottom of the baking dish to create steam and prevent sticking.
- If using, sprinkle the chopped nuts over the top of the pears.
- Bake for 25 to 35 minutes, or until the pears are tender when pierced with a fork. Baking time depends on the ripeness of your pears.
- Remove from the oven and let cool slightly before serving warm.
Notes
- Serve these warm baked pears with a scoop of vanilla ice cream or a dollop of Greek yogurt for a complete dessert.
- For an appetizer version, replace the honey with a drizzle of balsamic glaze and top with crumbled goat cheese before baking.
- If you prefer a richer flavor, substitute brown sugar for half of the honey.
Nutrition
- Serving Size: 1 pear half
- Calories: 210
- Sugar: 35
- Sodium: 5
- Fat: 1
- Saturated Fat: 0
- Unsaturated Fat: 1
- Trans Fat: 0
- Carbohydrates: 55
- Fiber: 7
- Protein: 1
- Cholesterol: 0