
Welcome, friends! When the holidays roll around, I always want to create something that looks totally spectacular but doesn’t keep me chained to the kitchen all day. We all deserve those easy, joyful moments, right? That’s why I’m obsessed with taking something wonderfully nostalgic—like those Little Debbie Christmas Tree Cakes we all secretly love—and turning it into an elegant showstopper. If you’ve been looking for a unique way to bring that childhood joy to your dessert table, look no further! This **Christmas Tree Cheesecake** is creamy, festive, and honestly, so much simpler to put together than you might imagine. It’s proof that the best desserts blend tradition and a little bit of fun. Plus, making this means you get to bake something new while remembering simpler times, kind of like how I feel when I make my famous easy pumpkin pie recipe!
- Why This Christmas Tree Cheesecake is Your New Holiday Favorite
- Ingredients for Your Creamy Christmas Tree Cheesecake
- Step-by-Step Instructions for the Perfect Christmas Tree Cheesecake
- Tips for a Crack-Free Christmas Tree Cheesecake
- Making a No Bake Christmas Tree Cheesecake Variation
- Ingredient Notes and Substitutions for Your Christmas Tree Cheesecake
- Serving Suggestions for Your Festive Desserts for Christmas
- Storage and Make-Ahead Tips for Your Christmas Tree Cheesecake
- Frequently Asked Questions About This Christmas Cheesecake Recipe
- Share Your Spectacular Christmas Sweets
Why This Christmas Tree Cheesecake is Your New Holiday Favorite
I know, I know, cheesecake sounds intimidating, but trust me on this one! This is where simple ingredients meet major holiday wow factor. We are leaning hard into those wonderful memories, making this one of the best Christmas cheesecake recipes you’ll make this year.
Why I absolutely insist you try this:
- Pure Nostalgia: It takes those beloved snack cakes and elevates them. These are true Nostalgic Christmas Desserts right here!
- Impressive Looks, Easy Bake: You get a slice that looks like it belonged on a magazine cover, but the actual hands-on work is minimal.
- Reliable Texture: Cheesecake bakes beautifully, and hiding the Little Debbie cakes inside keeps everything super creamy and prevents the dry spots you sometimes get. It’s a truly Spectacular Christmas Sweet!
Ingredients for Your Creamy Christmas Tree Cheesecake
Gathering your ingredients is part of the fun! For this recipe, we keep things straightforward, relying on pantry staples and, of course, those crucial Little Debbie Christmas Tree Cakes. Getting your cream cheese soft is non-negotiable; it sounds small, but it truly makes the difference between a lumpy filling and that velvety texture we are after.
For the Buttery Crust and Filling
You’ll need three standard blocks of cream cheese, make sure they are nice and soft so they whip up without any lumps! And when you’re shopping, grab those Christmas Tree Cakes—about two family-sized boxes should do the trick for this classic Holiday Cheesecake Recipe.
- 1 1/2 cups graham cracker crumbs
- 1/4 cup granulated sugar (for the crust)
- 6 tablespoons unsalted butter, melted
- 24 Little Debbie Christmas Tree Cakes, unwrapped
- 3 (8 ounce) packages cream cheese, softened (this is the key!)
- 1 1/2 cups granulated sugar (for the filling)
- 1 teaspoon vanilla extract
- 1/4 teaspoon salt
- 4 large eggs, room temperature is best
- 1/2 cup sour cream
For Decoration
This is where we paint the picture! Once your cheesecake chills completely, you can get creative turning that top layer into something festive.
- Green icing or frosting
- Holiday sprinkles (I like the little balls or stars!)
Step-by-Step Instructions for the Perfect Christmas Tree Cheesecake
Now for the fun part! Making a cheesecake requires a little attention to detail, especially regarding the oven temperature, but I promise it’s worth it when you see the results. We’re aiming for that super smooth texture, so don’t rush the mixing!
Preparing the Crust and Oven Setup
First things first, we need to get things ready! Preheat your oven to 325 degrees Fahrenheit—nice and low for baking. Grab your 9-inch springform pan and wrap the entire outside bottom and sides tightly with heavy-duty aluminum foil. I usually do two good layers because water leaks are the enemy of a perfect crust! Mix your graham cracker crumbs, the crust sugar, and the melted butter until it looks like wet sand. Press that firmly into the bottom of your pan and pop it into the oven to bake for about 10 minutes. When it comes out, just let it cool down a bit while you whip up that decadent filling.
Creating the Creamy Holiday Cheesecake Filling
In a big bowl, grab your softened cream cheese—remember, soft! Beat that with the filling sugar, vanilla, and salt until it’s ridiculously smooth. You don’t want any lumps hanging around. Now, we add the eggs, but this is key: add them one at a time, and only mix until it just disappears. Overmixing eggs brings in air, and air causes cracks! Finally, gently fold in the sour cream until the whole batter looks silky. That’s the magic for a truly creamy holiday cheesecake!
Assembling and Baking the Christmas Tree Cheesecake
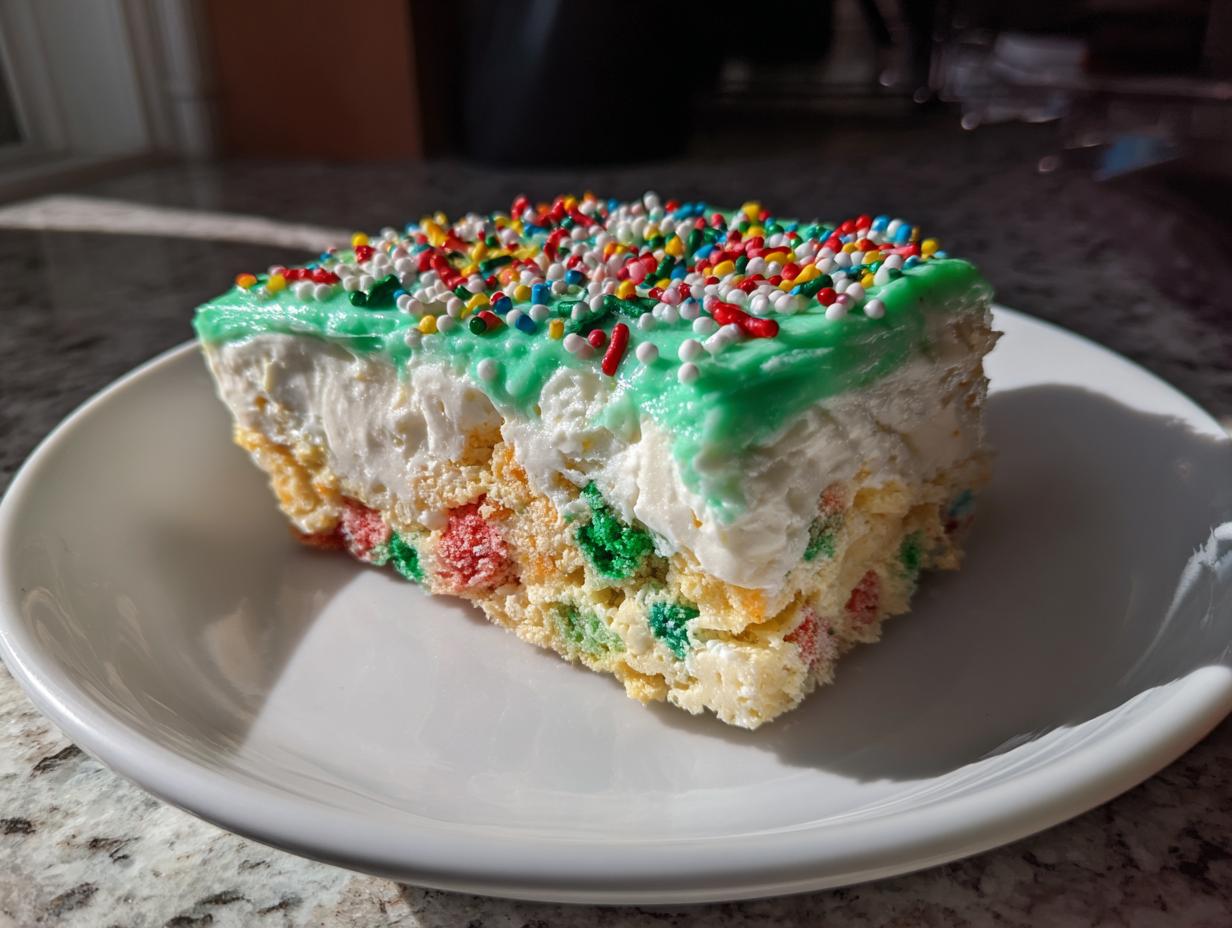
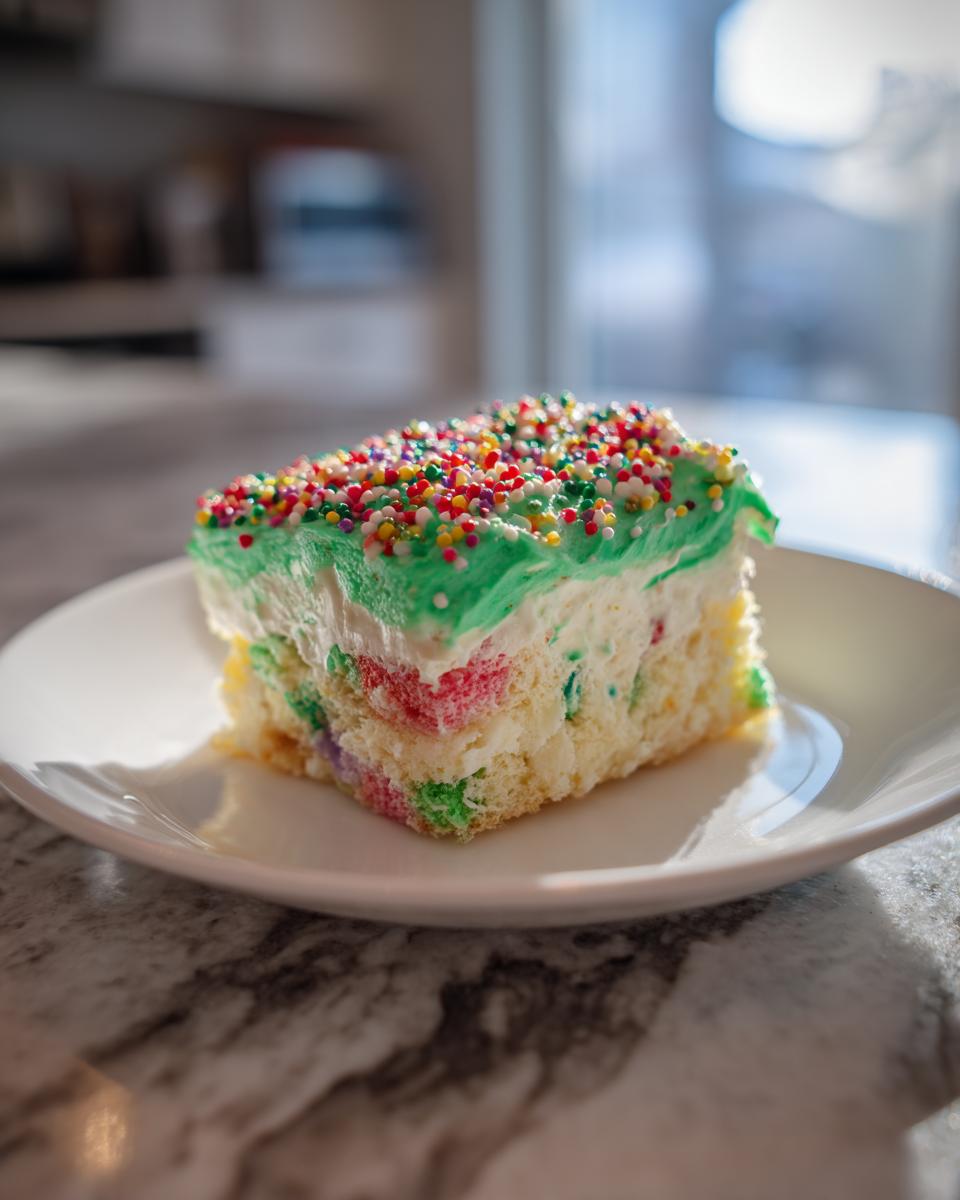
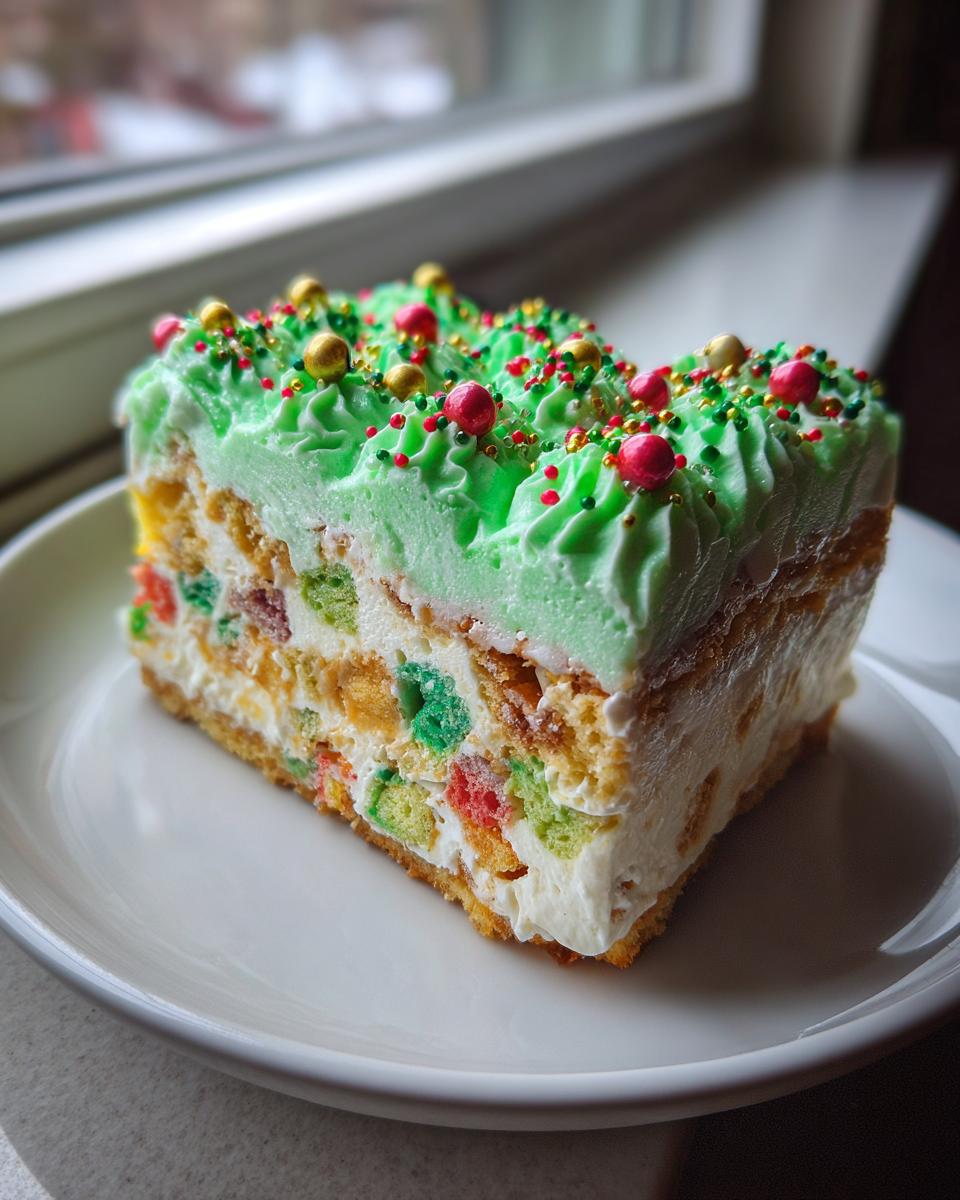
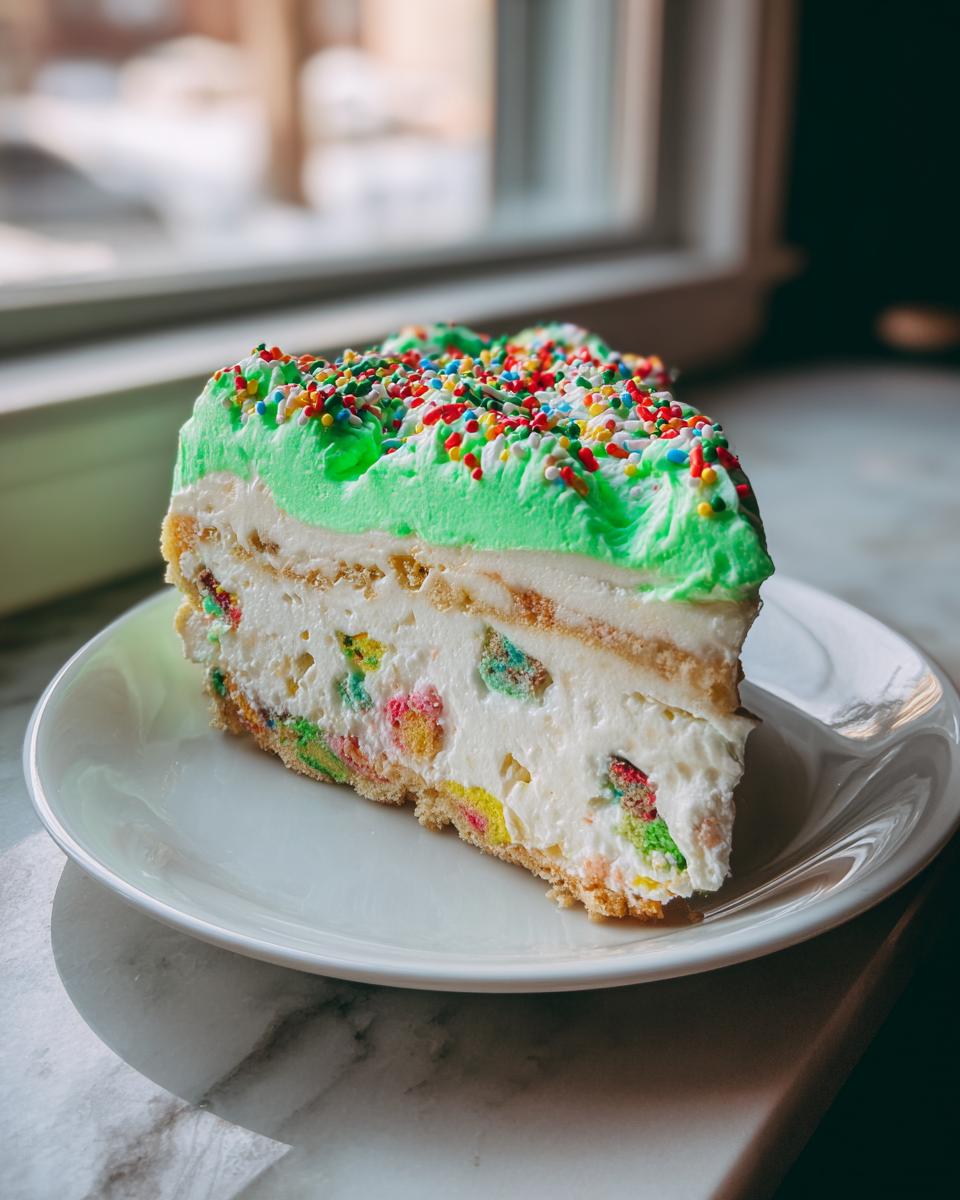
Time to assemble our holiday layers! Pour about half of your creamy batter over that cooled crust. Now strategically place 12 of those Little Debbie Christmas Tree Cakes gently on top. Pour the rest of the batter over them, and then drop the final 12 cakes on top, pressing them down just enough so they sink a little into the batter. Next, prepare your water bath: place that foil-wrapped springform pan inside a larger roasting pan and carefully pour hot water into the roasting pan until it hits about halfway up the sides of the springform. Bake this beauty for about 60 to 75 minutes. You’re looking for edges that look set, but the center should still have a slight jiggle—you know, like a good Jell-O!
Don’t pull it out immediately! Turn off the oven, crack the door open slightly, and let the cheesecake hang out in that warm environment for a full hour. This slow cooling is the secret handshake among cheesecake bakers to prevent those awful surface cracks.
Chilling and Decorating Your Christmas Tree Cheesecake
Once it’s completely cooled on the counter, cover it up and move it to the fridge. It needs a minimum of 6 hours in there, but honestly, overnight is always best for the firmest slice. Once it’s perfectly chilled and firm, carefully remove the springform sides. Now, whip out that green icing and get artistic! You can frost the top to resemble a big Christmas tree shape, and dust generously with your holiday sprinkles.
Enjoy your masterpiece!
Tips for a Crack-Free Christmas Tree Cheesecake
Cheesecake cracking is the bane of every baker’s existence, especially when you’re trying to make something look perfect for Christmas! But don’t you worry; fixing this is all about technique, not luck. We are aiming for that super creamy holiday cheesecake texture, and the water bath is your most important helper here.
First, make sure your cream cheese, eggs, and sour cream are all totally at room temperature before you even think about whipping them up. Cold ingredients make a lumpy batter quickly! Second, remember that slow cooling we talked about? Don’t skip letting it rest in that turned-off oven for an hour. That gradual temperature change is crucial. Finally, always wrap that pan really well in foil before it even kisses the water bath. These steps might sound fussy, but they are the difference between a perfect holiday centerpiece and a cracked disappointment!
Making a No Bake Christmas Tree Cheesecake Variation
Okay, what if your oven is already completely tied up with the turkey, or maybe you just don’t want to deal with the whole water bath situation? I totally get it! That’s why, for those busy holiday days, we absolutely have a fantastic No Bake Holiday Cheesecake option for this **Christmas Tree Cheesecake**.
The beauty of going the no-bake route is simplicity, which fits right in with my philosophy here at Devour Dish! You basically skip all the oven steps entirely. That means no crust baking—just mix the crust ingredients and press it firmly into the pan. Done! You save time and energy, which you can definitely use setting out those festive decorations!
For the filling, you mix everything up just like the recipe above, being super careful to beat that cream cheese until it’s perfectly smooth since we won’t have the oven to smooth out any lumps. Instead of pouring it into the water bath, you just assemble it all—crust, first layer of batter, Little Debbie cakes, second layer of batter, and top layer of cakes—and then pop the whole thing into the fridge.
The big difference is the chilling time. Since there’s no baking to set the structure, you need to be patient longer. Aim for at least 8 hours, but honestly, let it chill overnight if you can manage it. When it comes out, it will be firm, cold, and incredibly creamy. Just decorate as planned, and you have a spectacular, easy-to-manage holiday dessert!
Ingredient Notes and Substitutions for Your Christmas Tree Cheesecake
When you’re making any recipe for the first time, I always get a million questions about swapping ingredients. It’s smart to ask! We want this **Christmas Tree Cheesecake** to work perfectly for you, even if you’re missing one little item. I always recommend sticking close to the recipe, especially for the cream cheese ratios, because cheesecake texture is a science! But there are a couple of easy switches we can make that still keep everything delicious.
For instance, that buttery graham cracker crust? It’s lovely, but sometimes I want a little extra richness. If you have some chocolate cookies lying around, you can absolutely create a Golden Oreo crust alternative! Just swap the graham crumbs 1:1 for crushed Oreos (remove the cream filling first, unless you want an extra sweet base). It adds a nice visual contrast, too!
Now, let’s talk about the sour cream. This isn’t just filler, promise! I use sour cream because it adds a necessary slight tanginess that cuts through the sweetness of the cream cheese and the Little Debbie cakes. It keeps the whole dessert from tasting too flat or overly sweet. If you absolutely cannot find sour cream, using plain Greek yogurt works in a pinch, but you might need to use a little less, maybe start with 1/3 cup instead of 1/2 cup, just to keep things thick.
And remember those eggs? They need to be room temperature when you add them to the batter. If they jump straight from the fridge into the smooth cream cheese mixture, they can actually cause the batter to seize up and curdle slightly. Taking 30 minutes to let them sit out on the counter is such a small step for such a big payoff in smoothness!
Serving Suggestions for Your Festive Desserts for Christmas
Once you pull this stunning **Christmas Tree Cheesecake** out of the fridge, you need the right showcase! Because this is such a rich and decadent treat, I find it shines best alongside simpler accompaniments during your holiday gatherings. It’s definitely the star of the show.
For pairing, strong black coffee or a lovely cup of my rich, creamy homemade hot chocolate works perfectly to balance the sweetness. This is a true gem among Festive Desserts for Christmas, so serve it sliced thick on a simple white platter so those green decorations really pop. Everyone will be asking for the recipe before the plate is even cleared!
Storage and Make-Ahead Tips for Your Christmas Tree Cheesecake
This incredible **Christmas Tree Cheesecake** isn’t just gorgeous; it’s practically designed for stress-free entertaining because you really need to make it ahead! That long chilling time isn’t just for structure, it actually lets those Little Debbie flavors really meld beautifully into that vanilla filling. I always plan to bake this the day before my party, sometimes even two days before, and honestly, it tastes even better the second day!
Once it’s decorated and firm in the fridge, you need to keep it tightly covered. Plastic wrap directly touching the decoration might mess up your frosting design, so use tented foil or place a plastic dome over it if you have one. It keeps beautifully in the refrigerator for up to four days. That means you focus on appetizers and side dishes on party day—I often make a big batch of my easy homemade onion dip on Friday, and the cheesecake is done Saturday morning!
What about freezing? Yes, you can freeze cheesecake, and it’s a great trick for after the holidays! If you want to freeze it, do so *before* you add any decor, though. Slice it first, place the slices on a baking sheet lined with parchment paper, and freeze them solid. Once they are hard, transfer them into an airtight container layered with wax paper between each slice. It keeps really well for about a month. When you’re ready to eat a slice, just let it thaw in the fridge overnight. Perfect for those little cravings when the holiday rush finally settles down!
Frequently Asked Questions About This Christmas Cheesecake Recipe
I always love hearing what you all are wondering when you try a new bake! Cheesecake recipes, especially ones this fun, tend to bring up a few specific questions. I want to make sure you feel totally confident making this **Christmas Tree Cheesecake**. Here are some of the questions I get most often about our favorite slice of holiday joy!
Can I use a different Little Debbie cake in this Christmas Tree Cheesecake?
That’s such a great question if you can’t track down the Tree Cakes or maybe you just prefer a different flavor! While you absolutely can substitute them—maybe try the Oatmeal Creme Pies for a really rich twist, or even the Fudge Rounds—I do have to say that this recipe was specifically developed around the vanilla flavor and softer texture of the Christmas Tree Cakes. They really blend into that creamy white filling nicely and don’t fight the vanilla base. If you use a strongly flavored cake, the final flavor profile shifts quite a bit, but hey, that’s how new Little Debbie Inspired Recipes are born, right?
How important is the water bath for this recipe?
Oh, the water bath—the great debate of baking! For this specific recipe, I’d tell you it’s pretty darn important, especially if you want the absolute smoothest, creamiest texture possible, which is what makes this one of the Best Christmas Cheesecakes. That bath creates a humid, gentle heat environment. Without it, the outside edges of your cheesecake bake much faster than the center, causing the batter to set unevenly, which leads straight to those dreaded surface cracks. It’s worth the extra step of wrapping the pan in foil to guarantee a perfect top!
Can I skip the graham cracker crust and use a different base?
You totally can! The graham cracker crust is classic, dependable, and easy. But if you’re feeling creative, go for it! Lots of readers have had amazing success swapping it out for a shortbread cookie crumb crust, which adds a buttery, slightly sandy texture that’s divine. Another popular switch is using crushed vanilla or chocolate Oreos (just crush the whole cookie!). If you use Oreos, you might want to reduce the added sugar in the crust slightly, or go ahead and leave it the same if you like a sweeter foundation for your layers.
Share Your Spectacular Christmas Sweets
I truly hope this Creamy Little Debbie **Christmas Tree Cheesecake** brings a huge smile to your table this season!
If you give this recipe a try, please tell me all about it in the comments below! I love seeing your bakes. Don’t forget to rate it so others know it’s a winner. Happy holidays, and enjoy making some incredible Festive Desserts for Christmas!
PrintCreamy Little Debbie Christmas Tree Cheesecake

Make this nostalgic and festive Little Debbie Christmas Tree Cheesecake for your holiday gatherings. This recipe features a buttery crust, a rich vanilla filling, and layers of the iconic snack cake inside.
- Prep Time: 30 min
- Cook Time: 75 min
- Total Time: 1 hour 45 min
- Yield: 12 servings 1x
- Category: Dessert
- Method: Baking
- Cuisine: American
- Diet: Vegetarian
Ingredients
- 1 1/2 cups graham cracker crumbs
- 1/4 cup granulated sugar
- 6 tablespoons unsalted butter, melted
- 24 Little Debbie Christmas Tree Cakes (about 2 standard boxes)
- 3 (8 ounce) packages cream cheese, softened
- 1 1/2 cups granulated sugar
- 1 teaspoon vanilla extract
- 1/4 teaspoon salt
- 4 large eggs
- 1/2 cup sour cream
- Green icing or frosting (for decoration)
- Holiday sprinkles (for decoration)
Instructions
- Preheat your oven to 325 degrees Fahrenheit. Wrap the outside of a 9-inch springform pan tightly with heavy-duty aluminum foil.
- Prepare the crust: Mix graham cracker crumbs, 1/4 cup sugar, and melted butter in a bowl until combined. Press the mixture firmly into the bottom of the prepared springform pan. Bake for 10 minutes. Let the crust cool while you prepare the filling.
- Prepare the filling: In a large bowl, beat the softened cream cheese, 1 1/2 cups sugar, vanilla extract, and salt with an electric mixer until smooth. Beat in the eggs one at a time, mixing just until combined after each addition. Mix in the sour cream until the batter is smooth.
- Assemble the cheesecake: Pour half of the cream cheese batter over the cooled crust. Arrange 12 Little Debbie Christmas Tree Cakes evenly over the batter. Pour the remaining batter over the cakes. Place 12 more Little Debbie Christmas Tree Cakes on top of the batter, gently pressing them down slightly so they are partially submerged.
- Bake the cheesecake in a water bath: Place the foil-wrapped springform pan inside a larger roasting pan. Carefully pour hot water into the roasting pan until it reaches halfway up the sides of the springform pan.
- Bake for 60 to 75 minutes, or until the edges are set and the center has a slight jiggle.
- Turn off the oven, crack the oven door open slightly, and let the cheesecake cool inside the oven for 1 hour. This prevents cracking.
- Remove the cheesecake from the water bath and let it cool completely on a wire rack. Once cool, cover and refrigerate for at least 6 hours, or preferably overnight.
- Decorate before serving: Once chilled, carefully remove the sides of the springform pan. Decorate the top with green icing to resemble a tree shape, and top with holiday sprinkles.
Notes
- For a no-bake version, skip the crust baking step and the oven steps. Chill the cheesecake mixture for at least 8 hours until firm.
- You can use a Golden Oreo crust instead of a graham cracker crust for extra flavor.
- Make this decadent holiday treat ahead of time to save stress on party day.
Nutrition
- Serving Size: 1 slice
- Calories: 550
- Sugar: 55
- Sodium: 350
- Fat: 35
- Saturated Fat: 20
- Unsaturated Fat: 10
- Trans Fat: 1
- Carbohydrates: 58
- Fiber: 1
- Protein: 9
- Cholesterol: 120