

Oh my gosh, if you’re looking for a dessert that hits that perfect sweet spot between rich chocolate indulgence and creamy, salty peanut butter heaven, you’ve found your new favorite recipe! Seriously, the combination of chocolate and peanut butter is just legendary, isn’t it? I’m Avery, and here at Devour Dish, I promise you only the simplest, most reliable recipes, all tested until they are absolutely perfect for your real-life kitchen. That’s what I’m all about—making sure you feel confident every time you bake. Forget dry, crumbly cakes because we are making an Extra Moist Layered chocolate peanut butter cake today that will make everyone ask for the recipe, just like they expect from my tried-and-true methods over on my About page!
- Why This is the Best chocolate peanut butter cake Recipe
- Ingredients for Your Moist chocolate peanut butter cake
- Step-by-Step Instructions for the chocolate peanut butter cake
- Tips for the Ultimate chocolate peanut butter cake Success
- Making Variations of the chocolate peanut butter cake
- Storing Your Rich chocolate peanut butter cake
- Serving Suggestions for this chocolate peanut butter cake
- Frequently Asked Questions About the chocolate peanut butter cake
- Nutritional Estimates for Your Decadent Layer Cake Recipe
Why This is the Best chocolate peanut butter cake Recipe
I know, I know, everyone claims they have the “best” recipe, but hear me out! We’ve taken the guesswork out of this classic pairing. This isn’t some finicky dessert that only works if you consult an engineer. This is designed for real life, and it guarantees you incredible results. When you follow these steps, you get that ultimate texture we all crave. It’s the secret sauce for taking the stress out of baking for friends.
- It is unbelievably moist. Seriously, this cake stays fresh for days—if you can keep it around that long!
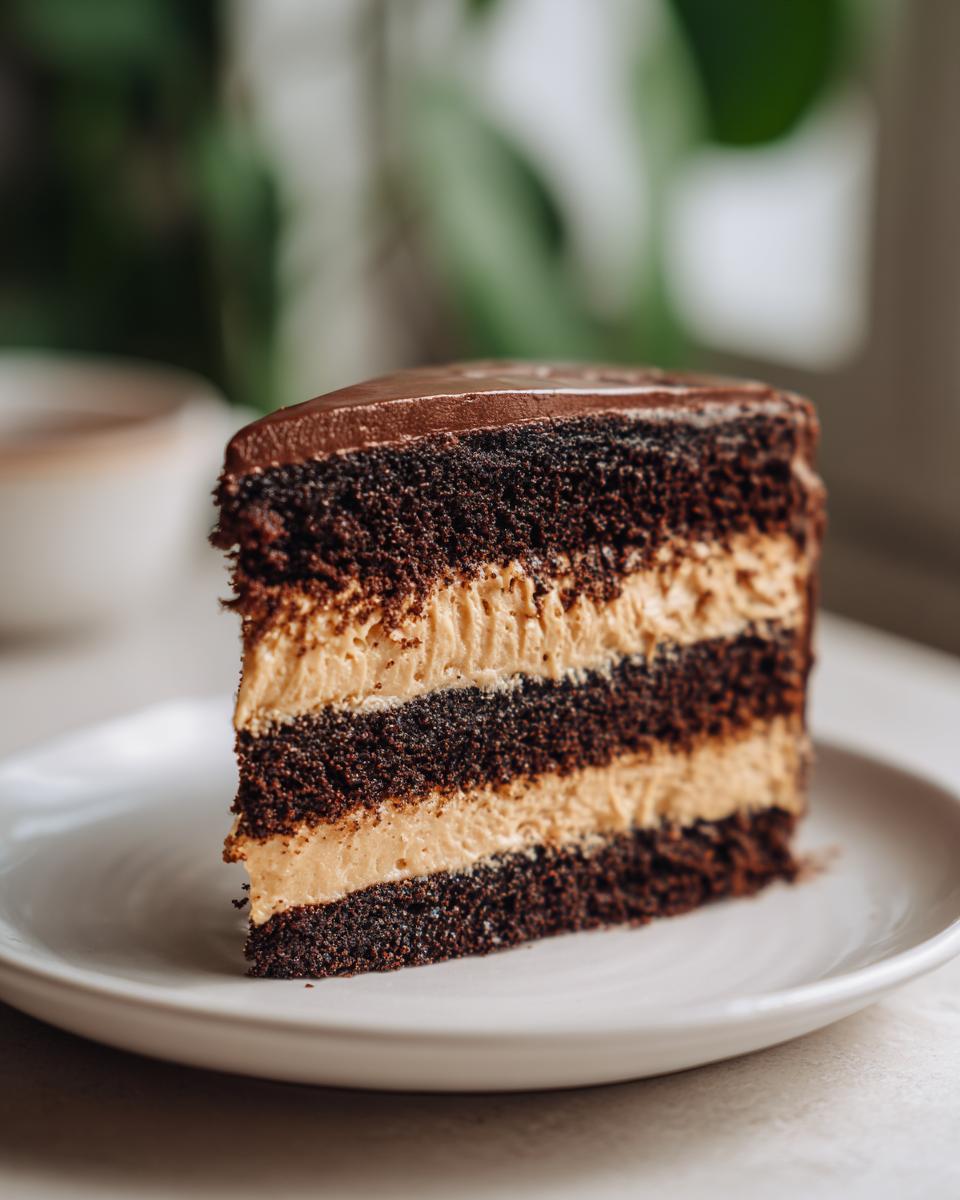
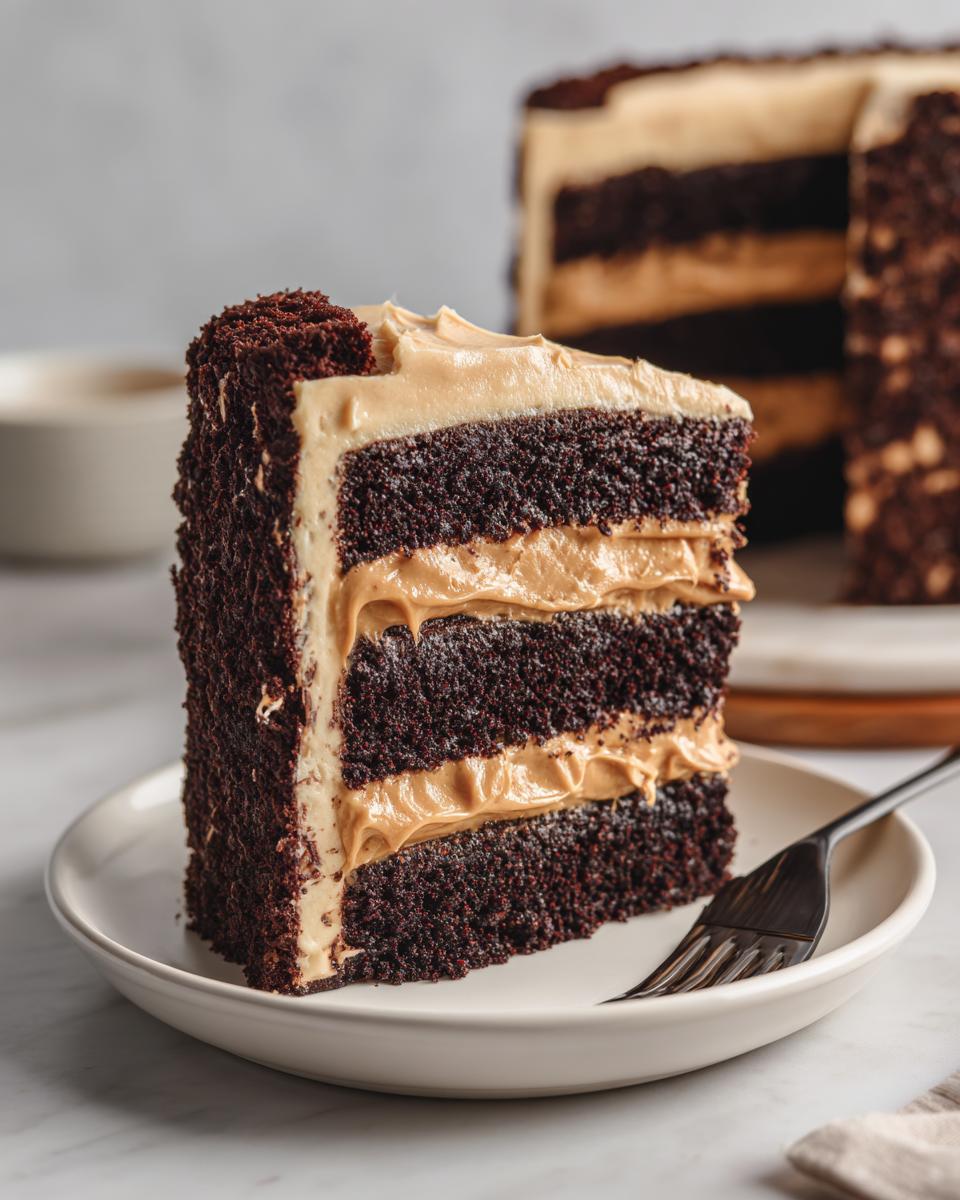
- The chocolate layers are deeply rich, providing the perfect dark base for the peanut butter.
- It’s a true showstopper! When you stack those two layers high, it’s perfect for any big gathering.
- It’s an accessible Decadent Layer Cake Recipe, meaning you get professional results without complicated techniques.
Ingredients for Your Moist chocolate peanut butter cake
The beauty of baking something truly special, like this rich chocolate peanut butter cake, is starting with good, familiar ingredients. You don’t need any fancy equipment here, just honest pantry staples! Remember, for the best texture—that super moist crumb we are aiming for—make sure your eggs and buttermilk have had a little time out on the counter to warm up a bit before you start mixing. That little temperature difference helps everything blend beautifully!
Here’s what you need for the two beautiful layers of chocolate cake:
- 1 3/4 cups all-purpose flour
- 1 3/4 cups granulated sugar
- 3/4 cup unsweetened cocoa powder
- 1 1/2 teaspoons baking soda
- 1 1/2 teaspoons baking powder
- 1 teaspoon salt
- 2 large eggs
- 1 cup buttermilk
- 1/2 cup vegetable oil
- 2 teaspoons vanilla extract
- 1 cup hot brewed coffee
For the Creamy Peanut Butter Frosting
This frosting is what truly dreams are made of! We want zero lumps and maximum fluffiness, so using that standard, creamy peanut butter ensures we get that utterly smooth texture. This is the key component for that wonderful Creamy Peanut Butter Frosting you’ll be slathering between those layers.
- 1 cup creamy peanut butter
- 1/2 cup (1 stick) unsalted butter, softened
- 3 cups powdered sugar
- 1/2 teaspoon salt
- 1/4 cup milk or heavy cream
Step-by-Step Instructions for the chocolate peanut butter cake
Okay, let’s get baking! Before you grab anything, the first thing you need to do is get that oven heating up to 350°F (175°C). We really want it fully ready right when you are. Also, grab those two 9-inch round cake pans and make sure you grease and flour them really well. Trust me, we want these cakes to slide right out later!
The baking process for this cake really locks in that moisture, giving us that great texture that people always rave about. Follow these sequence steps closely, and you’ll have a stunning dessert ready in about an hour of active time. If you want to see how I handle timing in other recipes, check out how I manage the process for my sweet potato pound cake!
Mixing the Thin Chocolate Peanut Butter Cake Batter
In a big bowl, whisk together all the dry stuff first: flour, sugar, that beautiful cocoa powder, baking soda, baking powder, and salt. Getting these mixed well before anything else is key for even distribution when we start the Moist Chocolate Cake Baking process.
Next, add the wet ingredients—eggs, buttermilk, oil, and vanilla—right into the dry. Beat that with your mixer on medium speed for a good two minutes until it looks just okay. Here’s my secret for getting that unbelievably deep chocolate flavor: carefully stir in that cup of hot brewed coffee last. It seems weird, but the heat actually blooms the cocoa, making the chocolate ten times richer in flavor! The batter will look super thin after you add the coffee, almost soupy. Don’t panic! That thinness is exactly what keeps this chocolate peanut butter cake so amazingly tender after it bakes.
Assembly and Frosting the chocolate peanut butter cake
Carefully divide that thin batter evenly between your two prepared pans. Pop them into that hot oven for about 30 to 35 minutes. You know they are done when a wooden pick comes out clean. Don’t overbake them, that’s the kiss of death for moisture!
Let those layers cool in the pans for just ten minutes—no more! Then, flip them onto a wire rack to cool completely. They must be totally cool before you attempt the frosting, or you’ll end up with a melted mess, which is definitely *not* a clean frosting line!
While they chill, whip up that creamy frosting. Once everything is ready, place your first layer down. Use about a third of that luscious peanut butter frosting, spreading it evenly. Pop the second layer on top. Now, for the prettiest part: cover the top and sides completely with the remaining frosting. This gorgeous result makes it the perfect Homemade Birthday Cake!

Tips for the Ultimate chocolate peanut butter cake Success
Making this cake legendary isn’t just about the steps; it’s about those little expert nudges that elevate a good dessert to an unforgettable one. Remember that piping hot coffee in the recipe? If you want to dive even deeper into that rich chocolate flavor profile—really boost that darkness—you can totally try swapping it out! Use hot water mixed with a teaspoon of instant espresso powder instead. It just intensifies that cocoa beautifully.
Also, if you’re thinking this cake needs an extra layer of fun for the kids or a special party, you absolutely have to lean into the candy theme. For a true Reese’s Inspired Cake experience, press some mini peanut butter cups right into the sides of the frosting or sprinkle them generously on top before serving. They stick really well to the creamy frosting! For more fun ideas on rich treats, you can peek at my red velvet cake pops recipe for some inspiration on additions.
Making Variations of the chocolate peanut butter cake
You know I love sticking to the tried-and-true method, but sometimes you just need to shake things up a little, right? This cake is so flexible! If you want to make this a truly extravagant Showstopper Celebration Cake, you absolutely have to consider adding a layer of simple chocolate ganache right over the peanut butter frosting before you do the final coat. Melted chocolate just elevates everything, making it extra decadent.
Another fun trick is creating a gorgeous Peanut Butter Chocolate Swirl! After you pour the cake batter into the pans, just dollop big spoonfuls of peanut butter (maybe thin it with a tiny bit of oil first so it spreads easier) right on top. Then, gently swirl it with a knife. Wow, the streaks that bake up are stunning! If you’re looking for other chocolate ideas, check out my no-bake chocolate ricotta truffles—they are so fun!
Storing Your Rich chocolate peanut butter cake
This is such a rich chocolate peanut butter cake, so keeping it fresh is important! Because of that wonderfully creamy frosting, I usually keep leftovers wrapped up tightly at cool room temperature for about two days. If your kitchen is super warm, or if you need it to last longer than that, pop it into the fridge. Just remember to pull a slice out about 30 minutes before serving so that frosting softens up again.
If you just happen to have a tiny bit left over, microwaving a single slice for about 10 seconds really brings that cake back to life and makes it taste freshly baked again. It’s the best way to enjoy this decadent dessert the next day!
Serving Suggestions for this chocolate peanut butter cake
This cake is versatile—it’s absolutely a Showstopper Celebration Cake when you need it to be, maybe dressed up with some extra drizzle or fresh berries. But honestly? I love pulling out a slightly warmed slice on a quiet Tuesday night. It hits the spot perfectly as a simple Weeknight Sweet Treat!

It pairs beautifully with a tall glass of ice-cold milk, just like we used to have as kids. If you are enjoying a slice after dinner, a robust, strong cup of black coffee really cuts through the richness of the peanut butter and makes all those deep chocolate notes sing. For other coffee-friendly treats, you should take a look at my coffee cake muffins sometime!
Frequently Asked Questions About the chocolate peanut butter cake
I get so many questions about this chocolate peanut butter cake after people try it, and that’s fantastic! It just means everyone wants to nail that perfect texture and flavor. Here are the few things people ask me most often when they are setting out to bake this Decadent Layer Cake Recipe for the first time.
Can I use natural peanut butter in the Creamy Peanut Butter Frosting?
That’s a great question! I really recommend sticking to that classic, processed creamy peanut butter for this Creamy Peanut Butter Frosting. The natural kind, the kind that separates when it sits on the shelf? It has too much oil that tends to weep right out of the frosting, making it soupy instead of fluffy. If you absolutely must use natural, you might need to add another full cup of powdered sugar to try and stabilize it, but honestly, it changes the flavor profile a bit.
How do I make this a Reese’s Inspired Cake?
Oh yes, if you want to take this over the top for someone who really loves that combination, making it a Reese’s Inspired Cake is so simple! Once you have the first layer frosted, before you put the second cake layer on, sprinkle a layer of roughly chopped mini Reese’s cups right over the peanut butter frosting. Then, once you’ve frosted the entire outside, just press more chopped cups onto the sides and top. It looks amazing and tastes even better!
Also, people sometimes ask if they can swap out the hot coffee for plain hot water. You can, but honestly, you lose so much of that deep chocolate flavor when you do that! A lot of people end up using instant espresso powder mixed with hot water instead of straight coffee, which is a fantastic way to boost the flavor without changing the liquid too much.
Nutritional Estimates for Your Decadent Layer Cake Recipe
Whenever I share one of my truly indulgent recipes, like this Rich Chocolate Desserts showstopper of a cake, I always get questions about the numbers. I want to be totally upfront with you all! Understanding what goes into a slice helps you enjoy it even more, though I always say the best ingredient is the love you put in, not the grams of fat!
The estimates below are calculated based on the ingredients listed above and divide the total recipe yield into 12 generous servings. Please keep in mind that these are just baking-blog estimates. How much frosting you pile on, the brand of peanut butter you use, and if you add extra candy on top will change these numbers wildly!
- Calories: 480 per slice (Wow, that’s a treat!)
- Fat: 28g total fat
- Carbohydrates: 60g
- Protein: 8g
This is definitely a dessert you save for special occasions or when you need that perfect mood boost! It’s a classic Chocolate Peanut Butter Dessert, so rich flavor comes standard. If you want to see how other folks rate this incredible dessert, you can check out this original recipe source, though I always encourage you to trust your gut and your measuring cups over online charts when it comes to baking!
PrintExtra Moist Layered Chocolate Peanut Butter Cake with Creamy Frosting

Make this rich, decadent chocolate peanut butter layer cake. It features extra moist chocolate cake layers and a simple, creamy peanut butter frosting, perfect for celebrations.
- Prep Time: 25 min
- Cook Time: 35 min
- Total Time: 60 min
- Yield: 12 servings 1x
- Category: Dessert
- Method: Baking
- Cuisine: American
- Diet: Vegetarian
Ingredients
- 1 3/4 cups all-purpose flour
- 1 3/4 cups granulated sugar
- 3/4 cup unsweetened cocoa powder
- 1 1/2 teaspoons baking soda
- 1 1/2 teaspoons baking powder
- 1 teaspoon salt
- 2 large eggs
- 1 cup buttermilk
- 1/2 cup vegetable oil
- 2 teaspoons vanilla extract
- 1 cup hot brewed coffee
- 1 cup creamy peanut butter (for frosting)
- 1/2 cup (1 stick) unsalted butter, softened (for frosting)
- 3 cups powdered sugar (for frosting)
- 1/2 teaspoon salt (for frosting)
- 1/4 cup milk or heavy cream (for frosting)
Instructions
- Preheat your oven to 350°F (175°C). Grease and flour two 9-inch round cake pans.
- In a large bowl, whisk together the flour, sugar, cocoa powder, baking soda, baking powder, and salt for the cake.
- Add the eggs, buttermilk, oil, and vanilla extract to the dry ingredients. Beat with an electric mixer on medium speed for two minutes.
- Carefully stir in the hot coffee until the batter is smooth. The batter will be thin.
- Divide the batter evenly between the prepared cake pans.
- Bake for 30 to 35 minutes, or until a wooden pick inserted into the center comes out clean.
- Let the cakes cool in the pans for 10 minutes before inverting them onto a wire rack to cool completely.
- Prepare the frosting: In a medium bowl, beat the softened butter until creamy. Add the peanut butter and beat until combined.
- Gradually add the powdered sugar, alternating with the milk or cream, beating until the frosting is smooth and fluffy. Add salt.
- Once the cake layers are completely cool, place one layer on a serving plate. Spread about one-third of the peanut butter frosting evenly over the top.
- Place the second cake layer on top. Frost the top and sides of the entire cake with the remaining frosting.
- Slice and serve this showstopper celebration cake.
Notes
- For an extra rich flavor, substitute the hot coffee with hot water mixed with 1 teaspoon of instant espresso powder.
- If you want a Reese’s inspired cake, press mini peanut butter cups onto the sides or top of the finished cake.
- This recipe makes a great homemade birthday cake.
Nutrition
- Serving Size: 1 slice
- Calories: 480
- Sugar: 55g
- Sodium: 350mg
- Fat: 28g
- Saturated Fat: 10g
- Unsaturated Fat: 18g
- Trans Fat: 0g
- Carbohydrates: 60g
- Fiber: 3g
- Protein: 8g
- Cholesterol: 55mg