

There is just something about sinking your teeth into those perfectly warm, fluffy breadsticks dipped in sauce. You know the ones—the ones that come fresh out of the oven at that big Italian chain. If you’re like me, sometimes only that specific, buttery, garlicky flavor will hit the spot! Well, forget running out to grab a basket. I’ve cracked the code to those famous treats right here at Devour Dish.
This is my go-to homemade breadsticks recipe for the Olive Garden Copycat Cheesy Garlic Breadsticks. And trust me, it lives up to the simple and trusted philosophy Avery built this blog on: incredible flavor without complicated steps. We’re talking reliably soft, genuinely fluffy breadsticks, and the whole process takes less than an hour and twenty minutes total. They are the easiest appetizer you’ll ever make!
- Why These Copycat Breadsticks Are Your New Favorite Appetizer Breadsticks
- Ingredients for Soft Homemade Breadsticks with Garlic Topping
- How to Make Breadsticks at Home: Step-by-Step Instructions
- Tips for Success When Making Cheesy Garlic Breadsticks
- Serving Suggestions for Your Homemade Breadsticks Recipe
- Storage and Reheating Instructions for Buttery Breadsticks
- Frequently Asked Questions About Copycat Breadsticks
- Nutritional Estimates for These Garlic Butter Breadsticks
- Share Your Homemade Breadsticks Creations
Why These Copycat Breadsticks Are Your New Favorite Appetizer Breadsticks
I have tested so many recipes trying to capture that restaurant magic, and I keep coming back to this one every single time. It’s not just a side dish; it’s the star of the show! Why should you make these copycat breadsticks tonight?
- They are genuinely soft homemade breadsticks—fluffy inside with that perfect light chew. Seriously addictive.
- The flavor hits all the right notes: lots of real garlic, Italian herbs, and plenty of salty Parmesan on top. Forget bland buns!
- It qualifies as a quick breadsticks recipe. You get the dough rising while you put together whatever else you are serving.
- Whether you need appetizer breadsticks for game day or the perfect dinner side breadsticks for that pot of soup, these fit the bill perfectly.
Pair these beauties with my creamy bruschetta dip, and watch them disappear! This recipe is worth every single second of the rising time.

Ingredients for Soft Homemade Breadsticks with Garlic Topping
Okay, let’s get down to brass tacks. The secret to making amazing soft homemade breadsticks that stay fluffy isn’t just the mixing; it’s having the right components ready to go. I always measure everything out first because once that yeast wakes up, we need to move fast! These ingredients are divided into what builds the bread structure and what gives us that amazing, rich coating.
For the Fluffy Breadsticks Dough
This is where the magic starts. The water temperature is key here—if it’s too hot, you kill the yeast! We want happy, active yeast so we can get those fluffy breadsticks we are craving.
- 1 1/2 cups warm water (make absolutely sure it’s between 105-115°F—you can test it with your finger first!)
- 2 1/4 teaspoons active dry yeast
- 2 tablespoons granulated sugar
- 4 cups all-purpose flour, plus more for dusting
- 1 teaspoon salt
- 1/4 cup unsalted butter, melted
For the Garlic Butter Breadsticks Topping
This topping is what transforms simple dough into restaurant-quality goodness. You want the butter soft so it brushes on easily right when those breadsticks come out of the oven. That quick brush seals in the moisture!
- 1/4 cup unsalted butter, softened (not melted!)
- 2 teaspoons garlic powder
- 1 teaspoon dried Italian seasoning
- 1/2 teaspoon salt (for topping)
- 1/2 cup grated Parmesan cheese
How to Make Breadsticks at Home: Step-by-Step Instructions
This process is so straightforward, much like my philosophy here at Devour Dish! When you’re ready to bake these incredible breadsticks, just follow along. Don’t rush the rising time though; that’s where the cloud-like texture comes from. We’re breaking this down into three main chunks. If you want a fantastic baseline for the dough, you can check out the notes on homemade breadsticks recipes for reference!
Activating Yeast and Mixing the Breadsticks Dough
First things first: wake up that yeast! Pour your warm water—remember, 105 to 115°F—into a large bowl, then stir in the sugar and the yeast. You need to let this sit for about five to ten minutes. What you’re looking for is foamy activity on top. If it gets nice and bubbly, your yeast is ready to party! If nothing happens, your water was likely too hot or too cold, and we have to start over.
Once you see that lovely foam, it’s time to dump in the melted butter, the salt, and almost all the flour. Mix it all up until it looks like one big, shaggy mess. This is exactly what you want before moving on to the good part—kneading!
Kneading and Rising for Fluffy Breadsticks
Time to get your hands dirty! Turn that shaggy dough out onto a lightly floured counter. You need to knead these breadsticks dough balls for a solid five to seven minutes. You are looking for it to get smooth and elastic under your palms. This develops the gluten so the bread holds its shape but stays wonderfully soft, making them the best fluffy breadsticks.
When it feels right, place it in a lightly oiled bowl, cover it tightly, and let it ride. I like to put mine in my oven with the light on—it stays perfectly warm in there. Let it rise for 45 minutes, or until it’s puffed up and doubled in size. Patience here prevents dense bread! I learned this trick from my mom; she always claimed the warmest spot in the house makes the dough happiest.

After rising, punch that air out! I know it feels wrong, but you need the air to redistribute. Then, divide that beautiful dough into 12 equal pieces. We want to make sure we use all the dough, just like when I make my Garlic Parmesan Potatoes; no good ingredient goes to waste!
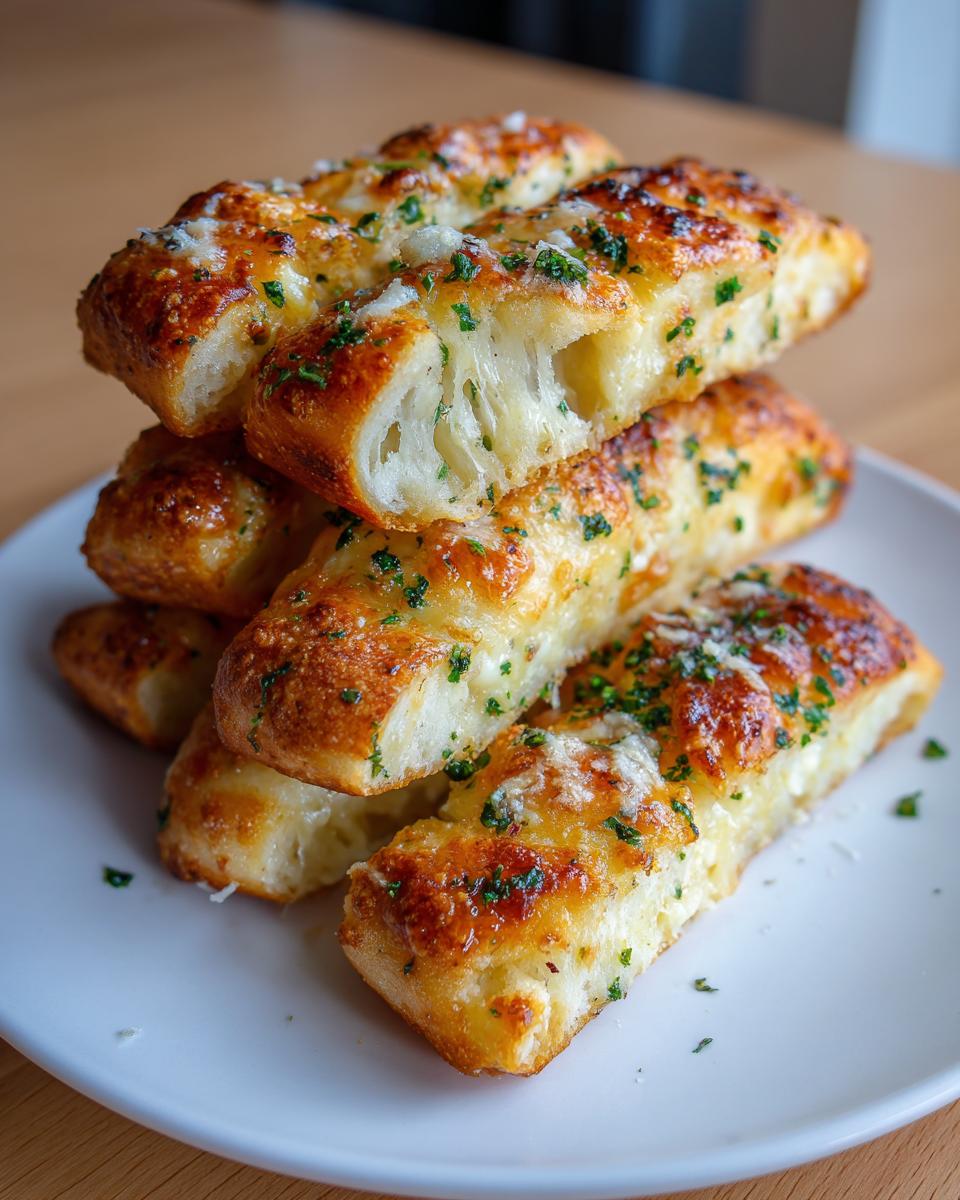
Shaping, Baking, and Applying the Garlic Butter Breadsticks Topping
Now we shape! Roll each of those 12 pieces into long, skinny breadsticks, aiming for about 10 inches. They’ll puff up a bit more in the oven. Lay them on a baking sheet lined with parchment paper, leaving just a little breath room between them. Bake them at 400°F for about 10 to 12 minutes until they look just barely golden brown.
Here is the critical moment for those signature garlic butter breadsticks: the second they come out of the oven, we brush them madly with that softened butter mixture we prepared earlier. Seriously, coat them liberally! Then, right away, sprinkle that grated Parmesan cheese all over the top. The heat melts it just enough to stick perfectly. If you are also making some crusty bread for sauce dipping later, check out my recipe for crusty Italian bread to see how the texture can vary!

Tips for Success When Making Cheesy Garlic Breadsticks
Honestly, these cheesy garlic breadsticks almost make themselves, but a few little insider tricks from my kitchen ensure they end up perfect every single time. I want your results to be exactly like mine—super soft and bursting with flavor! Don’t worry if you are using this recipe for the first time; Avery and I promise they are reliable.
Ingredient Secrets for Superior Breadsticks
If you want to take these from great to *gourmet breadsticks*, try this little trick: add about half a teaspoon of garlic salt right into the dough mixture along with the regular salt we listed. It gives the bread itself a deeper, subtle garlic note that you can’t quite get from the topping alone. And seriously, please double-check that water temperature! If the water isn’t warm enough for the yeast, you’ll end up wondering why your dough won’t rise. It matters more than you think! You can see a similar focused approach over at Olive Garden Garlic Breadsticks for reference on temperature control.
Troubleshooting Common Issues with Breadsticks
Did your dough not get fluffy? Nine times out of ten, it was the water temperature, or maybe you used old yeast. If your breadsticks bake up hard, that usually happens if you knead them too long—five to seven minutes is plenty! Overworking the dough develops too much tough gluten. Also, be careful not to overbake them; 12 minutes is usually the max. You want them pale golden, not dark brown, because that post-oven butter bath does most of the gorgeous golden coloring for you. My recipe for roasted garlic cowboy butter uses a similar technique if you want more intense garlic flavor!
Serving Suggestions for Your Homemade Breadsticks Recipe
So, now you have these warm, fluffy, garlic-bomb breadsticks sitting on your counter. What now? Don’t just eat them standing over the sink—although I won’t judge if you do! These are the most amazing dinner side breadsticks you’ll ever make. They are mandatory next to any saucy dish. Seriously, they soak up sauce like nothing else!
They are incredible with a big bowl of my creamy spinach Alfredo, or dipped right into my tortellini soup. If you skipped the Parmesan topping, definitely have some marinara sauce ready!
Storage and Reheating Instructions for Buttery Breadsticks
I know you probably want to eat all 12 of these magnificent buttery breadsticks right now, but let’s talk about saving some for later! If you have any leftovers—which is tough, I know—you need to store them properly to keep that signature fluffiness. Keep them in an airtight container at room temperature. Don’t put them in the fridge! The fridge steals their moisture, and nobody wants stale breadsticks.
To reheat and bring back that warm, soft texture, skip the microwave! Pop them onto a sheet pan and warm them in a 350°F oven for about five minutes. If you want them extra crispy, you can even give them a spray of water first. Buying recipe guides, like this one from Homemade Cheesy Garlic Breadsticks, is also an option if you need a physical guide!
Frequently Asked Questions About Copycat Breadsticks
I know you might have a few lingering questions after seeing how easy this recipe is! We want to make sure your first batch of these copycat breadsticks turns out golden brown and fluffy. It’s all about building that trust in the kitchen, just like when I make my Dill Pickle Chicken Salad—you need to trust the simple process!
Can I make these breadsticks without a stand mixer?
Absolutely, you can! You do not need a fancy mixer for these Italian breadsticks. I mention kneading by hand in the steps, and it’s honestly just as good, if not better, for getting a feel for the dough. You’ll need to be disciplined though! You have to commit to that full five to seven minutes of kneading time. That’s what develops the gluten structure to give you those amazing, soft homemade breadsticks. Your arms might get a little tired, but trust me, you’ll feel like a champion when they rise beautifully!
What is the best cheese substitute for these Parmesan breadsticks?
The sharp, salty flavor of Parmesan is what helps define these cheesy breadsticks, especially against all that garlic butter! If you don’t have Parmesan on hand, Pecorino Romano is a fantastic, slightly sharper substitute that works perfectly. If you happen to be vegan or dairy-free but still want that cheesy zing, you can swap the two-thirds cup of Parmesan for about half a cup of nutritional yeast mixed with a tiny pinch of extra salt.
Can I use refrigerated dough for a quick breadsticks recipe?
Look, I totally get it because sometimes even I want the absolute quickest way to get bread on the table! Yes, you *can* use refrigerated pizza dough or biscuit dough if you are truly desperate for a super fast appetizer. However, I have to be honest with you: it will not produce these same amazing, unbelievably soft homemade breadsticks. The rise and chew from making the yeast dough from scratch creates a fluffier, chewier texture that store-bought just can’t match. Stick with the five-to-ten-minute rise time for the yeast, and you’ll see why this is worth the few extra minutes!
Nutritional Estimates for These Garlic Butter Breadsticks
Okay, so we know these garlic butter breadsticks are the ultimate comfort food, and let’s be real, they taste way too good to be low-calorie! But if you are keeping track or just curious about what you’re enjoying alongside your main course or dipping sauce, I’ve got the estimates for you right here.
Remember, since these are fresh from scratch, these numbers are based exactly on the measurements in the recipe above, using standard all-purpose flour and full-fat Parmesan. Every kitchen cooks a little differently, so think of this as a really good guideline for a single breadstick serving.
- Serving Size: 1 breadstick
- Calories: About 180
- Fat: Roughly 7g (Watch out for that rich butter!)
- Saturated Fat: Around 4g
- Carbohydrates: 26g
- Protein: 5g
- Sugar: Only 2g (That’s natural sugar from the flour and yeast working hard!)
- Sodium: 350mg (That cheese and topping salt really add up!)
These are certainly more hearty than something you’d grab on the go, which is great because they keep you satisfied all the way until dessert. They make for a perfect, indulgent companion to almost any pasta dish, just like you’d expect from your favorite restaurant!
Share Your Homemade Breadsticks Creations
Whew! Now that you have a beautiful, warm pile of the best breadsticks you’ve ever made, I want to see them! I put my heart into making sure this recipe is super reliable—true to the Devour Dish philosophy of simple, real food—so I truly hope you love them.
If you made these, please hit the rating button at the top of the page and give them five stars if they earned it! That helps other home cooks find this fantastic recipe. Also, I’m obsessed with seeing what everyone pairs these with. Did you serve them with a big bowl of my chicken with buttered noodles? Or maybe you saved some sauce from last night’s dinner just for dipping?
Snap a picture of your cheesy, garlicky masterpieces and tag me on social media! I absolutely live for seeing your creations. And please, drop a comment below telling me how you served your buttery breadsticks. Did you stick to the classic Italian theme, or get creative?
PrintOlive Garden Copycat Cheesy Garlic Breadsticks

Make soft, fluffy breadsticks at home that taste like the famous restaurant version, topped with rich garlic butter and Parmesan cheese. This easy recipe is ready in about an hour.
- Prep Time: 20 min
- Cook Time: 12 min
- Total Time: 77 min
- Yield: 12 breadsticks 1x
- Category: Appetizer
- Method: Baking
- Cuisine: American
- Diet: Vegetarian
Ingredients
- 1 1/2 cups warm water (105-115°F)
- 2 1/4 teaspoons active dry yeast
- 2 tablespoons granulated sugar
- 4 cups all-purpose flour, plus more for dusting
- 1 teaspoon salt
- 1/4 cup unsalted butter, melted
- 1/4 cup unsalted butter, softened (for topping)
- 2 teaspoons garlic powder
- 1 teaspoon dried Italian seasoning
- 1/2 teaspoon salt (for topping)
- 1/2 cup grated Parmesan cheese
Instructions
- Combine the warm water, yeast, and sugar in a large bowl. Let stand for 5 to 10 minutes until foamy.
- Add the melted butter, flour, and 1 teaspoon of salt to the yeast mixture. Mix until a shaggy dough forms.
- Knead the dough on a lightly floured surface for 5 to 7 minutes until it becomes smooth and elastic.
- Place the dough in a lightly oiled bowl, turning to coat. Cover the bowl and let the dough rise in a warm place for 45 minutes, or until doubled in size.
- Preheat your oven to 400°F (200°C). Line a large baking sheet with parchment paper.
- Punch down the risen dough. Divide the dough into 12 equal pieces. Roll each piece into a long, thin breadstick shape, about 10 inches long.
- Place the breadsticks on the prepared baking sheet, leaving a small space between them. Bake for 10 to 12 minutes, or until lightly golden brown.
- While the breadsticks bake, prepare the topping: In a small bowl, mix the softened butter, garlic powder, Italian seasoning, and 1/2 teaspoon of salt.
- Immediately after removing the breadsticks from the oven, brush them generously with the garlic butter mixture.
- Sprinkle the grated Parmesan cheese evenly over the warm, buttered breadsticks.
- Serve warm as an appetizer or dinner side dish.
Notes
- For extra flavor, add 1/2 teaspoon of garlic salt to the dough mixture before kneading.
- If you want a quicker rise time, place the dough in a slightly warm oven (turned off) to proof.
- These breadsticks pair well with marinara sauce or Alfredo sauce for dipping.
Nutrition
- Serving Size: 1 breadstick
- Calories: 180
- Sugar: 2
- Sodium: 350
- Fat: 7
- Saturated Fat: 4
- Unsaturated Fat: 3
- Trans Fat: 0
- Carbohydrates: 26
- Fiber: 1
- Protein: 5
- Cholesterol: 15