
When I think about comforting, classic American desserts, nothing beats a slice of homemade fruit pie, especially when it comes bursting out of the oven smelling like summer heaven. That’s why I’m so thrilled to share my absolute favorite blackberry pie recipe with you today! This isn’t just another recipe; this is the one I trust when I need a showstopper. We focus heavily on two things here at Devour Dish: making sure you get that impossibly flaky, all-butter crust, and locking in the filling so you end up with a truly juicy, perfectly set slice—say goodbye to that dreaded soggy bottom! This is the kind of reliable baking I learned growing up, and it’s designed to bring comfort right to your table.
- Why This Homemade Blackberry Pie Recipe Works Every Time
- Gathering Ingredients for Your Blackberry Pie
- Step-by-Step Instructions for the Best Blackberry Pie
- Baking and Cooling the Blackberry Pie Perfectly
- Tips for the Ultimate Old Fashioned Blackberry Pie
- Serving Suggestions for Your Blackberry Pie
- Storage and Reheating Instructions for Blackberry Pie
- Frequently Asked Questions About Making Blackberry Pie
- Estimated Nutritional Data for Blackberry Pie
- Share Your Homemade Blackberry Pie Experience
Why This Homemade Blackberry Pie Recipe Works Every Time
I know there are a million recipes out there, but I poured my heart into making sure this homemade blackberry pie is foolproof. When you follow these steps, you’re not just baking; you’re setting yourself up for success. My goal is always reliability, and that means tackling the two biggest pie-day disasters head-on. Stick with me, and you’ll see why this pie is always a winner. If you want to know a little more about my baking philosophy—it’s all heart and simplicity—you can check out my About Page!
Achieving the Perfect Flaky Pie Crust
It all comes down to temperature, my friend! We are using a purely all-butter crust here because, honestly, nothing else tastes as rich. The most important rule? Keep everything ice cold! Butter, water—I even chill my bowl sometimes. Those tiny, cold pieces of butter melt in the oven, creating steam pockets. That steam is exactly what gives you that incredible, shattered, flaky pie crust that makes people ask for the recipe.
The Secret to a Juicy Blackberry Filling (No Soggy Bottom Pie)
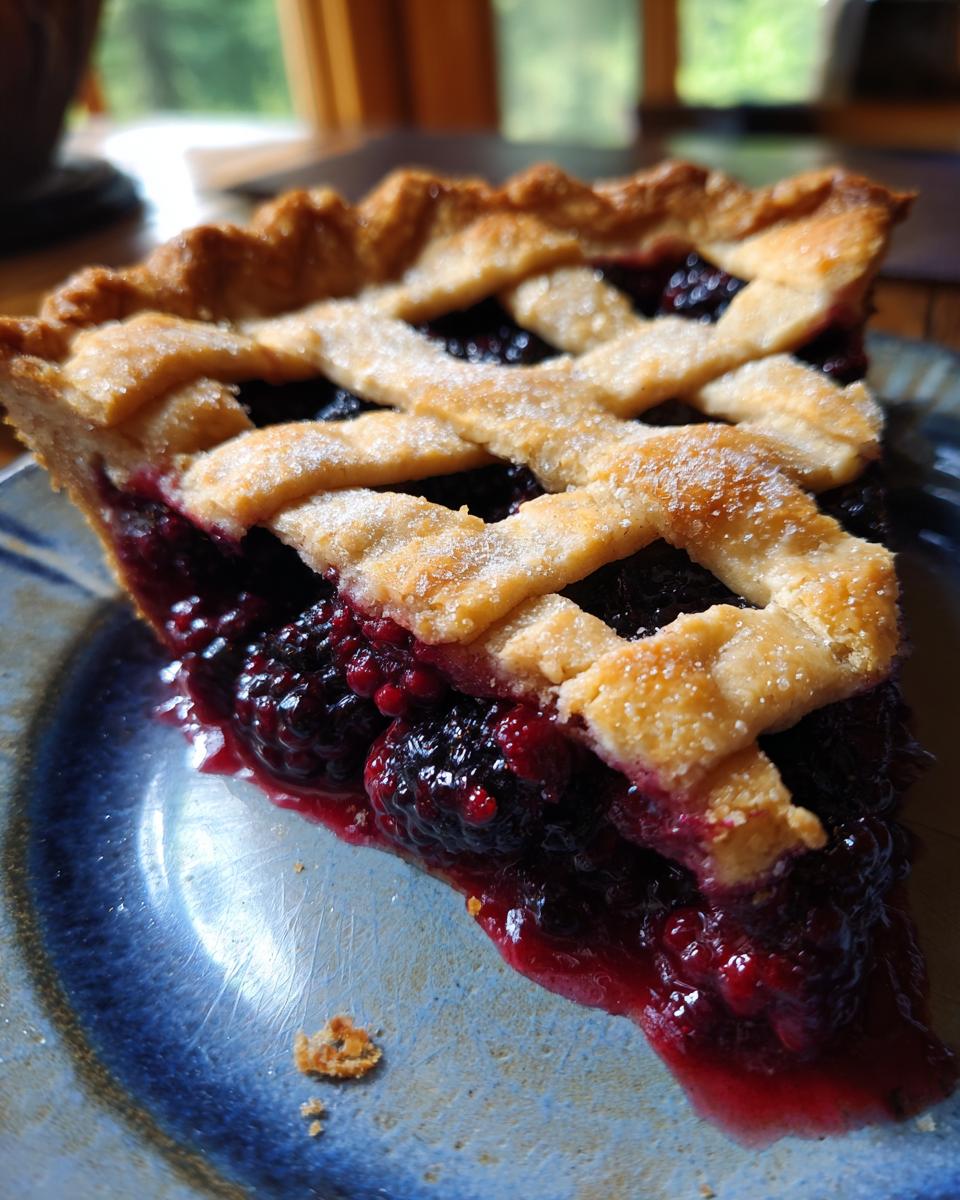
Let’s talk about that dreaded watery filling. We beat that problem with cornstarch! It’s our thickening superhero. It makes sure that when the berries let go of all their wonderful juice, it turns into a thick, gorgeous glaze instead of a runny mess pooling at the bottom of your pan. Also, listen up: if you grab frozen berries, do *not* thaw them first! Cooking them straight from frozen helps the filling set up better during that crucial initial bake time. That’s how you guarantee a no soggy bottom pie!
Gathering Ingredients for Your Blackberry Pie
Making a truly from scratch pie means knowing your ingredients, and thankfully, this list is straightforward! We’re focusing on quality here, especially for that crust. You’ll need 2 1/2 cups of all-purpose flour, a teaspoon of salt, and just one tablespoon of sugar for the dough itself. The magic number is one cup of unsalted butter—and remember, it has to be very cold and cut into cubes!
For the filling, grab about 6 cups of blackberries—fresh or frozen, your call! We round out the filling with 1 1/2 cups of sugar, 1/4 cup of cornstarch for thickness, a little lemon juice and zest to brighten things up, and just a whisper of cinnamon. Don’t forget the egg wash and coarse sugar for that beautiful golden topping we talked about!
Step-by-Step Instructions for the Best Blackberry Pie
Alright, let’s get down to the real action! Making the blackberry pie is so satisfying once you get into the rhythm. Remember that patience during the chilling phase pays off massively later! We are going to break this down into mixing the dough, preparing the fruit, and putting it all together for that stunning look. I’ve got a companion recipe using sourdough discard for a different kind of crust if you ever want to get adventurous with your baking later on, but for now, stick to this all-butter gold standard. You can see the details when you check out my sourdough discard pie crust post!
Making the Buttery Pie Crust Dough
First step is always the crust. Whisk the flour, salt, and that tiny bit of sugar together. Now for the butter—it needs to be super cold and cubed up. You need to cut that butter into the flour until it looks rough, like coarse crumbs, but you absolutely must leave some spots the size of little peas! Those are essential for a buttery pie crust that flakes apart perfectly. Once you add the ice water bit by bit until it just barely holds together—stop mixing! Wrap those disks up and they must chill for at least two hours. Don’t rush this chilling time; it lets that butter firm up again.
Mixing the Juicy Blackberry Filling
While your dough is getting comfortable in the fridge, get your filling ready. This is what makes the pie taste like summer! In a big bowl, gently toss your 6 cups of berries—frozen or fresh, remember? I just use a light hand here so I don’t smash the fruit. Whisk together the sugar, cornstarch (our thickener!), lemon zest, lemon juice, and cinnamon, then pour it over the berries and softly mix until they are all coated. Hello, future juicy blackberry filling!
Assembling and Topping Your Blackberry Pie
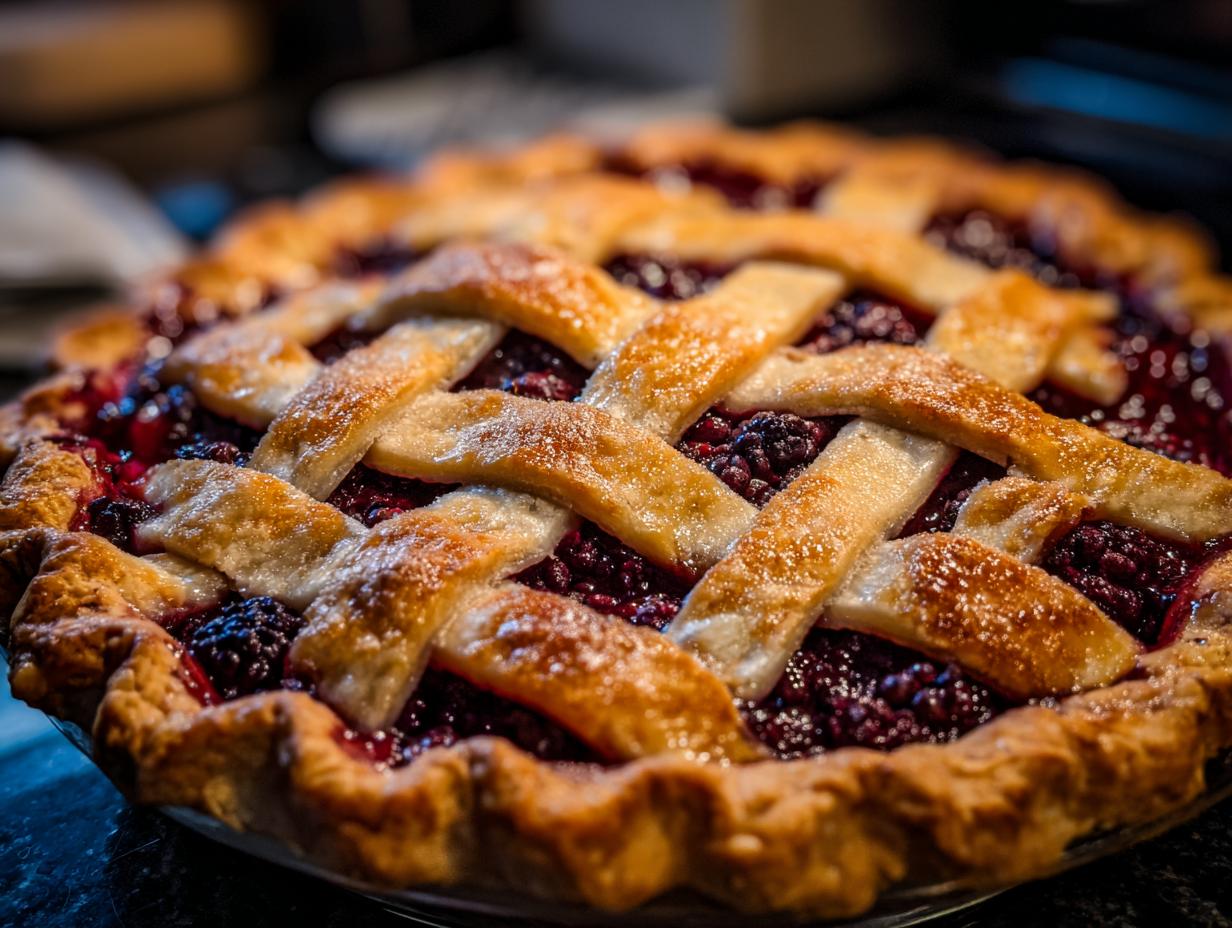
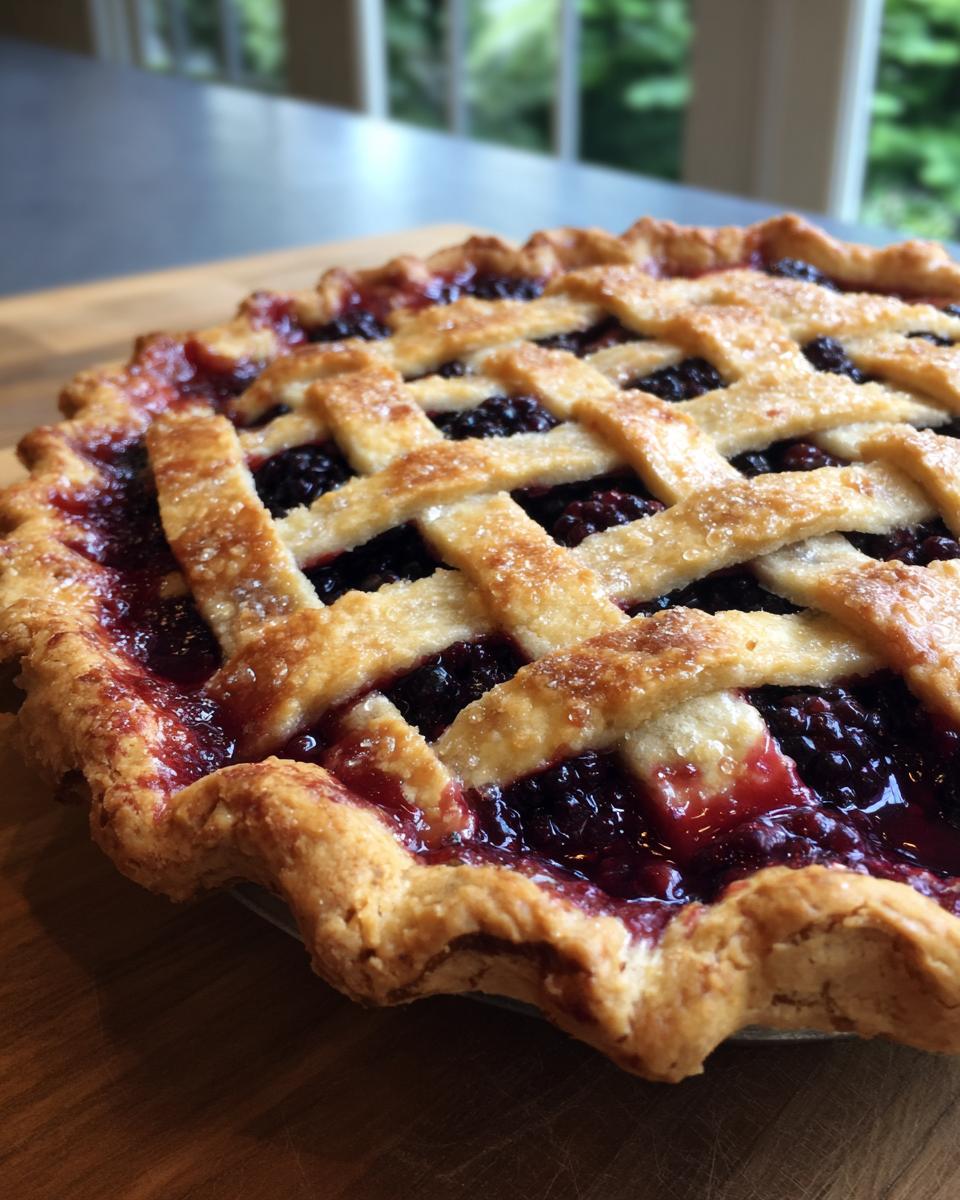
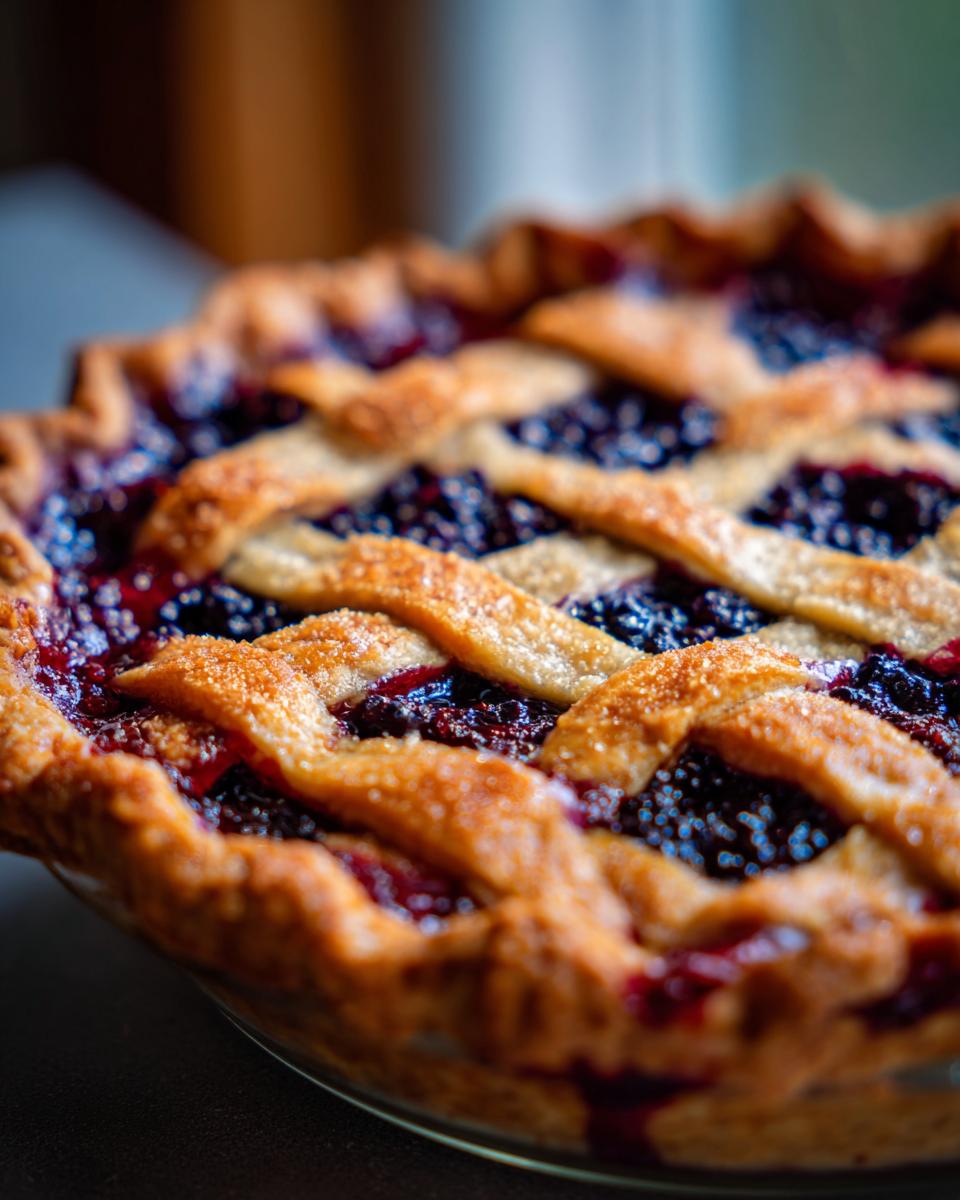
Time to roll! Dust your surface lightly and roll out one disk into a 12-inch circle and guide it carefully into your pie plate. Trim the edges, leaving about that one-inch overhang. Now, pour that gorgeous berry mix right in. You can dot the top with a few extra small knobs of cold butter if you are feeling extra decadent. Next, get your top crust ready. Whether you are weaving a nice lattice pie crust tutorial style top or just laying a solid top on, place it over the berries. Crimp those edges securely to seal everything in tight. Brush the top evenly with your egg wash and sprinkle that coarse sugar over the top for sparkle and crunch. Seriously beautiful!
Baking and Cooling the Blackberry Pie Perfectly
Okay, we are so close to the finish line, but baking this blackberry pie recipe requires two different temperatures, trust me on this one! First, pop that pie into a 400°F oven for about 20 minutes. That blast of high heat is important because it sets the butter in the bottom crust really fast, which is your first line of defense against sogginess. After that initial heat surge, drop the oven temperature down to 375°F. Keep baking until you see that beautiful golden-brown crust and the filling is bubbling thick in the center vents!
Here is the hardest part, but you absolutely must do it: cooling! Once it’s out of the oven, it needs at least four long hours on a wire rack. I know it smells amazing, and it’s tempting to slice in right away, but those precious juices need time to gel up around the cornstarch. If you cut it hot, you’ll get soup! Patience means you get that perfect, firm slice.
Tips for the Ultimate Old Fashioned Blackberry Pie
To really push this into the realm of a real, old fashioned blackberry pie experience, ingredient sourcing and handling are everything. Think about it—the best fillings come from the best berries. If you have access to amazing, local berries, use those fresh ones! They just sing louder.
But the biggest secret I can teach you is being gentle with that dough. When you’re mixing the flour and butter, try to use your fingertips, not your whole hand if you can manage it. Your hands transfer heat way too fast, and warm butter equals flat, tough crust instead of flaky layers. If the dough feels warm at any point, just wrap it up and toss it back in the fridge for 15 minutes. It’s worth repeating that trip to the cold zone!
For a little extra depth of flavor that Grandma used to do, a tiny teaspoon of fresh lemon zest goes a long way to balancing the sweetness. It’s subtle, but it lifts the whole pie. If you want to see another example of baking that reminds me of the simpler times, check out my recipe for easy homemade applesauce. And if you really want old-fashioned inspiration, take a peek at how they do things over at The Duvall Homestead—they know a thing or two about rustic perfection!
Serving Suggestions for Your Blackberry Pie
Honestly, a slice of this perfect classic American pie is wonderful all by itself, but I rarely serve it that way! The warm, tart filling begs for something cool and creamy to balance it out. My default choice is always a big scoop of high-quality vanilla ice cream—the way it melts right into those warm berries? Perfection!

If you aren’t feeling ice cream, some freshly whipped cream is just divine. It adds a lovely lightness missing from the rich crust. Sometimes, if I’m feeling fancy, I’ll whip some cream with a little extra vanilla extract. Speaking of great desserts, you should totally check out my recipe for banana cupcakes—the frosting is amazing!
If you’re looking for more inspiration on serving, I loved the simple suggestions from Our Zesty Life for keeping things approachable but delicious. It’s all about that contrast!
Storage and Reheating Instructions for Blackberry Pie
Now, how do we handle the glorious leftovers from this easy blackberry pie? Because we used the correct amount of cornstarch, you can actually just leave it covered lightly at room temperature for an afternoon. But for longer storage, pop the whole thing, or wrapped slices, into the fridge. It lasts happily in there for about three days.
When you want to reheat a slice, skip the microwave! It ruins that beautiful flaky crust. Take your slice out of the fridge to warm up slightly or pop it into a toaster oven or a regular oven set very low, maybe 300°F, for about 10 minutes. You just want to warm it through gently to re-crisp that crust edge.
Frequently Asked Questions About Making Blackberry Pie
I always get so many questions after people try making this recipe because everyone wants their blackberry pie to be perfect! It’s the little details that make all the difference between a good pie and the *best* pie. Here are the things I hear most often when folks are trying to nail that perfect bake. Honestly, if you master the crust and let it cool, you’re halfway to success!
Can I use frozen blackberries in this blackberry pie recipe?
Yes, absolutely! I know sometimes fresh berries just aren’t available, or maybe you picked a ton and froze them yourself. The key to using frozen berries is that you must use them straight from the freezer. Do NOT thaw them first! If you thaw them, they release all their juices prematurely, and you’ll definitely end up with a soupy disaster in your pan. Use them frozen, and maybe add about 5 minutes extra to the total bake time, just to be safe.
What is the best way to ensure my blackberry pie filling sets?
This is the million-dollar question that separates the amateurs from the pros in the summer berry pie world! We use 1/4 cup of cornstarch in the filling, which is plenty for thickening. But the real trick, the thing I emphasized earlier for that guaranteed perfect slice, is the cooling time. After you pull that gorgeous pie out of the oven, you need to let it sit, untouched, for a minimum of four hours. That time allows the starch to fully activate and the juices to gel, ensuring you don’t have a runny mess when you slice into it. Don’t forget to check out my recipe for easy breakfast cookies for another simple recipe!
Estimated Nutritional Data for Blackberry Pie
I always hate calculating nutrition, honestly, but here are the estimated numbers based on standard charts if you’re curious about your classic blackberry pie slice. Remember, these figures are just estimates for one serving, and your exact count will change based on the specific brand of butter or sugar you use. We’re aiming for deliciousness, after all!
- Serving Size: 1 slice
- Calories: 450
- Sugar: 45g
- Sodium: 250mg
- Fat: 25g
Please keep in mind that these are just rough estimates based on the ingredients list, so take them with a grain of salt—or maybe a sprinkle of coarse sugar!
Share Your Homemade Blackberry Pie Experience
Now that you’ve tackled the crust and mastered the juicy filling, I am dying to know how your blackberry pie turned out! Seriously, please don’t just walk away from the screen! Baking is all about sharing the joy, and I absolutely love seeing the gorgeous latticework you all create.
When you get a moment, scroll down and leave me a comment. Tell me if that all-butter crust actually shattered the way mine does! Were the berries sweet enough? Did you serve it with that perfect scoop of vanilla ice cream?
If you took a picture—and I truly hope you did of that perfect slice—tag me on social media! Seeing your success absolutely makes my day and reminds me why I spend hours testing these recipes for you. If you ever have a question or just want to send some love my way, you can always find me over on the Contact Page. Happy baking, everyone! I hope this becomes your new favorite Blackberry Pie Recipe.
PrintClassic Homemade Blackberry Pie with Flaky All-Butter Crust

Make a classic American blackberry pie with a sweet-tart, juicy filling and a perfectly flaky, buttery double crust. This recipe focuses on technique to prevent a soggy bottom.
- Prep Time: 45 min
- Cook Time: 65 min
- Total Time: 170 min
- Yield: 8 servings 1x
- Category: Dessert
- Method: Baking
- Cuisine: American
- Diet: Vegetarian
Ingredients
- 2 1/2 cups all-purpose flour
- 1 teaspoon salt
- 1 tablespoon granulated sugar
- 1 cup (2 sticks) unsalted butter, very cold and cubed
- 1/2 cup ice water, plus more if needed
- 6 cups fresh or frozen blackberries (do not thaw if frozen)
- 1 1/2 cups granulated sugar (adjust based on berry sweetness)
- 1/4 cup cornstarch
- 1 tablespoon lemon juice
- 1 teaspoon lemon zest
- 1/4 teaspoon ground cinnamon
- 1 large egg, beaten with 1 teaspoon water (for egg wash)
- 1 tablespoon coarse sugar (for sprinkling)
Instructions
- Prepare the Pie Dough: In a large bowl, whisk together the flour, salt, and 1 tablespoon of sugar. Cut in the cold butter using a pastry blender or your fingers until the mixture resembles coarse crumbs with some pea-sized pieces of butter remaining.
- Add ice water one tablespoon at a time, mixing gently until the dough just comes together. Do not overmix. Divide the dough in half, flatten each half into a disk, wrap in plastic, and chill for at least 2 hours.
- Prepare the Filling: In a large bowl, gently combine the blackberries, 1 1/2 cups sugar, cornstarch, lemon juice, lemon zest, and cinnamon. Mix until the berries are evenly coated. Set aside while you roll out the bottom crust.
- Assemble the Bottom Crust: On a lightly floured surface, roll out one disk of dough into a 12-inch circle. Carefully transfer the dough to a 9-inch pie plate. Trim the edges, leaving a 1-inch overhang. Place the pie plate in the refrigerator.
- Roll the Top Crust: Roll out the second disk of dough. Cut strips for a lattice top or leave whole for a solid top crust. If making a lattice, chill the strips while you fill the pie.
- Fill the Pie: Pour the blackberry filling into the chilled bottom crust. Dot the top of the filling with a few small pieces of remaining cold butter, if desired.
- Top the Pie: Place the lattice or solid top crust over the filling. Trim the overhang and crimp the top and bottom crust edges together to seal. Cut several vents in a solid top crust.
- Chill and Bake: Brush the top crust with the egg wash and sprinkle evenly with coarse sugar. Chill the assembled pie for 15 minutes before baking. Preheat your oven to 400°F (200°C).
- Bake: Place the pie on a baking sheet (to catch drips). Bake at 400°F (200°C) for 20 minutes. Reduce the oven temperature to 375°F (190°C) and continue baking for another 35 to 45 minutes, or until the crust is golden brown and the filling is bubbling thickly. If the edges brown too quickly, cover them loosely with foil.
- Cool: Cool the pie completely on a wire rack for at least 4 hours before slicing. This cooling time allows the filling to set properly and prevents a runny slice.
Notes
- Serve this classic American dessert warm or at room temperature with vanilla ice cream or fresh whipped cream.
- If using frozen berries, do not thaw them first, but you may need to add 5-10 minutes to the total bake time.
- For a truly flaky pie crust, keep all ingredients cold and handle the dough as little as possible.
Nutrition
- Serving Size: 1 slice
- Calories: 450
- Sugar: 45g
- Sodium: 250mg
- Fat: 25g
- Saturated Fat: 15g
- Unsaturated Fat: 10g
- Trans Fat: 0g
- Carbohydrates: 60g
- Fiber: 5g
- Protein: 5g
- Cholesterol: 55mg