
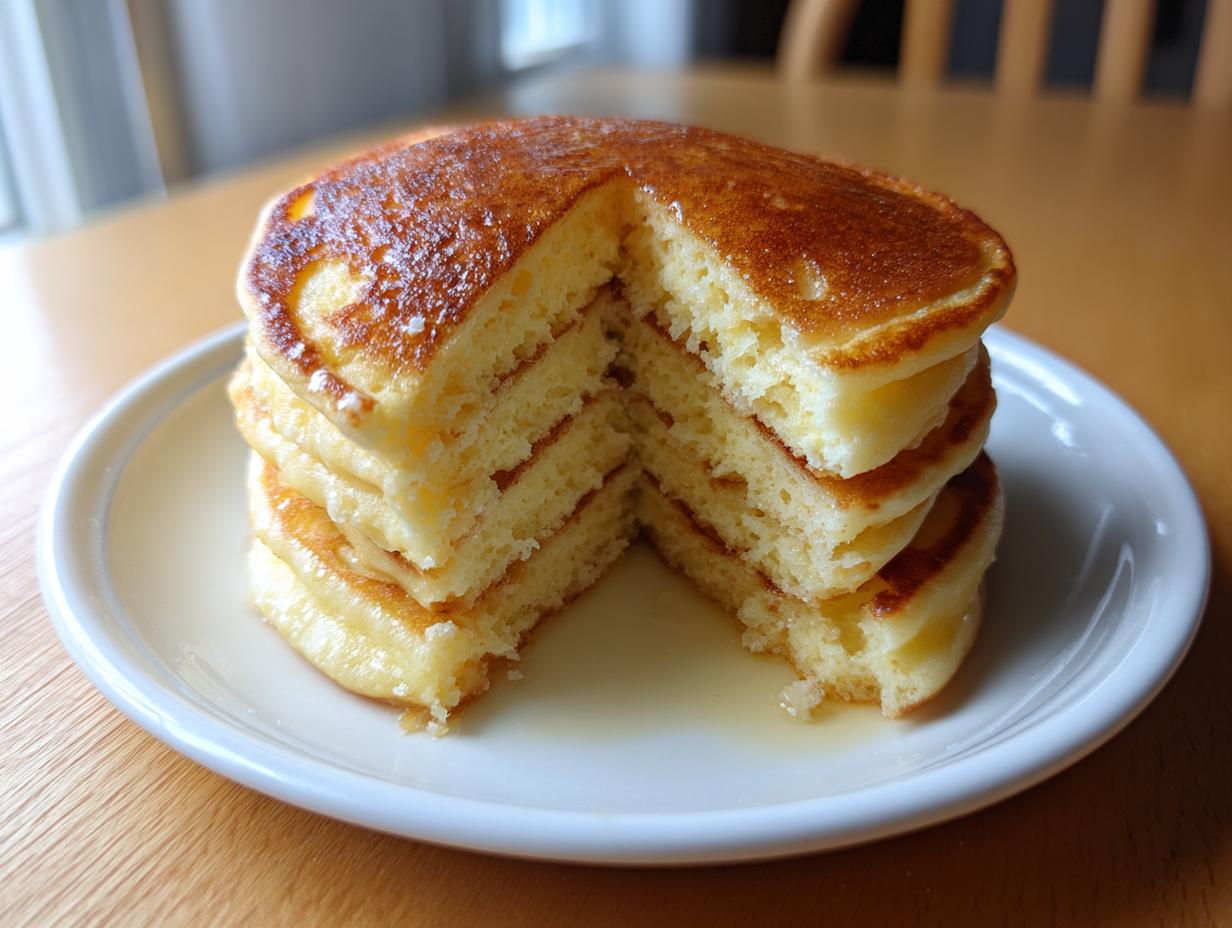
There is just something magical about a slow weekend morning when you know the only thing waiting for you is a massive, towering stack of golden pancakes. Forget the rubbery, flat discs most people sadly call breakfast! I’m Avery, and here at Devour Dish, I promise you, we aren’t doing complicated. My whole philosophy is built on taking simple, everyday things—like flour and buttermilk—and boosting the technique just enough to create pure joy. Trust me when I say this recipe is my absolute go-to for achieving the fluffiest, diner-style buttermilk pancakes you’ve ever made. They come together so quickly you’ll wonder why you ever bothered with a mix again!

- Why This is the Best Pancake Recipe for Fluffy Homemade Pancakes
- Gathering Ingredients for Classic Pancakes
- Simple Steps to Make Perfect Pancakes
- Ingredient Notes and Substitutions for Your Buttermilk Pancakes
- Tips for Achieving Diner Style Pancakes Every Time
- Serving Suggestions for Your Weekend Breakfast Ideas with Pancakes
- Storage and Reheating Instructions for Leftover Pancakes
- Frequently Asked Questions About Making Pancakes
- Estimated Nutrition Facts for These Pancakes
- Share Your Fluffy Pancakes Experience
Why This is the Best Pancake Recipe for Fluffy Homemade Pancakes
I’ve tested every kind of breakfast batter under the sun, and I truly believe this is the Best Pancake Recipe out there for big, impressive results. What sets these apart? It’s a combination of two things: using buttermilk and my iron-clad rule against overmixing. When I first started making these Fluffy Homemade Pancakes, every batch came out tough. It took forever, but I finally figured out that a few lumps in the batter are your best friend! Seriously, stop whisking when it looks a little shaggy. Check out my guide on making truly Old-Fashioned Pancakes for more classic breakfast goodness.
When I got the mixing technique down, my pancakes went from being just ‘good’ to being perfectly light and airy, just like the ones you dream about at a classic diner. You can read all the tips you want on places like other recipe sites, but until you embrace the lumps, you won’t get that perfect lift.
The Secret to Light and Airy Pancakes: Buttermilk Magic
It’s all about that tangy buttermilk reacting with our leaveners. The acid in the buttermilk loves the baking soda, and when they meet the baking powder, you get tons of tiny gas bubbles forming right in the batter. These bubbles are what lift the whole thing up on the griddle, giving you that beautiful, cloud-like texture inside. Don’t skip the buttermilk, or you miss out on the ultimate fluff!
Gathering Ingredients for Classic Pancakes
Okay, we know we want the fluffiest results, and the secret is in using high-quality essentials! This recipe moves fast, clocking in at just 25 minutes total time, which is perfect for a slightly chaotic Sunday morning. We’re aiming for about 12 beautifully golden pancakes, so get your bowls ready. It’s always worth noting that for an *Easy Breakfast Recipe*, using fresh, measured ingredients makes all the difference. Don’t substitute here if you can help it; we are building something special!
Here’s exactly what you need to pull together this batter from scratch. Make sure you measure your flour correctly; spoon it into the cup, don’t scoop straight from the bag!
- 1 3/4 cups all-purpose flour
- 2 tablespoons white sugar
- 2 teaspoons baking powder
- 1 teaspoon baking soda
- 1/2 teaspoon salt
- 2 cups buttermilk
- 2 large eggs
- 4 tablespoons unsalted butter, melted, plus more for the griddle
Simple Steps to Make Perfect Pancakes
Alright, let’s get into the fun part! Making these pancakes truly is a Quick Pancake Recipe, but the technique is everything. We’ll start by mixing our dry stuff in one bowl and our wet stuff in another. This two-bowl method is key to ensuring we don’t wake up that gluten monster hiding in the flour! If you’ve ever tried things like my French Toast Muffins, you know how important simple separation of ingredients is for texture.
Once your wet ingredients (the buttermilk, eggs, and lovely melted butter) are whisked up nicely, pour them right into the dry ingredients. Now, listen closely, because this is non-negotiable advice for our Foolproof Pancake Batter: whisk only until the ingredients are *just* combined. I mean it! If you see a few streaks of flour or a lumpy section, stop whisking immediately. Lumps are friends here; they mean fluffy pancakes. Over-whisking leads to tough, sad breakfast hockey pucks, and we won’t have that!
Also, a quick pro tip I learned from watching my mentor, Avery: let that batter sit for five minutes after mixing. This short rest allows all the leaveners to start working their magic before they even hit the heat.
Mixing the Foolproof Pancake Batter
Honestly, the ratio matters more than your whisking arm. Pouring the wet into the dry ensures everything gets incorporated without being overworked. When I first saw how lumpy the initial batter looked, I panicked and whisked it smooth. That batch was flat! Now? I stop when I can still see flour clinging to the sides, stir maybe two more times by hand, then I walk away for that essential 5-minute rest. That’s when I know I’m on track for the best stack.
Griddle Prep and Cooking Your Pancakes
Next up is the griddle! You absolutely must use medium heat. If it’s too high, the outside burns before the middle cooks, and if it’s too low, they just sit there getting sad and tough. To test if it’s ready, flick a few drops of water onto the hot surface. If they sizzle instantly and dance around before evaporating, you’re golden. I use a touch of butter for flavor—just enough to coat the griddle thinly. Pour about a quarter cup of batter for each one. The visual cue for flipping, which you can see detailed over at this great resource, is when those beautiful bubbles start popping up across the surface and the edges look dry and matte. Flip carefully! Cooking the second side takes less time, usually just a minute or two until it’s beautifully golden brown. Remember to cook them in batches to keep that griddle heat even!
Ingredient Notes and Substitutions for Your Buttermilk Pancakes
I know, I know. Sometimes you wake up, you’ve got the craving for the fluffiest pancakes ever, and you open the fridge only to find zero buttermilk. Don’t panic! This is one of those times where you *can* work around it, but you need the right fix. My grandmother always said a good cook makes do with what she has, and lucky for us, we have the magic ratio for easy pantry cheats.
If you’re out of buttermilk for these classic Buttermilk Pancakes, just grab regular whole milk—any kind works, but whole milk gives the best results. You need 2 cups of that milk, and then you just stir in 2 tablespoons of white vinegar or fresh lemon juice. Let that mixture sit on the counter for about five minutes. You’ll see it start to curdle just a tiny bit. That slight souring action is exactly what those fats in the buttermilk do, so it works perfectly when mixed into the dry ingredients!
Another thing people sometimes ask me about is the butter. That four tablespoons of melted unsalted butter is essential for richness! If, by some chance, you are completely out of butter, you can substitute it with a neutral oil, like vegetable or canola oil, in a direct one-to-one replacement. You might lose just a tiny bit of that traditional buttery flavor depth, but the pancakes will still be wonderfully light and fluffy thanks to the buttermilk magic we just talked about. See? No need to scrap breakfast!
Tips for Achieving Diner Style Pancakes Every Time
If you want the final result to taste like you pulled them straight off a super-hot griddle at a classic roadside spot, you need two extra secret weapons beyond just the buttermilk. Trust me, these tiny steps elevate your breakfast from good to unbelievably good. Pay attention!
First, remember that 5-minute rest after mixing the batter? That’s crucial! It’s when the baking powder and soda get activated by the buttermilk, creating all those little pockets of air that become our signature lift. If you skip the rest, the reaction slows down, and your pancakes deflate just a little on the heat. Patience for five minutes equals major fluff later.
Second, once they start coming off the griddle, you can’t just pile them onto a cold cutting board! That steam gets trapped, and your beautiful Diner Style Pancakes will get soggy really fast. I use a trick I saw from a professional chef: place a wire rack inside a baking sheet and set that whole setup inside your oven set at its lowest warm setting—around 200°F. That lets the heat circulate around the stack, keeping them piping hot and perfectly tender while you finish the last few rounds. For visual inspiration on building the perfect breakfast look, you can check out how others style amazing stacks over at Lil’ Luna.
If you’re still perfecting your morning routine, my recipe for Fluffy Scrambled Eggs makes a great, easy partner to these batter beauties!
Serving Suggestions for Your Weekend Breakfast Ideas with Pancakes
Okay, we’ve made the perfect light and airy stack, and now it’s time for the best part of any beautiful breakfast: what are we putting on top? When these fluff balls come hot off the griddle, they are ready for anything! Since this is a classic American breakfast staple, we have to honor the traditions, but I also love sharing a few fun ways to dress them up for the ultimate Weekend Breakfast Ideas.
First things first, you absolutely cannot skip a good maple syrup. And I don’t mean the thin, corn-syrup-tasting stuff! Get the real stuff, warm it up just slightly in the microwave—it pours so much better and melts wonderfully into all those air pockets we worked so hard to create in the batter. Seriously, warm syrup changes everything. You should try warming some of my Cinnamon Maple Baked Pears next to the syrup in the microwave; they make an incredible, cozy topping addition!
For something fresh, I always keep sliced bananas and fresh blueberries on hand. A dollop of good quality whipped cream makes these feel instantly special, like you’re actually at a fancy brunch spot, not just your own kitchen! If you want a little tang to cut through the richness, mixing cream cheese with a tiny bit of milk and drizzling that over the top is divine. It tastes almost like a warm cream cheese frosting melting over the cakes. My kids usually just want butter and syrup, but I sneak the fruit on there whenever I can!
Storage and Reheating Instructions for Leftover Pancakes
I hope you manage to eat most of these right off the griddle because they are best the second they come off the heat! However, let’s be real, sometimes we make too many, or maybe you just want that easy option for breakfast tomorrow. Good news: these fluffy treats store really well if you handle them right. You don’t want humidity to make your beautiful stacks soggy overnight!
The absolute best way to store any leftover pancakes is to let them cool completely on a wire rack first. Don’t put them away while they are still warm, or the condensation inside the container will ruin that perfect outer texture we worked so hard for. Once they are totally cooled, I stack them up with a small square of parchment paper or wax paper layered between each one. This prevents them from sticking together, which is super important when you go to reheat them later.
Tuck the whole stack into an airtight container or a heavy-duty zip-top bag and keep them in the refrigerator. They’ll hold up beautifully for three to four days this way. Don’t try freezing them unless you are planning on wrapping individual pancakes tightly in plastic wrap first, followed by a layer of foil, because otherwise, freezer burn gets them fast!
Now for reheating—this is where people mess up their perfectly good leftovers! If you just microwave them for 45 seconds, they warm up, sure, but they get rubbery incredibly fast. If you need them done yesterday, use the microwave for about 20 seconds, but that’s it. For the best results, though, you want to bring back that crispy edge and soft center. Pop those cooled pancakes onto a baking sheet and toast them in a 350°F oven for about 5 to 7 minutes. If you’re feeling extra fancy, you can briefly crisp them up slightly in a dry skillet over medium-low heat, just flipping them until warmed through. That little bit of dry heat removes any surface sogginess and makes them taste almost freshly made!
Frequently Asked Questions About Making Pancakes
I know when I first try a new recipe, I always have a million little questions buzzing in my head. It’s totally normal! I wanted to gather a few of the most common things people ask about these Easy Breakfast Recipes so you feel totally confident heading into your next batch of pancakes. I hope this helps you nail that fluffy texture we talked about!
Can I make these pancakes ahead of time?
You sure can! While they are best eaten hot off the griddle, they hold up well. If you make a big batch, make sure they are completely cooled first. Then, stack them with a small piece of parchment paper between each one, pop them in an airtight container, and store them in the fridge for up to four days. Reheating them in the oven is way better than the microwave if you want to keep that outside texture nice and crisp!
How do I know when my pancakes are done cooking?
This is the golden question for perfect timing! You need two visual cues before you grab your spatula. First, watch for the bubbles: when little bubbles start erupting all over the surface of the batter, and the edges look set—like they aren’t runny anymore—that’s your cue to flip. Don’t wait too long, or they’ll dry out! The second side cooks much faster, usually just a minute or two until it looks golden brown, just like the first side. That’s how you get that lovely golden-brown exterior on your Classic Pancakes.
What if I don’t have buttermilk for these pancakes?
Oh, that’s a common hiccup, but don’t worry about running to the store! I covered this in detail in the section just above this one, but the quick fix is super simple: make your own! Take 2 cups of regular whole milk (plus about 2 tablespoons of vinegar or lemon juice) and let it sit for about five minutes until it looks slightly curdled. That slight souring action is exactly what those fats in the buttermilk do, so it works perfectly when mixed into the dry ingredients! Go check out that section for the full context on making substitutions!
Estimated Nutrition Facts for These Pancakes
I measure my success by flavor first, but I know some of you like to keep an eye on the numbers! Providing nutritional information is a little trickier because brands vary so much, but I’ve run the averages on a standard serving size using the ingredients in this recipe. Think of this as a really good guideline for your weekly meal planning, rather than a perfect laboratory reading. Every batch relies on the wholesome quality of the ingredients you choose, of course.
For a serving size of just two of these lovely, fluffy pancakes, here are the approximate figures:
- Serving Size: 2 pancakes
- Calories: 280
- Sugar: 6g
- Sodium: 450mg
- Fat: 12g
- Saturated Fat: 7g
- Trans Fat: 0g
- Carbohydrates: 35g
- Fiber: 1g
- Protein: 10g
- Cholesterol: 95mg
Just a quick note: these are estimated values based on standard pantry staples, so they might shift slightly depending on the brand of flour or the amount of butter you use for greasing the griddle! As always, if you’re tracking closely, you might want to do a final check based on the exact products you use when making these Simple Breakfast Food items.
Share Your Fluffy Pancakes Experience
Now it’s your turn! I’ve shared all my secrets, from the crucial buttermilk magic to the ‘don’t overmix’ rule, and I absolutely can’t wait to hear about your weekend breakfast success. Did you manage to stack them high? Did you try warming your maple syrup like I suggested? Or maybe you came up with a wild new topping that deserves to be famous?
Please, please, leave a star rating right down below—it helps other folks know this is the real deal for fluffy pancakes! And don’t just stop there; shoot me a comment telling me exactly how they turned out. Seriously, knowing I helped someone achieve that perfect, light, airy stack makes my whole week. If you snapped a picture of your beautiful creation, tag me on social media! I love seeing your gorgeous breakfast spreads. If you run into any troubleshooting snags, or just want to share praise, you can always reach out directly via my contact page too. Happy flipping, and enjoy every bite of those amazing homemade pancakes!
PrintBest Fluffy Buttermilk Pancakes: Easy Homemade Recipe

Make light, airy, diner-style buttermilk pancakes from scratch. This simple recipe guarantees fluffy results every time for a perfect weekend breakfast.
- Prep Time: 10 min
- Cook Time: 15 min
- Total Time: 25 min
- Yield: About 12 pancakes 1x
- Category: Breakfast
- Method: Griddling
- Cuisine: American
- Diet: Vegetarian
Ingredients
- 1 3/4 cups all-purpose flour
- 2 tablespoons white sugar
- 2 teaspoons baking powder
- 1 teaspoon baking soda
- 1/2 teaspoon salt
- 2 cups buttermilk
- 2 large eggs
- 4 tablespoons unsalted butter, melted, plus more for the griddle
Instructions
- Combine dry ingredients: In a large bowl, whisk together the flour, sugar, baking powder, baking soda, and salt.
- Combine wet ingredients: In a separate medium bowl, whisk together the buttermilk, eggs, and 4 tablespoons of melted butter until fully mixed.
- Mix batter: Pour the wet ingredients into the dry ingredients. Whisk gently until just combined. Do not overmix; a few lumps in the batter are fine. Overmixing develops gluten and results in tough pancakes.
- Heat griddle: Heat a large nonstick skillet or griddle over medium heat. Lightly grease the surface with butter or cooking spray. The griddle is ready when a drop of water sizzles immediately.
- Cook pancakes: Pour 1/4 cup of batter onto the hot griddle for each pancake. Cook for 2 to 3 minutes per side. You know the first side is ready to flip when bubbles appear on the surface and the edges look set.
- Flip and finish: Flip the pancakes and cook for another 1 to 2 minutes until golden brown and cooked through.
- Serve immediately: Stack the pancakes and serve hot with your favorite toppings.
Notes
- For extra fluffiness, let the batter rest for 5 minutes before cooking. This allows the leavening agents to activate.
- If you do not have buttermilk, mix 2 cups of whole milk with 2 tablespoons of white vinegar or lemon juice. Let it sit for 5 minutes before using.
- Keep cooked pancakes warm in a single layer on a baking sheet in a 200°F oven while you finish the rest of the batter.
Nutrition
- Serving Size: 2 pancakes
- Calories: 280
- Sugar: 6
- Sodium: 450
- Fat: 12
- Saturated Fat: 7
- Unsaturated Fat: 5
- Trans Fat: 0
- Carbohydrates: 35
- Fiber: 1
- Protein: 10
- Cholesterol: 95