

Oh, nothing says ‘everything is okay’ like a deeply comforting, classic dessert, right? If you’re looking for that perfect, nostalgia-inducing treat that’s utterly reliable, then you’ve found your holy grail. I spent ages perfecting what I call the Fail-Proof Creamy Baked Egg Custard. I built Devour Dish because I believe the best food is simple and true, and this recipe for classic egg custard? It proves that point perfectly. It’s old-fashioned, wonderfully homemade, and truly requires just five basic pantry items to achieve that rich, silky-smooth texture we all dream about. You can learn more about my commitment to simple, trusted recipes over on my About page!
- Why This Fail-Proof Creamy Egg Custard Recipe Works
- Ingredients for Your Classic Old Fashioned Egg Custard
- Step-by-Step Guide: How to Make Egg Custard Perfectly
- Tips for Success with Your Homemade Egg Dessert
- Variations on the Simple Vanilla Custard
- Storage and Serving Suggestions for Egg Custard
- Frequently Asked Questions About Creamy Egg Custard Recipe
- Estimated Nutritional Data for This Comfort Food Custard
- Share Your Timeless Dessert Classics Experience
Why This Fail-Proof Creamy Egg Custard Recipe Works
When I set out to create the ultimate egg custard, I wasn’t messing around. I wanted a dessert that folks who swore they couldn’t make custard could nail on the first try! Honestly, there are just a few specific things we do here that take this recipe from ‘maybe okay’ to ‘absolutely perfect’ every single time.
- It uses only simple desserts with eggs and milk, so you don’t need specialty ingredients.
- We rely on that crucial water bath to prevent the edges from getting tough or rubbery.
- The gentle warming and tempering process means no scrambled bits, guaranteed!
If you want reliable results, you have to trust the process. I even found others who swear by this fail-proof method too! Check this out if you love no-fail results!
Achieving a Silky Smooth Egg Dessert Texture
The secret to a truly silky smooth egg dessert is all about controlling what you do to those eggs and milk. First, never, ever over-whisk! We only want a little bit of air incorporated—too much froth leads to bubbles on top, and nobody wants that, right?
Then comes tempering: slowly adding the warm milk to the eggs while whisking nonstop is key. But the real cheat? Straining! We pour the whole mixture through a fine-mesh sieve right before it goes into the oven. That simple step catches any little clumps or bits and leaves you with the smoothest custard imaginable. Trust me on that sieve step!
Ingredients for Your Classic Old Fashioned Egg Custard
You won’t believe how few things you need for this stunning, classic old fashioned custard! Seriously, these are the building blocks of comfort food. Keeping these measurements exact is how we ensure we get that perfect texture every time we make this homemade egg dessert. Precision matters when it comes to chemistry in the oven!
- 6 large eggs
- 1/2 cup granulated sugar
- 1/4 teaspoon salt
- 1 teaspoon pure vanilla extract
- 3 cups whole milk
- A tiny pinch of ground nutmeg for the top—don’t skip this!
That’s it! Simple, right? We’re focusing on quality here to get that rich flavor we want in our egg custard.
Step-by-Step Guide: How to Make Egg Custard Perfectly
Okay, deep breath! This is where we turn our simple ingredients into the most beautiful egg custard you’ve ever tried. Don’t let the word ‘tempering’ scare you off; it’s just a fancy way of saying we’re being careful so we don’t accidentally make scrambled eggs! Follow these steps exactly, and you’ll have that no fail custard recipe everyone begs you for.
Preparing the Oven and Dishes for the Easy Baked Custard
First things first: go ahead and set your oven to 325 degrees Fahrenheit. While that’s warming up, grab a baking pan big enough to hold your pie plate or those cute little ramekins. Pop the dishes inside the pan *before* adding the hot water. The water bath—or bain-marie—is non-negotiable for a tender, easy baked custard. It surrounds the custard in gentle heat, making sure it sets evenly from the edges to the cozy, wobbly center. We want creamy, not cracked pottery!
Tempering the Eggs for a No Fail Custard Recipe
While the water heats separately, gently warm your milk on the stove until tiny bubbles show up around the edge. Remember, we are warming it, not boiling it—if it boils, you have to let it cool down before proceeding! Now for the famous tempering part. Take your whisk and keep it moving in the bowl with your egg and sugar mixture. Then, pour that warm milk in, slow as honey, in a thin stream. Whisking constantly while pouring is essential because it slowly raises the temperature of your eggs without cooking them all at once. It’s honestly relaxing once you get into the rhythm!
Once everything is combined, don’t forget to strain the entire mixture into a clean bowl! I linked to other great guides on baking like this one if you want to see visual examples of the straining process. Then, just pour the liquid into your dishes and add that hot water bath!
Tips for Success with Your Homemade Egg Dessert
So, you’ve got your beautiful egg custard sitting in the water bath, gently baking away. How do you know when to pull that precious thing out? This is where so many people panic, but stick with me because we are going for that perfect, slightly creamy texture, not a solid block! We want that jiggle, remember?
When checking for doneness, don’t just rely on the toothpick test alone for this one; it can be deceiving with a liquid dessert like this. For this homemade egg dessert? Look closely! The edges should look firm and set, but when you gently nudge the pan (be careful, it’s full of hot water!), the very center should still have a visible wobble, like set gelatin. It should look *almost* done, but not quite.
The knife test works as a nice confirmation, too. If you insert a thin knife close to the edge and it comes out clean, you are golden. But the real secret to a truly amazing and reliable slice of this fail-proof custard dessert happens *after* the oven:
- Pull it out when it’s still slightly underdone in the middle.
- Let it cool completely on the counter first. Getting it out of that hot water bath right away is a huge step!
- Then, and this is crucial for flavor and texture, you need patience. Wrap it up and chill it for at least four hours, but honestly? Overnight is best. Baking time is only half the battle; the resting time finishes the cooking process and firms everything up beautifully. Check out some other tips for nailing this great custard here!

Variations on the Simple Vanilla Custard
I love that this base recipe for delicious egg custard is so versatile! Since everyone asks about using this filling in different ways—especially since so many people crave that classic old fashioned custard experience—I wanted to make sure you know how easy it is to convert it. Whether you want a sliceable pie or prefer a bowl of custard goodness, we’ve got you covered. You can easily pivot from the standalone dessert to a fantastic pie experience, just by adding a crust!
Making a Classic Egg Custard Pie Recipe
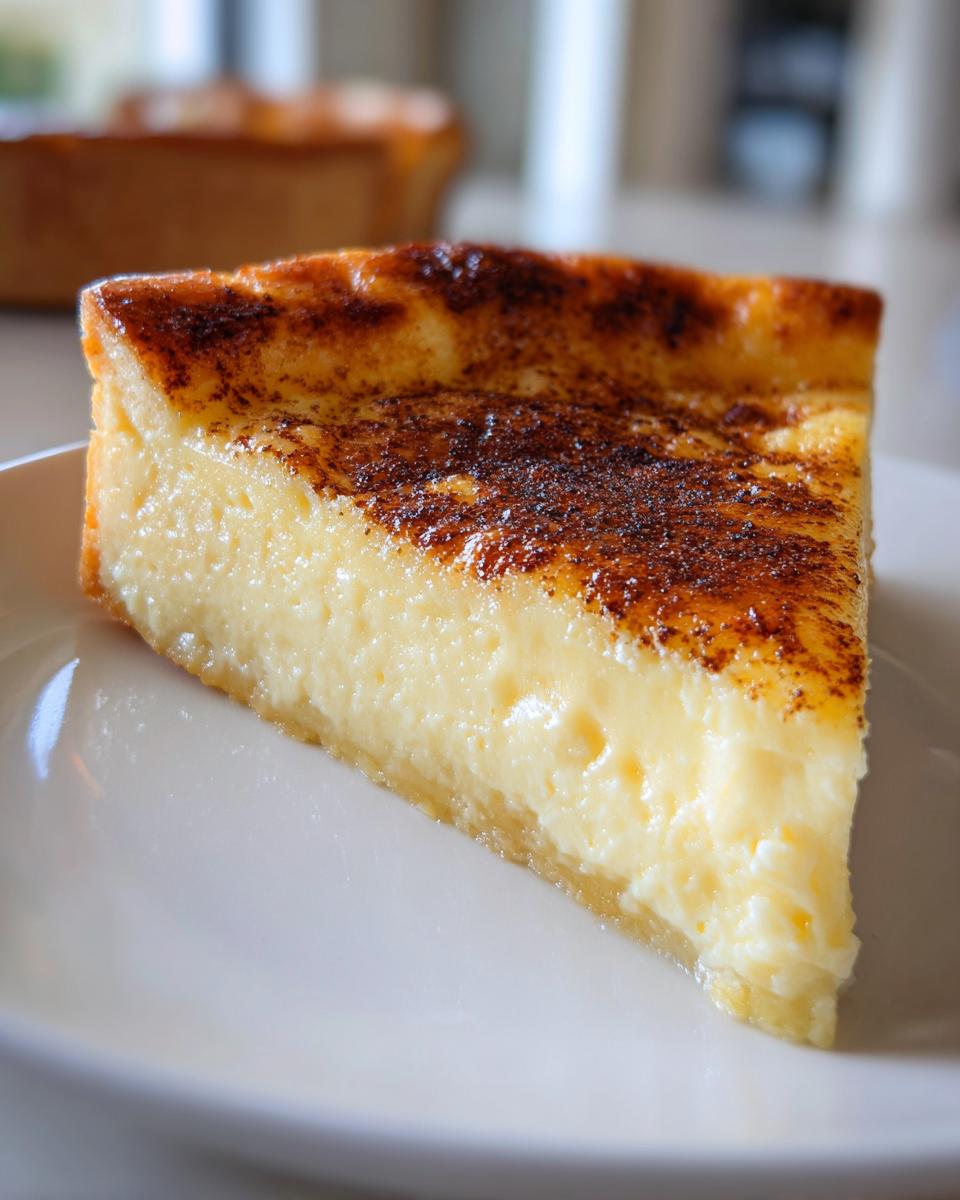
If you’re ready to step into the world of egg custard pie recipe heaven, this is how you do it! You don’t need to change the creamy filling at all; just treat it like its new cozy bed. Take one unbaked, flaky pie crust—I mean, who has time to blind bake when that filling is calling your name? Line your 9-inch pie plate with that pastry.
Now, carefully pour all of your strained custard mixture right into that crust. Remember, we tempered those eggs, so they are super stable now! Since the crust adds an extra layer that needs to cook through underneath the filling, you might need just a touch more time in the oven than the ramekins needed. I usually give it about 5 to 10 extra minutes, but always test it!

If you poke that knife in near the edge of the crust and it comes out clean, it’s done, and you’ve got yourself a sliceable piece of comfort. If you want to skip the crust entirely for a lighter, crustless egg custard, that’s fine too! Just bake it as directed in the pie plate, and it firms up just like the individual ramekins. For more great tips on making a true Southern egg custard pie, check out these suggestions right here!
Storage and Serving Suggestions for Egg Custard
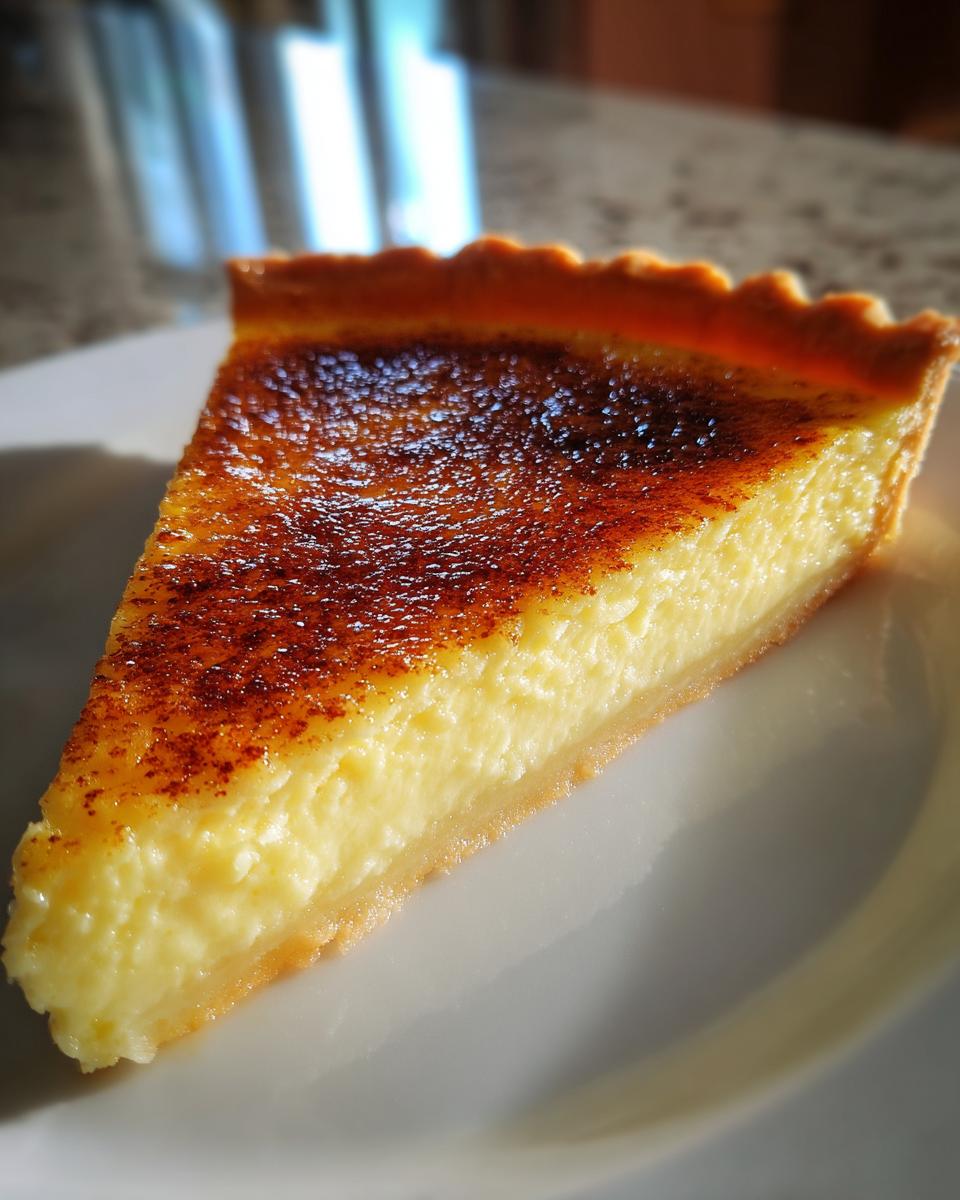
Once your beautiful egg custard is fully chilled—which should be a minimum of four hours—it’s ready for its moment! While you *can* eat it slightly warm, honestly, this simple vanilla custard is best served cold. That chill time is what lets it set up into that perfect, quivering slice of heaven you’ve been working toward. Give it a final light sprinkle of ground nutmeg right before serving; that aroma really brings it home! I found some fantastic serving tips here for making it even prettier.
It keeps wonderfully in the fridge, too. If you cover those individual ramekins tightly or seal the pie plate well, this dessert stays perfectly creamy for about four days. It’s a fantastic make-ahead comfort food custard for when company drops by unexpectedly!
Frequently Asked Questions About Creamy Egg Custard Recipe
Whenever I share this recipe, people always have questions, which is totally normal! Making a creamy egg custard recipe can feel a little intimidating, but remember, we built this guide specifically to be a no fail custard recipe. Here are the things folks ask me most often when they want to bake this silky smooth egg dessert.
What causes egg custard to curdle or scramble?
Oh, that’s the million-dollar question! It happens when the eggs cook too fast, way too aggressively. Think about an omelet versus a nice creamy texture—it’s the same principle. The number one culprit is pouring the hot milk in too fast, or putting the custard in an oven that’s too hot without protection. That’s exactly why we spend time tempering those eggs slowly, and why the water bath is so important. It’s all about gentle heat management so your eggs set smoothly instead of turning granular!
Can I make this egg custard recipe without a water bath?
You absolutely *can* technically try it, but if you skip the water bath, you are actively choosing to ignore the ‘fail-proof’ part of the recipe title! I highly discourage it for beginners trying to achieve that perfect easy baked custard texture. The water bath acts like a climate-controlled environment for your custard. Without it, the edges of your dish will cook much faster than the middle, leading to a rubbery edge and potentially a cracked surface. If you want the reliably smooth result promised here, please, use that hot water bath!
One other quick one I get a lot: Can I use heavy cream instead of milk? Yes! You can substitute up to half the milk with heavy cream if you want an even richer texture, but then you might need to add a tiny bit more sugar to balance it out. It makes for an incredibly decadent comfort food custard!
Estimated Nutritional Data for This Comfort Food Custard
Now, I know we aren’t making this comfort food custard for diet reasons, but it’s always good to have a sense of what’s in that creamy goodness! Since this is a classic, old-fashioned dessert made with whole milk and real eggs, it definitely has some richness!
We’re talking about simple ingredients here—eggs, milk, sugar—so the numbers aren’t too scary, especially considering how satisfying a small bowl is. Keep in mind these figures are estimates based on the specific recipe measurements I’ve laid out for this baked egg custard recipe. Your results might vary slightly depending on the brand of milk or size of the eggs you use, of course!
Here’s a quick breakdown based on a single serving:
- Calories: 210
- Fat: 9g (5g Saturated)
- Carbohydrates: 19g
- Sugar: 18g (Yes, most of that is naturally occurring or added sugar, which makes it taste so lovely!)
- Protein: 13g
- Sodium: 120mg
See? Pretty straightforward stuff for a dessert that tastes like pure joy. Honestly, when something tastes this good, I try not to stress too much over the details!
Share Your Timeless Dessert Classics Experience
I am so excited for you to try this creamy egg custard recipe! When you make this—whether it’s a beautiful standalone dessert or a classic egg custard pie recipe—I genuinely want to know how it turned out for you. There is nothing better than seeing your photos or reading your comments about making these timeless dessert classics in your own kitchen!
Did you go for the simple nutmeg sprinkle, or did you try one of the richer variations? Did you serve it warm or did you wait the agonizing hours for it to chill completely? Tell me everything! Drop a rating for how easy you found this fail proof custard dessert below, and let’s chat in the comments. It means the world to me when you share your cooking journey!
If you loved this recipe, you should definitely check out all the other simple, reliable desserts I’ve compiled over on my main Desserts page. Happy baking, and I really look forward to seeing your gorgeous, silky smooth custards!
PrintFail-Proof Creamy Baked Egg Custard

Make a creamy, silky-smooth baked egg custard dessert that is simple and reliable. This classic recipe uses basic ingredients for a comforting, old-fashioned treat.
- Prep Time: 15 min
- Cook Time: 50 min
- Total Time: 65 min
- Yield: 6 servings 1x
- Category: Dessert
- Method: Baking
- Cuisine: American
- Diet: Vegetarian
Ingredients
- 6 large eggs
- 1/2 cup granulated sugar
- 1/4 teaspoon salt
- 1 teaspoon pure vanilla extract
- 3 cups whole milk
- Pinch of ground nutmeg for topping
Instructions
- Preheat your oven to 325 degrees Fahrenheit. Place a 9-inch pie plate or four 6-ounce ramekins in a large baking pan.
- In a medium bowl, whisk the eggs lightly. Do not over-whisk; you want to avoid incorporating too much air for a smooth texture.
- Whisk in the sugar and salt until combined. Stir in the vanilla extract.
- Gently warm the milk in a saucepan over medium heat until small bubbles form around the edges. Do not boil.
- Slowly pour the warm milk into the egg mixture while whisking constantly. This tempering process prevents the eggs from scrambling.
- Strain the custard mixture through a fine-mesh sieve into a clean bowl to remove any chalazae or unmixed bits, resulting in a silky smooth texture.
- Pour the strained custard into the prepared pie plate or ramekins.
- Carefully pour hot water into the large baking pan until the water reaches halfway up the sides of the custard dishes. This water bath (bain-marie) ensures even, gentle baking.
- Bake for 45 to 55 minutes for a pie, or 35 to 40 minutes for ramekins. The custard is done when the edges are set but the center still jiggles slightly when gently nudged.
- Carefully remove the custard from the water bath. Let it cool on a wire rack to room temperature.
- Sprinkle the top lightly with ground nutmeg.
- Chill the baked egg custard for at least 4 hours, or preferably overnight, before serving.
Notes
- For a crustless egg custard pie, simply use a pie dish without a crust.
- If you prefer an Egg Custard Pie, line a 9-inch pie plate with a single, unbaked, flaky pie crust before pouring in the filling. Adjust baking time as needed.
- To test for doneness, insert a thin knife near the edge; if it comes out clean, it is ready.
Nutrition
- Serving Size: 1 serving
- Calories: 210
- Sugar: 18
- Sodium: 120
- Fat: 9
- Saturated Fat: 5
- Unsaturated Fat: 4
- Trans Fat: 0
- Carbohydrates: 19
- Fiber: 0
- Protein: 13
- Cholesterol: 150